Connect XAML Form to pyRevit Script
We've created a XAML form, now let's look at how to connect it to pyRevit script to display it in Revit.
Connect XAML Form to pyRevit Script
We've created a XAML form, now let's look at how to connect it to pyRevit script to display it in Revit.
Summary
Introduction
Finally, the moment has come. In this lesson, we're going to create a pyRevit button with a WPF form right inside of Revit.
We will keep it simple and only make it display the form in Revit without any logic yet. And later we will go through step by step and add all the events and data binding in the upcoming lessons.
Let's focus on how to connect XAML to pyRevit.
How to Connect XAML with pyRevit?
Displaying XAML code with pyRevit is very easy if you don't have any events setup yet. We just need to:
Copy the XAML code to the same folder
Create simple Python Class for WPF form
Connect the two
And it's really that simple. I always start my WPFs with the front-end and then I connect it as a dummy inside of Revit, and then I start to think about all the logic I need to provide inside of it.
Create pyRevit Button
I hope that you are already familiar with pyRevit and you know how to create new buttons. If not, your can refresh your memory with these videos from LearnRevitAPI Course:
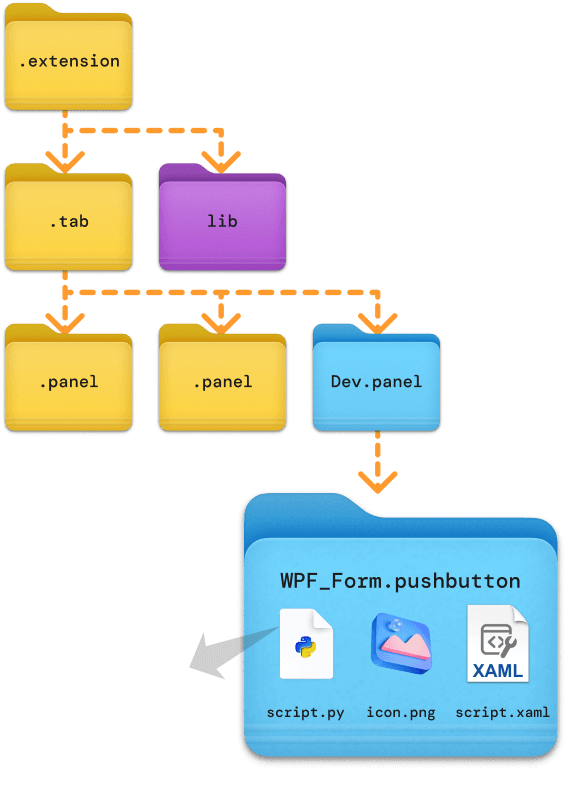
In general, you need to create a simple folder structure for your pyRevit extension and your buttons will be represented with a simple pushbutton folder (see image below).
Inside your pushbutton you will need:
script.py
icon.png
Script.xaml
Notice that you will also add a new file for your xaml code.
Keep in mind that you can name this file anything you want since we will manually reference it in the code.
I will call it FirstButton.xaml for my button. You can do the same.
WPF Base Template for pyRevit
Now, I want to provide you my very simple WPF Base Template for pyRevit.
It's nothing fancy. It's just code for a very simple WPF form that works. It's always great when you have a working example you could look at and adjust to your own needs.
Firstly, I will provide you files from the template, and then we will adjust xaml to our own form by replacing the whole script.
Here is XAML sample:
<Window xmlns="http://schemas.microsoft.com/winfx/2006/xaml/presentation"
xmlns:x="http://schemas.microsoft.com/winfx/2006/xaml"
xmlns:av="http://schemas.microsoft.com/expression/blend/2008" xmlns:mc="http://schemas.openxmlformats.org/markup-compatibility/2006" mc:Ignorable="av"
Title="EF-WPF Sample Form"
Height="300" Width="300" WindowStartupLocation="CenterScreen">
<StackPanel Margin="10">
<Image Source="https://framerusercontent.com/images/LRmkkOk8c7TWErBSS6H9jhFklU.png" Height="30" HorizontalAlignment="Center" Margin="0,0,0,10"/>
<Border BorderBrush="Gray" BorderThickness="1" CornerRadius="5" Padding="10" Margin="0,0,0,0">
<StackPanel>
<TextBlock Text="EF-WPF Base Form" FontSize="14" FontWeight="Bold" Margin="0,0,0,10"/>
<TextBlock TextWrapping="Wrap"><Run Text="This is the base example for creating WPF forms in pyRevit. Use this base form to build your awesome forms on top of it."/><LineBreak/><Run/><LineBreak/><Run FontWeight="Bold" Text="Happy Coding!"/><LineBreak/><Run FontWeight="Bold" Text="-Erik Frits"/></TextBlock>
</StackPanel>
</Border>
<Separator Margin="0,10,0,5"/>
<Button Click="UIe_button_run" Content="Submit!" Width="75" Height="25" Margin="0,0,0,10"/>
__title__ = "EF-WPF Base"
__doc__ = """Version = 1.0
Date = 08.08.2024
________________________________________________________________
Description:
This is the base for building your WPF forms.
It includes a very simple XAML file and the Python code
to display your form and react to the submit button.
________________________________________________________________
Last Updates:
- [08.08.2024] v1.0 RELEASE
________________________________________________________________
Author: Erik Frits"""
from Autodesk.Revit.DB import *
from pyrevit import forms
import wpf, os, clr
clr.AddReference("System")
from System.Collections.Generic import List
from System.Windows import Window, ResourceDictionary
from System.Windows.Controls import CheckBox, Button, TextBox, ListBoxItem
from System import Uri
PATH_SCRIPT = os.path.dirname(__file__)
doc = __revit__.ActiveUIDocument.Document
uidoc = __revit__.ActiveUIDocument
app = __revit__.Application
class AboutForm(Window):
def __init__(self):
path_xaml_file = os.path.join(PATH_SCRIPT, 'BaseUI.xaml')
wpf.LoadComponent(self, path_xaml_file)
self.ShowDialog()
def UIe_button_run(self, sender, e):
"""Button action: Rename view with given """
self.Close()
UI = AboutForm()
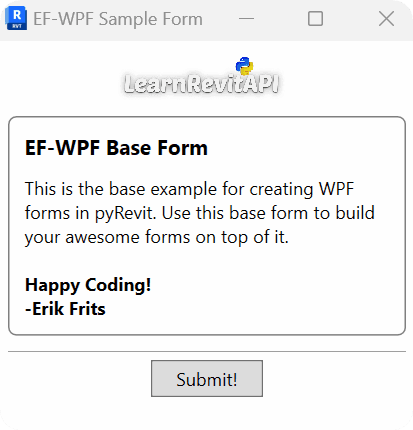
And this is the simple form that you will see if you try to use this code 👉
In general it's a very simple template.
There is a python class that is based on Window class from System.Windows namespace.
Then we reference our XAML file and we can display the form by using ShowDialog() method.
And that's all we need to connect the dummy before we start adding events and other logic to our forms.
💡Also, keep in mind that my Base Template includes Click event for the button and it has the event handler method called UIe_button_run. We will use it later as well, but don't worry, it shouldn't cause you any errors if your XAML doesn't have any events.
Adjust Template to our XAML Code
Now I want you to create a new .pushbutton and place our XAML code and simplify the python code a little.
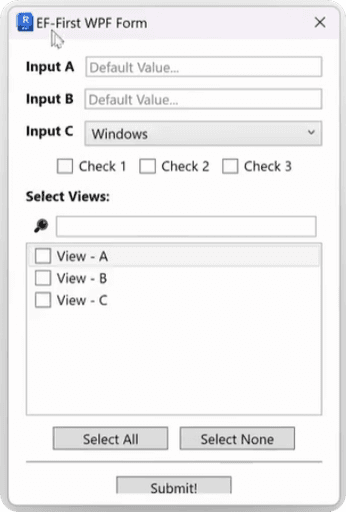
Let's continue with the XAML code we prepared in the previous lesson, and make it display this form inside of Revit.
I will create aFirstButton.xaml in pushbutton folder and copy-paste this XAML code:
<Window Title="EF-First WPF Form"
        xmlns="http://schemas.microsoft.com/winfx/2006/xaml/presentation"
        xmlns:x="http://schemas.microsoft.com/winfx/2006/xaml"
        Height="450" Width="300" MinHeight="150"
        WindowStartupLocation="CenterScreen" ResizeMode="NoResize">

    <StackPanel Margin="10">
        <DockPanel Margin="5">
            <TextBlock Text="Input A" Margin="0,0,10,0" FontWeight="Bold"/>
            <TextBox Text="Default Value..." Foreground="Gray"/>
        </DockPanel>

        <DockPanel Margin="5">
            <TextBlock Text="Input B" Margin="0,0,10,0" FontWeight="Bold"/>
            <TextBox Text="Default Value..." Foreground="Gray"/>
        </DockPanel>

        <DockPanel Margin="5">
            <TextBlock Text="Input C" Margin="0,0,10,0" FontWeight="Bold"/>
            <ComboBox>
                <ComboBoxItem Content="Walls"/>
                <ComboBoxItem Content="Floors"/>
                <ComboBoxItem Content="Roofs"/>
                <ComboBoxItem Content="Windows" IsSelected="True"/>
                <ComboBoxItem Content="Doors"/>
            </ComboBox>
        </DockPanel>

        <DockPanel HorizontalAlignment="Center" Margin="5">
            <CheckBox Content="Check 1" Margin="0,0,10,0"/>
            <CheckBox Content="Check 2" Margin="0,0,10,0"/>
            <CheckBox Content="Check 3"/>
        </DockPanel>

        <TextBlock Text="Select Views:" FontWeight="Bold" Margin="0,0,0,5"/>
        <DockPanel Margin="5">
            <TextBlock Text="🔎" Margin="0,0,5,0" />
            <TextBox/>
        </DockPanel>

        <ListBox Height="150" SelectedIndex="0">
            <ListBoxItem><CheckBox Content="View - A"/></ListBoxItem>
            <ListBoxItem><CheckBox Content="View - B"/></ListBoxItem>
            <ListBoxItem><CheckBox Content="View - C"/></ListBoxItem>
        </ListBox>

        <DockPanel HorizontalAlignment="Center" Margin="0,10,0,0">
            <Button Content="Select All" Width="100" Margin="0,0,10,0"/>
            <Button Content="Select None" Width="100"/>
        </DockPanel>

        <Separator Margin="5,5,5,12"/>
        <Button Content="Submit!" Width="100"/>
Now let's create a WPF class for our form in the python code and connect the XAML file to it.
Here is the adjusted python file from WPF Base Template.
__title__ = "02.02 - First pyRevit Form"
__doc__ = """Version = 1.0
Date = 08.08.2024
________________________________________________________________
Description:
This is the base for building your WPF forms.
It includes a very simple XAML file and the Python code
to display your form and react to the submit button.
________________________________________________________________
Last Updates:
- [08.08.2024] v1.0 RELEASE
________________________________________________________________
Author: Erik Frits"""
from Autodesk.Revit.DB import *
from pyrevit import forms
import wpf, os, clr
clr.AddReference("System")
from System.Collections.Generic import List
from System.Windows import Application, Window
from System.Windows.Controls import CheckBox, Button, TextBox, ListBoxItem
from System import Uri
PATH_SCRIPT = os.path.dirname(__file__)
doc = __revit__.ActiveUIDocument.Document
uidoc = __revit__.ActiveUIDocument
app = __revit__.Application
class FirstButton(Window):
def __init__(self):
path_xaml_file = os.path.join(PATH_SCRIPT, 'FirstButton.xaml')
wpf.LoadComponent(self, path_xaml_file)
self.ShowDialog()
UI = FirstButton()
1️⃣ Firstly, make sure that you make all necessary imports like shown in the template.
2️⃣ Secondly, notice that we need to provide exact name of our XAML file in path_xaml_file variable. That's important.
3️⃣ Thirdly, I've removed UIe_button_run method since we don't need it yet, we will add it in the next lesson.
And that's pretty much it. I hope that we can all agree that the code is very simple so far.
And now if you test your button, you are supposed to see your form that you made with XAML code. Congratulations 🥳
Fix Height=Auto Bug
You've noticed that I had a bug where the form got much taller with Height="Auto".
And it can actually be solved by adding a single property SizeToContent. Update your Window tag to this:
<Window Title="EF-First WPF Form"
        xmlns="http://schemas.microsoft.com/winfx/2006/xaml/presentation"
        xmlns:x="http://schemas.microsoft.com/winfx/2006/xaml"
        Height="Auto" Width="300" MinHeight="150"
        WindowStartupLocation="CenterScreen" ResizeMode="NoResize"
        SizeToContent="Height">
Remarks
Keep in mind that to import wpf module we need to reference a few libraries. But luckily you can use from pyrevit import forms and it already does everything you need in the background.
I spent a lot of time trying to debug this thing until I realized that I can just import forms from pyRevit instead. Since then I think something has changed an it might not be necessary, but I won't leave it to chance. So I always import forms from pyRevit in my WPF code.
Summary
By following these steps, you should now be able to create and display your own WPF form inside Revit.
While the buttons and form elements aren't functional yet, displaying the form itself is a big achievement. Many people get stuck at this point, but you made it! You're now ahead of most others who gave up on WPF forms in pyRevit.
Your Homework
Follow along with this lesson and display your XAML form inside Revit. If your form looks different, that's fine—you get bonus points for experimenting! The goal for this lesson is to see WPF form made with XAML code inside of Revit.
Note: If you encounter an error when adding events to your form, it means you may have rushed a bit. Remove the events for now; we will cover them in the next lesson.
What’s Next?
In the next lesson, we will set up event triggers so we can add some logic to your forms when we click on buttons.
🙋♂️ See you in the next lesson.
- EF
🙋♂️ See you in the next lesson.
- EF
Discuss the lesson:
P.S. Sometimes this chat might experience connection issues.
Please be patient or join via Discord app so you can get the most out of this community and get access to even more chats.
Discuss the lesson:
P.S. Sometimes this chat might experience connection issues.
Please be patient or join via Discord app so you can get the most out of this community and get access to even more chats.


