Let's look at how to make our forms look better with the Styling in WPF. I will start with the Basics and Styling Types to explain you the logic.
Let's look at how to make our forms look better with the Styling in WPF. I will start with the Basics and Styling Types to explain you the logic.
Summary
Styling in WPF
You learnt a lot about WPF functionality already, and now let's learn about styling in WPF.
We can create Hover Effects, Animations and even draw anything we want, but let's focus on the basics and how to make reusable styles for your WPF forms.
Let's open Visual Studio and start with the styling basics.
Change Colors Manually
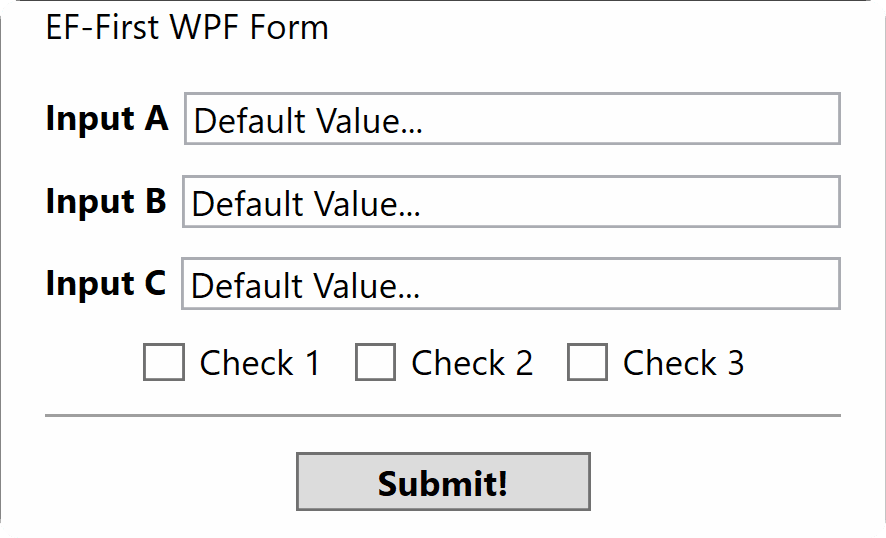
Let's begin this lesson with this very simple form. There are just a few inputs and a button, so we have something to try styling.
<Window Title="EF-First WPF Form"
xmlns="http://schemas.microsoft.com/winfx/2006/xaml/presentation"
xmlns:x="http://schemas.microsoft.com/winfx/2006/xaml"
Height="Auto" Width="300" MinHeight="150"
WindowStartupLocation="CenterScreen" ResizeMode="NoResize"
SizeToContent="Height">
<StackPanel Margin="10" >
<DockPanel Margin="5">
<TextBlock Text="Input A" Margin="0,0,5,0" FontWeight="Bold"/>
<TextBox Text="Default Value..." />
</DockPanel>
<DockPanel Margin="5">
<TextBlock Text="Input B" Margin="0,0,5,0" FontWeight="Bold"/>
<TextBox Text="Default Value..." />
</DockPanel>
<DockPanel Margin="5">
<TextBlock Text="Input C" Margin="0,0,5,0" FontWeight="Bold"/>
<TextBox Text="Default Value..." />
</DockPanel>
<DockPanel HorizontalAlignment="Center" Margin="5">
<CheckBox Content="Check 1" Margin="0,0,10,0"/>
<CheckBox Content="Check 2" Margin="0,0,10,0"/>
<CheckBox Content="Check 3" />
</DockPanel>
<Separator Margin="5,5,5,12" />
<Button Content="Submit!"
FontWeight="Bold"
Width="100" />
Style with Properties
Firstly, let's look at the properties. We can go to every single Control and change how it looks by overriding property values of Foreground and Background.
When you assign colors, you can select pre-defined color names like 'Blue', 'Red'… Or you can use the hex code like #1c1c1c
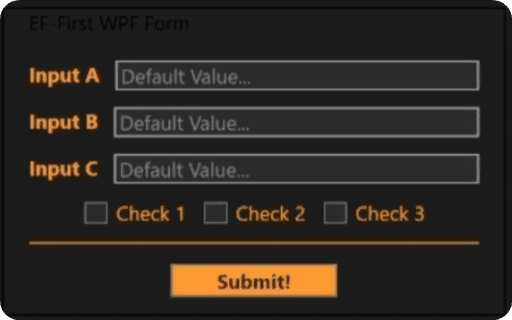
I will style this form on the go by using my color scheme from the website, but you can select any colors you want.
Here is an example:
<Window Title="EF-First WPF Form"
xmlns="http://schemas.microsoft.com/winfx/2006/xaml/presentation"
xmlns:x="http://schemas.microsoft.com/winfx/2006/xaml"
Height="Auto" Width="300" MinHeight="150"
WindowStartupLocation="CenterScreen" ResizeMode="NoResize"
SizeToContent="Height"
Background="#1c1c1c">
<StackPanel Margin="10" >
<DockPanel Margin="5">
<TextBlock Text="Input A" Margin="0,0,10,0" FontWeight="Bold" Foreground="#ff9a2e"/>
<TextBox Text="Default Value..." Foreground="Gray" Background="#2b2b2b"/>
</DockPanel>
<DockPanel Margin="5">
<TextBlock Text="Input B" Margin="0,0,10,0" FontWeight="Bold" Foreground="#ff9a2e"/>
<TextBox Text="Default Value..." Foreground="Gray" Background="#2b2b2b"/>
</DockPanel>
<DockPanel Margin="5">
<TextBlock Text="Input C" Margin="0,0,10,0" FontWeight="Bold" Foreground="#ff9a2e"/>
<TextBox Text="Default Value..." Foreground="Gray" Background="#2b2b2b"/>
</DockPanel>
<DockPanel HorizontalAlignment="Center" Margin="5">
<CheckBox Content="Check 1" Margin="0,0,10,0" Foreground="#ff9a2e" Background="#2b2b2b"/>
<CheckBox Content="Check 2" Margin="0,0,10,0" Foreground="#ff9a2e" Background="#2b2b2b"/>
<CheckBox Content="Check 3" Foreground="#ff9a2e" Background="#2b2b2b"/>
</DockPanel>
<Separator Margin="5,5,5,12" Background="#ff9a2e"/>
<Button Content="Submit!"
Background="#ff9a2e"
Foreground="#1c1c1c"
FontWeight="Bold"
Width="100" />
That's how it would look:
Why Manual Styling Isn't Enough
Applying colors manually worked well, but you know perfectly well, that once we start copy pasting the same values in code, we are doing something wrong.
🔥It's like a sin in programming, and we need to think how to improve it.
To address this issue, we can use Styles in WPF, which allow you to define a set of property values and reuse them across multiple controls.
This will allow you to manage your code much better, and make it easier to update colors and other styles in your forms.
Styling Types
There are different ways to utilize Styles in WPF, such as:
Local Style: Styles defined within a control.
Child Control Styles - Style all child controls within a parent control.
Window-Wide Styles - Style all Controls within the Window.
Application-Wide Styles - Allows you to style everything inside the application. This is not applicable to us as pyRevit developers.
Explicit Styles: Styles with a name that can be explicitly applied to your controls.
e.g. You can create style_A, style_B and then individually decide which one to apply to your buttons.
Let's quickly go over these types so I can show you the difference and an example on how to create a Style.
Local Style
Let's start with the local styles.
You can select any control you want, and make styles only available to this element. Let's start with the <TextBlock>.
Here is an example of how to create a <Style>
        <TextBlock  Text="Input A" Width="75">
            <TextBlock.Resources>
                <Style TargetType="TextBlock">
                    <Setter Property="Foreground" Value="#1c1c1c"/>
                    <Setter Property="Background" Value="#ff9a2e"/>
                    <Setter Property="FontWeight" Value="Bold"/>
                </Style>
            </TextBlock.Resources>
        </TextBlock
It will have the same effect as overriding the properties directly like Foreground = "#f2f2f2.
It doesn't make much sense creating styles for a single element, except for testing and debugging and more advanced effects.
In XAML to apply a <Style>, we need to define it inside of Resources. And nearly all controls in WPF have Resources. When you create a Style you need to set the TargetType to a specific control, like CheckBox, TextBlock and so on...
Then we need to use Setter to change property values within the style. When you do that you would need to set:
Property = "…"
Value = "…"
This is similar to overriding Style manually like Foreground = '#1c1c1c'. As I've said, it doesn't make sense to create a <Style> for a single element, but it's a good place to start and we will reuse this styles in the next steps.
Child Control Resources
Now let's look at how we can control multiple Controls within another control.
Let's open up <StackPanel.Resources>and paste exactly the same Style we just created.
And you will notice that all <TextBlocks> within this <StackPanel> are affected. So now it starts to make more sense.
We create Style once, and then apply it to multiple controls over and over. And you can create multiple styles. For example, let's duplicate and change TargetType="TextBox"
Here is the code:
<StackPanel Margin="10" >
<StackPanel.Resources>
<Style TargetType="TextBlock">
<Setter Property="Foreground" Value="#1c1c1c"/>
<Setter Property="Background" Value="#ff9a2e"/>
<Setter Property="FontWeight" Value="Bold"/>
</Style>
<!-- TextBox Style-->
<Style TargetType="TextBox">
<Setter Property="Foreground" Value="#f2f2f2"/>
<Setter Property="Background" Value="#2b2b2b"/>
</Style>
</StackPanel.Resources>
<!--First Label and TextBox-->
<DockPanel Margin="5">
<TextBlock Text="Input A" Style="{StaticResource ef_texblock_a}"/>
<TextBox Text="Default Value..." />
</DockPanel>
<!--Second Label and TextBox-->
<DockPanel Margin="5">
<TextBlock Text="Input B" Style="{StaticResource ef_texblock_b}" Foreground="Beige"/>
<TextBox Text="Default Value..." />
</DockPanel>
<!--Third Label and TextBox-->
<DockPanel Margin="5">
<TextBlock Text="Input C" Style="{StaticResource ef_texblock_b}"/>
<TextBox Text="Default Value..." />
</DockPanel>
<!--Checkboxes-->
<DockPanel HorizontalAlignment="Center" Margin="5">
<CheckBox Content="Check 1" Margin="0,0,10,0"/>
<CheckBox Content="Check 2" Margin="0,0,10,0"/>
<CheckBox Content="Check 3" />
</DockPanel>
<!--Separator-->
<Separator Margin="5,5,5,12" />
<!--Submit Button-->
<Button Content="Submit!"
FontWeight="Bold"
Width="100" />
</StackPanel>
</Window
💡Controls outside this StackPanel won't be affected by these styles.
Window Resources
Now, we can also copy the same styles and move to to <Window.Resources>. This is similar logic that we used in <StackPanel>, but since Window is the root element in our forms, this will be the global style for all Controls.
<Window Title="EF-First WPF Form"
        xmlns="http://schemas.microsoft.com/winfx/2006/xaml/presentation"
        xmlns:x="http://schemas.microsoft.com/winfx/2006/xaml"
        Background="#1c1c1c">

    <Window.Resources>
        <Style TargetType="TextBlock">
            <!-- Setters -->
        </Style>
        <Style TargetType="TextBox">
            <!-- Setters -->
        </Style>
    </Window.Resources>

    <!-- Content here -->
</Window
Now, all TextBlock and TextBox controls within the window will use these styles.
Explicit Styles
Lastly, you should be aware of Explicit Styles.
This allow you to create multiple styles and then select from them. For Example, we can create:
ef_textblock_a Style for TextBlock
ef_textblock_b Style for TextBlock
To do that, we need to add x:Key='custom_name' to different Styles like this:
<Window.Resources>
    <Style x:Key="ef_textblock_a" TargetType="TextBlock">
        <Setter Property="Foreground" Value="#ff9a2e"/>
        <Setter Property="FontWeight" Value="Bold"/>
        <Setter Property="Margin" Value="0,0,10,0"/>
    </Style>

    <Style x:Key="ef_textblock_b" TargetType="TextBlock">
        <Setter Property="Foreground" Value="#1c1c1c"/>
        <Setter Property="Background" Value="#ff9a2e"/>
        <Setter Property="Margin" Value="0,0,10,0"/>
        <Setter Property="FontWeight" Value="Bold"/>
    </Style>
</Window
Then when you can use Style property and select from available styles. To access a list of available styles you need to use Style = "{StaticResource STYLE_NAME}"
Here is example:
<TextBlock Text="Input A" Style="{StaticResource ef_textblock_a}"/>
<TextBlock Text="Input B" Style="{StaticResource ef_textblock_b}"/>
Overriding Styles
Also, keep in mind that when you apply Styles, you can still override properties locally.
For example you can select ef_textblock_b style and then override the foreground style for a specific TextBlock.
Here is an example:
<TextBlock Text="Input B" Style="{StaticResource ef_textblock_b}" Foreground="Beige"/>
What's Next?
Alright this was just a basic introduction to WPF Styling and available options.
In the next lesson, we will Style a form from start so we can practice creating new Styles and I will share a few more secrets about it.
Happy Coding!
🙋♂️ See you in the next lesson.
- EF
🙋♂️ See you in the next lesson.
- EF
Discuss the lesson:
P.S. Sometimes this chat might experience connection issues.
Please be patient or join via Discord app so you can get the most out of this community and get access to even more chats.
Discuss the lesson:
P.S. Sometimes this chat might experience connection issues.
Please be patient or join via Discord app so you can get the most out of this community and get access to even more chats.

