Create SelectFromDict Form
Let's create the second most used form you will reuse - SelectFromDict. You would be surprised how much you can do with this form only.
Create SelectFromDict Form
Let's create the second most used form you will reuse - SelectFromDict. You would be surprised how much you can do with this form only.
Summary
✨The 2nd Most Popular Form
We've made Alerts, which is probably the most reusable form for any pyRevit user.
And now we are going to look at the second most used form - SelectFromList, but in my case, I like to call it SelectFromDict, because I prefer providing dict to have better control over visible names and returned values.
We've already used <ListBox> in the 2nd module, so you know already all the steps. However, since it's such popular control, it will be great to practice it once more and put your skills to the test.
XAML - SelectFromDict
We are going to start with our XAML code and create the Front-End of our form. Also, it's a great place for you to practice it on your own.
Take this starting template with the skeleton of the code and try to make this form yourself. And don't worry to get stuck, that will actually mean that you found what you need to learn to be able to do it in the future.
<Window Title="EF-SelectFromDict"
xmlns="http://schemas.microsoft.com/winfx/2006/xaml/presentation"
xmlns:x="http://schemas.microsoft.com/winfx/2006/xaml"
Height="Auto" Width="300" MinHeight="150"
WindowStartupLocation="CenterScreen" ResizeMode="CanResizeWithGrip"
SizeToContent="Height">
<StackPanel Margin="10">
</StackPanel>
</Window>
Spoiler Alert!
You are about to see the complete XAML code, so think twice if you are ready to see it. It's the perfect opportunity for you to practice, and if you fail you will get to see the complete solution and my step by step explanation.
And now here is the snippet (pss, I warned you.)
<Window Title="EF-SelectFromDict"
xmlns="http://schemas.microsoft.com/winfx/2006/xaml/presentation"
xmlns:x="http://schemas.microsoft.com/winfx/2006/xaml"
Height="Auto" Width="300" MinHeight="150"
WindowStartupLocation="CenterScreen" ResizeMode="CanResizeWithGrip"
SizeToContent="Height">
<StackPanel Margin="10">
<TextBlock x:Name="UI_label" Text="Select Elements:" FontWeight="Bold" Margin="0,0,0,10"/>
<DockPanel Margin="0,0,0,10">
<TextBlock Text="🔎" Margin="0,0,5,0"/>
<TextBox x:Name="UI_search" TextChanged="UIe_search_changed"/>
</DockPanel>
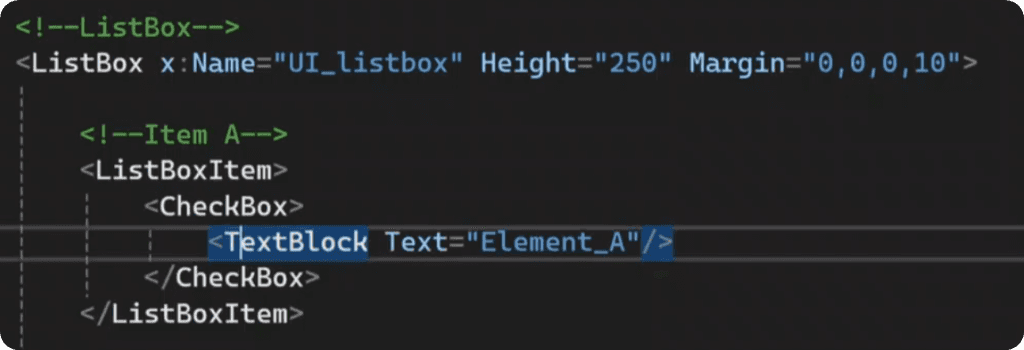
<ListBox x:Name="UI_listbox" Height="250" Margin="0,0,0,10">
<ListBoxItem>
<CheckBox>
<TextBlock Text="Element_A"/>
</CheckBox>
</ListBoxItem>
<ListBoxItem>
<CheckBox>
<TextBlock Text="Element B"/>
</CheckBox>
</ListBoxItem>
</ListBox>
<DockPanel HorizontalAlignment="Center" Margin="0,0,0,10">
<Button Click="UIe_btn_all" Content="Select All" Width="75" Margin="0,0,10,0"/>
<Button Click="UIe_btn_none" Content="Select None" Width="75"/>
</DockPanel>
<Separator Margin="0,0,0,10"/>
<Button x:Name="UI_btn_run" Click="UIe_btn_run" Content="Select" Width="160"
<
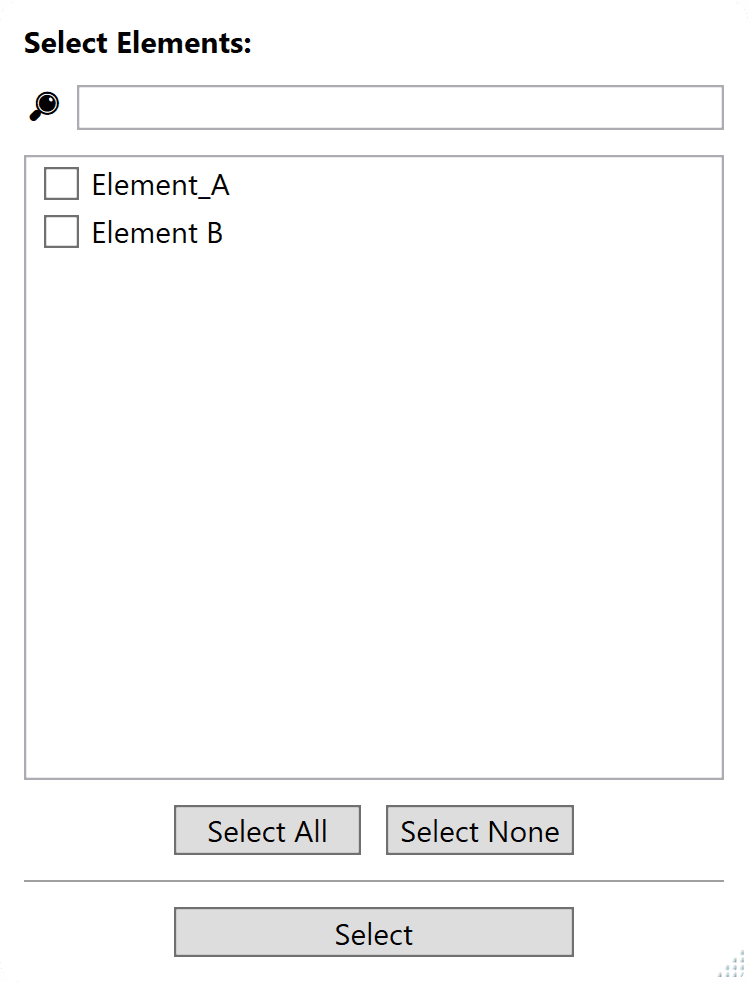
And once you are done, you should have a form with this front-end.
Now copy the whole XAML code and paste it inside a xaml file in your pushbutton. And then we are ready to start with python code.
Setup python Code
Now let's create a base WPF class so we can display XAML code inside of Revit before we will start writing out all the functionality. For now we don't care about functionality, we just want to display our XAML code inside of Revit.
💡Remember that we need to create EventHandler for each Event that we've defined in the XAML code. So I will add the placeholders to avoid error messages.
__title__ = "03.03 - SelectFromDict"
__doc__ = """Version = 1.0
Date = 24.10.2024
________________________________________________________________
Description:
Learn how to create SelectFromDict form.
________________________________________________________________
Author: Erik Frits"""
from Autodesk.Revit.DB import *
from pyrevit import forms
import wpf, os, clr
clr.AddReference("System")
from System.Collections.Generic import List
from System.Windows import Window, Visibility
from System.Windows.Controls import CheckBox, Button, TextBox, ListBoxItem, TextBlock
PATH_SCRIPT = os.path.dirname(__file__)
doc = __revit__.ActiveUIDocument.Document
uidoc = __revit__.ActiveUIDocument
app = __revit__.Application
class SelectFromDict(Window):
def __init__(self):
path_xaml_file = os.path.join(PATH_SCRIPT, 'SelectFromDict.xaml')
wpf.LoadComponent(self, path_xaml_file)
self.ShowDialog()
def UIe_search_changed(self, sender, e):
pass
def UIe_btn_all(self, sender, e):
pass
def UIe_btn_none(self, sender, e):
pass
def UIe_btn_run(self, sender, e):
"""Button action: Rename view with given """
self.Close()
UI = SelectFromDict()
And now if you test it in Revit, you are supposed to see your form.
Make sure you fix any errors before moving further.
Provide Arguments
Now we need to add some arguments to our class.
We will need:
And we can also make some of them work right away, because they are quite simple. We just need to reference the correct <Control> and override the value.
class SelectFromDict(Window):
def __init__(self, items, label='', title='', btn_name=''):
path_xaml_file = os.path.join(PATH_SCRIPT, 'SelectFromDict.xaml')
wpf.LoadComponent(self, path_xaml_file)
if label: self.UI_label.Text = label
if title: self.Title = title
if btn_name: self.UI_btn_run.Content = btn_name
self.ShowDialog()
Populate items in ListBox
Now we are getting to the main section of the form - <ListBoxItems>.
First of all, it's good to have a look at the working XAML code to understand the logic you are about to recreate.
In our case, we will create a
TextBlock -> CheckBox -> ListBoxItem
- TextBlock will store the visible name in the form
- CheckBox will store the actual element and collect user input
- ListBoxItem is necessary to add items to the ListBox
So let's put all of it now into a populate_listbox method.
def populate_listbox(self, items):
"""Add Items to ListBox by create ListBoxItem-CheckBox-TextBlock."""
self.UI_listbox.Items.Clear()
for item_name, item in sorted(items.items()):
textblock = TextBlock()
textblock.Text = item_name
check = CheckBox()
check.Content = textblock
check.Tag = item
list_item = ListBoxItem()
list_item.Content = check
self.UI_listbox.Items.Add(list_item)
💡 Don't forget to use this method inside __init__ statement.
Make sure to test your form to see if you are adding elements to your form. That's important before going to the next step.
We can get all views in the project and try to use this class.
all_views = FilteredElementCollector(doc).OfCategory(BuiltInCategory.OST_Views).WhereElementIsNotElementType().ToElements()
dict_views = {v.Name : v for v in all_views}
UI = SelectFromDict(dict_views, 'Select Views', 'Select Views Form', 'Select Views.')
Add Search Functionality
Now let's add the search functionality.
We've already defined the TextChanged Event in the XAML Code, so now we need to read the provided text and see if we have any matches in the <ListBox>.
As you remember, there are lots of ways to achieve this functionality, but changing Visibility of the <ListBoxItems> is by far the easiest and the best option to use.
So this method will:
Get User Input + lower()
split() into multiple words for wildcard search
Then get element name (item -> checkbox -> textblock -> text)
And modify Visiblity based on the check result.
Here is the code:
    def UIe_search_changed(self, sender, e):
        search_input = self.UI_search.Text.lower()
        if search_input:
            search_words = search_input.split()

            for item in self.UI_listbox.Items:
                checkbox  = item.Content
                textblock = checkbox.Content
                item_name = textblock.Text.lower()

                if all(word in item_name for word in search_words):
                    item.Visibility = Visibility.Visible
                else:
                    item.Visibility = Visibility.Collapsed

        else:
            for item in self.UI_listbox.Items:
                item.Visibility = Visibility.Visible
Select All/None Buttons
Now let's also make our Select All and None buttons work. It's an optional feature, but I like to have it under my ListBoxes. It's not hard to add it, and sometimes it can save a lot of time or frustrations.
We just need to iterate through all visible items and change their IsChecked property to True/False.
Also we will create a method to reuse the functionality for both buttons, because they need opposite boolean values.
Here is the code:
def listbox_select_all(self, toggle):
    for item in self.UI_listbox.Items:
        if item.Visibility == Visibility.Visible:
            checkbox = item.Content
            checkbox.IsChecked = toggle

def UIe_btn_all(self, sender, e):
    self.listbox_select_all(True)

def UIe_btn_none(self, sender, e):
    self.listbox_select_all(False)
Get Selected Items
Lastly, we need to get our results from the form.
Iterate through items in the ListBox and check their IsChecked value. And if they are checked we can get the resulting element from Tag property.
Additionally we can also check the visible name of the element if you want to return the list of selected names.
In my case, I will create 2 @properties
selected_items
selected_names
Second one is not necessary, but it might be useful.
Here is the code:
    @property
    def selected_items(self):
        selected_items = []

        for item in self.UI_listbox.Items:
            checkbox = item.Content
            if checkbox.IsChecked:
                item = checkbox.Tag
                selected_items.append(item)

        return selected_items

    @property
    def selected_names(self):
        selected_names = []
        for item in self.UI_listbox.Items:
            checkbox = item.Content
            if checkbox.IsChecked:
                textblock = checkbox.Content
                item_name = textblock.Text
                selected_names.append(item_name)

        return selected_names
Final Test
Now let's put it to the final test and try to get selected items from the form.
Here is a simple code we will use.
all_views = FilteredElementCollector(doc).OfCategory(BuiltInCategory.OST_Views).WhereElementIsNotElementType().ToElements()
dict_views = {v.Name : v for v in all_views}

UI = SelectFromDict(dict_views, 'Select Views', 'Select Views Form', 'Select Views.')
print(UI.selected_items)
print('-'*100)
print(UI.selected_names)
Final Code
Just to avoid any confusion, here is the final XAML and Python code.
<Window Title="EF-SelectFromDict"
        xmlns="http://schemas.microsoft.com/winfx/2006/xaml/presentation"
        xmlns:x="http://schemas.microsoft.com/winfx/2006/xaml"
        Height="Auto" Width="300" MinHeight="150"
        WindowStartupLocation="CenterScreen" ResizeMode="CanResizeWithGrip"
        SizeToContent="Height">

    <StackPanel Margin="10">

        <!--Listbox Label-->
        <TextBlock x:Name="UI_label" Text="Select Elements:" FontWeight="Bold" Margin="0,0,0,10"/>

        <!--SearchBox-->
        <DockPanel Margin="0,0,0,10">
            <TextBlock Text="🔎" Margin="0,0,5,0"/>
            <TextBox x:Name="UI_search" TextChanged="UIe_search_changed"/>
        </DockPanel>

        <!--ListBox-->
        <ListBox x:Name="UI_listbox" Height="250" Margin="0,0,0,10">

            <!--Item A-->
            <ListBoxItem>
                <CheckBox>
                    <TextBlock Text="Element_A"/>
                </CheckBox>
            </ListBoxItem>

            <!--Item B-->
            <ListBoxItem>
                <CheckBox>
                    <TextBlock Text="Element B"/>
                </CheckBox>
            </ListBoxItem>

        </ListBox>

        <!--ListBox Buttons-->
        <DockPanel HorizontalAlignment="Center" Margin="0,0,0,10">
            <Button Click="UIe_btn_all" Content="Select All"  Width="75" Margin="0,0,10,0"/>
            <Button Click="UIe_btn_none" Content="Select None" Width="75"/>
        </DockPanel>

        <!--Separator-->
        <Separator Margin="0,0,0,10"/>

        <!--Run Button-->
        <Button x:Name="UI_btn_run" Click="UIe_btn_run" Content="Select" Width="160"/>


    </StackPanel>


</Window>
__title__ = "03.03 - SelectFromDict"
__doc__ = """Version = 1.0
Date = 24.10.2024
________________________________________________________________
Description:
Learn how to create SelectFromDict form.
________________________________________________________________
Author: Erik Frits"""
from Autodesk.Revit.DB import *
from pyrevit import forms
import wpf, os, clr
from select import select
clr.AddReference("System")
from System.Collections.Generic import List
from System.Windows import Window, Visibility
from System.Windows.Controls import CheckBox, Button, TextBox, ListBoxItem, TextBlock
PATH_SCRIPT = os.path.dirname(__file__)
doc = __revit__.ActiveUIDocument.Document
uidoc = __revit__.ActiveUIDocument
app = __revit__.Application
class SelectFromDict(Window):
def __init__(self, items, label='', title='', btn_name=''):
path_xaml_file = os.path.join(PATH_SCRIPT, 'SelectFromDict.xaml')
wpf.LoadComponent(self, path_xaml_file)
if label: self.UI_label.Text = label
if title: self.Title = title
if btn_name: self.UI_btn_run.Content = btn_name
self.populate_listbox(items)
self.ShowDialog()
@property
def selected_items(self):
selected_items = []
for item in self.UI_listbox.Items:
checkbox = item.Content
if checkbox.IsChecked:
item = checkbox.Tag
selected_items.append(item)
return selected_items
@property
def selected_names(self):
selected_names = []
for item in self.UI_listbox.Items:
checkbox = item.Content
if checkbox.IsChecked:
textblock = checkbox.Content
item_name = textblock.Text
selected_names.append(item_name)
return selected_names
def populate_listbox(self, items):
"""Add Items to ListBox by create ListBoxItem-CheckBox-TextBlock."""
self.UI_listbox.Items.Clear()
for item_name, item in sorted(items.items()):
textblock = TextBlock()
textblock.Text = item_name
check = CheckBox()
check.Content = textblock
check.Tag = item
list_item = ListBoxItem()
list_item.Content = check
self.UI_listbox.Items.Add(list_item)
def UIe_search_changed(self, sender, e):
search_input = self.UI_search.Text.lower()
if search_input:
search_words = search_input.split()
for item in self.UI_listbox.Items:
checkbox = item.Content
textblock = checkbox.Content
item_name = textblock.Text.lower()
if all(word in item_name for word in search_words):
item.Visibility = Visibility.Visible
else:
item.Visibility = Visibility.Collapsed
else:
for item in self.UI_listbox.Items:
item.Visibility = Visibility.Visible
def listbox_select_all(self, toggle):
for item in self.UI_listbox.Items:
if item.Visibility == Visibility.Visible:
checkbox = item.Content
checkbox.IsChecked = toggle
def UIe_btn_all(self, sender, e):
self.listbox_select_all(True)
def UIe_btn_none(self, sender, e):
self.listbox_select_all(False)
def UIe_btn_run(self, sender, e):
"""Button action: Rename view with given """
self.Close()
all_views = FilteredElementCollector(doc).OfCategory(BuiltInCategory.OST_Views).WhereElementIsNotElementType().ToElements()
dict_views = {v.Name : v for v in all_views}
UI = SelectFromDict(dict_views, 'Select Views', 'Select Views Form', 'Select Views.')
print(UI.selected_items)
print('-'*100)
print(UI.selected_names)
💡P.S. Let me know if it's too inconvenient to copy code from smaller windows.
Conclusion
🥳Congratulations!
This will be a really useful form in your future tools, and you will often come back to copy certain parts to reuse this functionality in other forms.
Make sure you follow along and make this form work. Because in the next lesson we will need to make this form reusable and also prapare a bunch of reusable functions for your future scripts.
Happy Coding and see you soon.
🙋♂️ See you in the next lesson.
- EF
🙋♂️ See you in the next lesson.
- EF
Discuss the lesson:
P.S. Sometimes this chat might experience connection issues.
Please be patient or join via Discord app so you can get the most out of this community and get access to even more chats.
Discuss the lesson:
P.S. Sometimes this chat might experience connection issues.
Please be patient or join via Discord app so you can get the most out of this community and get access to even more chats.


