Lesson 02.03

Event Triggers in WPF Forms

Let's look at Event Triggers in WPF so we can assign some actions to our buttons and some other events. This is crucial concept for building your WPF forms.

Lesson 02.03

Event Triggers in WPF Forms

Let's look at Event Triggers in WPF so we can assign some actions to our buttons and some other events. This is crucial concept for building your WPF forms.

Summary

Events in WPF Forms

If you followed along the previous lesson, you should have your XAML form displayed in Revit and we will continue working on it. In this lesson, we'll explore events in WPF forms.

Events allow us to subscribe to certain actions in the software(or WPF form in this case) and execute code with EventHandlers when Events are triggered. This allows us to add additional logic to our forms.

We will look at different events during this lesson, such as:

  • Button.Click

  • TextBlock.TextChanged

  • CheckBox.Clicked

  • MouseEnter


The goal for this lesson is to understand how to subscribe to different events, and how to handle them when they are triggered.

This will allow you to build more interactive and useful WPF forms with pyRevit. Are you ready to add events?

Events in XAML Code

Right now we can display our form, but nothing happens if we click on buttons or try to write something. That's because we need to specify the logic in our code.

Firstly, we need to define events in our components in XAML code. And it just means that we need to choose the right EventName like a property and assign a value that will be the name of our EventHandler.

Let's go to VisualStudio and duplicate the code from previous lesson so we can make a few minor changes.

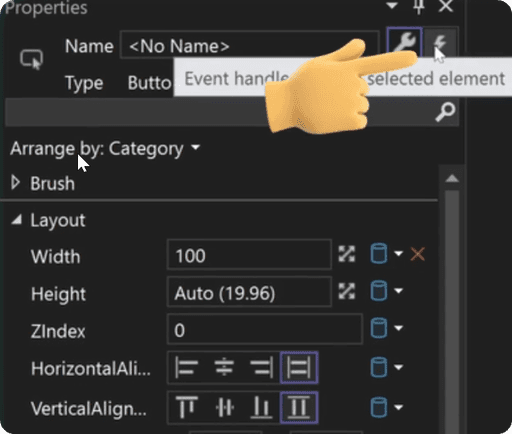
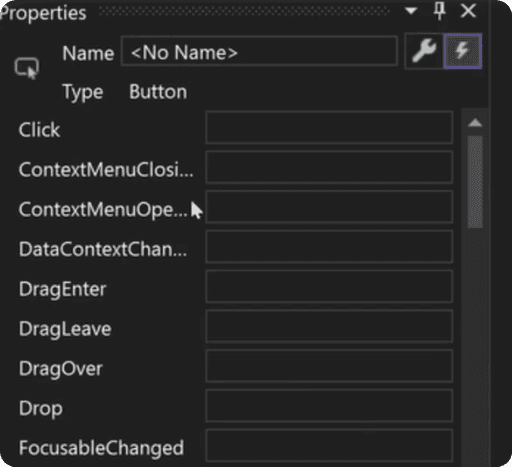
Firstly, let's have a look at all available events for our controls. For that select any control like <Button> and then you will notice a button in the properties to open a list of all available Events.

To subscribe to an event we need to give a name to it, and then we will need to also create an EventHandler in our python code with the same name.

You can either use this menu and write the name you want, or you can go in the Start tag of your component and write it as a property.

💡Tip: I recommend to always use prefix UIe_ for your events. It will make it easier to navigate your XAML code and find all your events.

I will add event to the existing <Button> as follows:

<Button Content="Submit!" Width="100" Click="UIe_btn_run" />

Now, once you've updated your xaml code, make sure you copy-paste the updated code inside your XAML file in pushbuton folder.

Test The Button

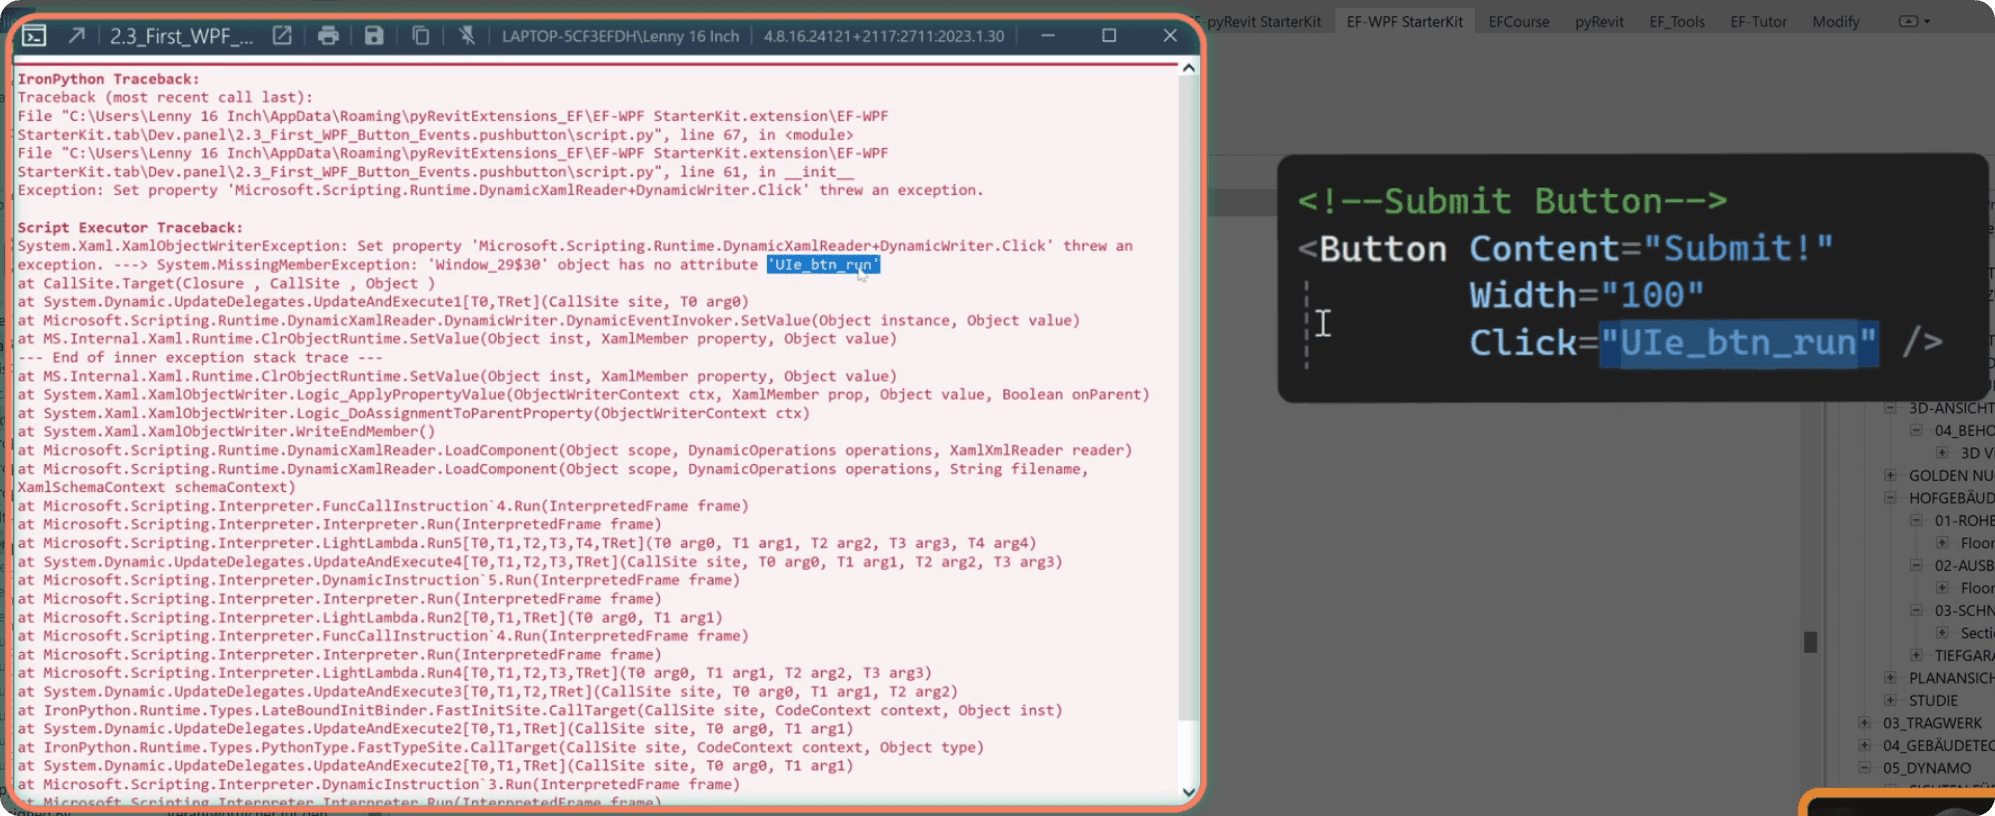
Once you've updated XAML code with the Event you can test the button in Revit. You will notice an error message, because we've added an event in XAML code, but we haven't written an EventHandler in our python code…

This is the error message:

You will get a large error message, and inside you will notice the name of the event, and the prefix makes it so much easier to recognize it (UIe_btn_run).

So now let's open the python code and address that.

EventHandler in Python

To add EventHandlers in your Python it's fairly simple.

The class that we've created previously represents the <Window> of our form. Since we've connected our xaml file, it's aware about everything inside of it, including events.

Now we need to create a method with the exact same name as we assigned to the event - UIe_btn_run

Here is the class with EventHandler method:

class FirstButton(Window):
    def __init__(self):
        # Connect to .xaml File (in the same folder!)
        path_xaml_file = os.path.join(PATH_SCRIPT, 'FirstButtonEvents.xaml')
        wpf.LoadComponent(self, path_xaml_file)

        # Show Form
        self.ShowDialog()

    # ╔╗ ╦ ╦╔╦╗╔╦╗╔═╗╔╗╔  ╔═╗╦  ╦╔═╗╔╗╔╔╦╗╔═╗
    # ╠╩╗║ ║ ║  ║ ║ ║║║║  ║╣ ╚╗╔╝║╣ ║║║ ║ ╚═╗
    # ╚═╝╚═╝ ╩  ╩ ╚═╝╝╚╝  ╚═╝ ╚╝ ╚═╝╝╚╝ ╩ ╚═╝
    def UIe_btn_run(self, sender, e):
        print('Form Submitted!')
        self.Close()

Notice that EventHandlers always take 2 arguments:

  • Sender - The control or object that triggered the event.

  • e (EventArgs) - Event details, like mouse position or key pressed, providing context for the action.

It doesn't mean you have to use them, but they have to be specified as arguments, because that's the programming convention for all event handlers.

Inside the method we added the print statement and also self.Close(), which will close the open UI form.

Now you can test your first EventHandler in Revit.

MouseEnter Events

Let's add more events in our form, such as Mouse Enter and Mouse Leave events for the button for example. These are not what you would normally use, but these are fun ones to practice events.

Firstly, open your XAML code and add these events:

<Button Content="Submit!" Width="100" Click="UIe_btn_run" 
        MouseEnter="UIe_enter"
        MouseLeave="UIe_leave"
        />

💡Don't forget to copy your XAML code as well.

Secondly, create these methods for EventHandling in Python.

# Mouse enter event handler
def UIe_enter(self, sender, e):
    print('Yey, Click me.')

# Mouse leave event handler
def UIe_leave(self, sender, e):
    print("Oh no, Don't leave me")

Now you can experiment and see what happens, and it should create print statements when you hover over your button.

It's certainly over the top event, but it's a fun one.

TextBox Text Change Events

Next, we'll use the TextChanged event for the <TextBox>.

This event will trigger whenever the text inside a text box changes, allowing us to respond immediately to user input. That's actually a very useful event for something like a search box, which I will show you later.

First modify your XAML code:

<TextBox Text="Default Value..." 
         TextChanged="UIe_txt1_changed"
         Foreground="Gray"/>

Secondly, add here the EventHandler and we can also practice using sender argument.

In this case, sender is going to be our <TextBox> itself, so we can use it to read the actual values that user providing in Text property.

# Text changed event handler
def UIe_txt1_changed(self, sender, e):
    print(sender.Text)
    
    if sender.Text == 'LearnRevitAPI.com':
        print("You've just mentioned the best course on Revit API.")

Here is the result:

Checkbox Checked/Unchecked Events

Lastly, Let's have a look at events in CheckBoxes. I want to have a look at Checked and Unchecked Events. And keep in mind that we can also reference the same EventHandler in different events and Controls.

In this example we will use the same EventHandlers for different CheckBoxes.

Firstly, we will adjust the XAML Code:

<!--Checkboxes-->
<DockPanel HorizontalAlignment="Center" Margin="5">
    <CheckBox Content="Check 1" Margin="0,0,10,0" 
                Checked="UIe_checked1" 
                Unchecked="UIe_unchecked1"/>

    <CheckBox Content="Check 2" Margin="0,0,10,0"
                Checked="UIe_checked1" 
                Unchecked="UIe_unchecked1"
                />
    <CheckBox Content="Check 3"
                Checked="UIe_checked1" 
                Unchecked="UIe_unchecked1"/>

Next, we need to create these EventHandlers in Python:

def UIe_checked1(self, sender, e):
    print("You've checked {}".format(sender.Content))


def UIe_unchecked1(self, sender, e):
    print("You've unchecked {}".format(sender.Content))

And now you can test it on multiple CheckBoxes.

Final Code

Lastly, let me summarize the code from this lesson so we avoid any confusion.

Here is Python Code:

# -*- coding: utf-8 -*-
__title__   = "02.03 - First pyRevit Form (Events)"
__doc__     = """Version = 1.0
Date    = 15.09.2024
________________________________________________________________
Description:
Learn how to handle Events in WPF with IronPython.

________________________________________________________________
Author: Erik Frits"""


# ╦╔╦╗╔═╗╔═╗╦═╗╔╦╗╔═╗
# ║║║║╠═╝║ ║╠╦╝ ║ ╚═╗
# ╩╩ ╩╩  ╚═╝╩╚═ ╩ ╚═╝ IMPORTS
#====================================================================================================
from Autodesk.Revit.DB import *
from pyrevit import forms   # By importing forms you also get references to WPF package! IT'S Very IMPORTANT !!!
import wpf, os, clr         # wpf can be imported only after pyrevit.forms!

# .NET Imports
clr.AddReference("System")
from System.Collections.Generic import List
from System.Windows import Application, Window
from System.Windows.Controls import CheckBox, Button, TextBox, ListBoxItem
from System import Uri

# ╦  ╦╔═╗╦═╗╦╔═╗╔╗ ╦  ╔═╗╔═╗
# ╚╗╔╝╠═╣╠╦╝║╠═╣╠╩╗║  ║╣ ╚═╗
#  ╚╝ ╩ ╩╩╚═╩╩ ╩╚═╝╩═╝╚═╝╚═╝ VARIABLES
#====================================================================================================
PATH_SCRIPT = os.path.dirname(__file__)
doc     = __revit__.ActiveUIDocument.Document #type: Document
uidoc   = __revit__.ActiveUIDocument
app     = __revit__.Application


# ╔╦╗╔═╗╦╔╗╔  ╔═╗╔═╗╦═╗╔╦╗
# ║║║╠═╣║║║║  ╠╣ ║ ║╠╦╝║║║
# ╩ ╩╩ ╩╩╝╚╝  ╚  ╚═╝╩╚═╩ ╩ MAIN FORM
#====================================================================================================
# Inherit .NET Window for your UI Form Class
class FirstButton(Window):
    def __init__(self):
        # Connect to .xaml File (in the same folder!)
        path_xaml_file = os.path.join(PATH_SCRIPT, 'FirstButtonEvents.xaml')
        wpf.LoadComponent(self, path_xaml_file)

        # Show Form
        self.ShowDialog()

    # ╔╗ ╦ ╦╔╦╗╔╦╗╔═╗╔╗╔  ╔═╗╦  ╦╔═╗╔╗╔╔╦╗╔═╗
    # ╠╩╗║ ║ ║  ║ ║ ║║║║  ║╣ ╚╗╔╝║╣ ║║║ ║ ╚═╗
    # ╚═╝╚═╝ ╩  ╩ ╚═╝╝╚╝  ╚═╝ ╚╝ ╚═╝╝╚╝ ╩ ╚═╝
    def UIe_btn_run(self, sender, e):
        print('Form Submitted!')
        self.Close()

    def UIe_txt1_changed(self, sender, e):
        print(sender.Text)

        if sender.Text == 'LearnRevitAPI.com':
            print("You've just mentioned the best course on Revit API.")


    def UIe_checked1(self, sender, e):
        print("You've checked {}".format(sender.Content))


    def UIe_unchecked1(self, sender, e):
        print("You've unchecked {}".format(sender.Content))


    # def UIe_enter(self, sender, e):
    #     print('Yey, Click me.')
    #
    #
    # def UIe_leave(self, sender, e):
    #     print("Oh no, Don't leave me")


# Show form to the user
UI = FirstButton()

Here is XAML:

<Window Title="EF-First WPF Form"
        xmlns="http://schemas.microsoft.com/winfx/2006/xaml/presentation"
        xmlns:x="http://schemas.microsoft.com/winfx/2006/xaml"
        Height="Auto" Width="300" MinHeight="150"
        WindowStartupLocation="CenterScreen" ResizeMode="NoResize"
        SizeToContent="Height">

    <!--Stack Panel for all elements-->
    <StackPanel Margin="10">

        <!--First Label and TextBox-->
        <DockPanel Margin="5">
            <TextBlock Text="Input A" Margin="0,0,10,0" FontWeight="Bold"/>
            <TextBox Text="Default Value..." 
                     TextChanged="UIe_txt1_changed"
                     Foreground="Gray"/>
        </DockPanel>

        <!--Second Label and TextBox-->
        <DockPanel Margin="5">
            <TextBlock Text="Input B" Margin="0,0,10,0" FontWeight="Bold"/>
            <TextBox Text="Default Value..." Foreground="Gray"/>
        </DockPanel>

        <!--Third Label with ComboBox-->
        <DockPanel Margin="5">
            <TextBlock Text="Input C" Margin="0,0,10,0" FontWeight="Bold"/>
            <ComboBox>
                <ComboBoxItem Content="Walls"/>
                <ComboBoxItem Content="Floors"/>
                <ComboBoxItem Content="Roofs"/>
                <ComboBoxItem Content="Windows" IsSelected="True"/>
                <ComboBoxItem Content="Doors"/>
            </ComboBox>
        </DockPanel>

        <!--Checkboxes-->
        <DockPanel HorizontalAlignment="Center" Margin="5">
            <CheckBox Content="Check 1" Margin="0,0,10,0" 
                      Checked="UIe_checked1" 
                      Unchecked="UIe_unchecked1"/>

            <CheckBox Content="Check 2" Margin="0,0,10,0"
                      Checked="UIe_checked1" 
                        Unchecked="UIe_unchecked1"
                      />
            <CheckBox Content="Check 3"
                      Checked="UIe_checked1" 
                        Unchecked="UIe_unchecked1"/>

        </DockPanel>


        <!--ListBox of Random Views-->

        <StackPanel Margin="5">
            <!--ListBox Label-->
            <TextBlock Text="Select Views:" FontWeight="Bold" Margin="0,0,0,5"/>

            <!--Search Box-->
            <DockPanel Margin="5">
                <TextBlock Text="🔎" Margin="0,0,5,0" />
                <TextBox/>
            </DockPanel>

            <ListBox Height="150" SelectedIndex="0">
                <!--ListBox Item with a CheckBox-->
                <ListBoxItem>
                    <CheckBox Content="View - A"/>
                </ListBoxItem>

                <ListBoxItem>
                    <CheckBox Content="View - B"/>
                </ListBoxItem>

                <ListBoxItem>
                    <CheckBox Content="View - C"/>
                </ListBoxItem>

            </ListBox>

            <DockPanel HorizontalAlignment="Center" Margin="0,10,0,0">
                <Button Content="Select All" Width="100" Margin="0,0,10,0"/>
                <Button Content="Select None" Width="100"/>
            </DockPanel>
        </StackPanel>


        <!--Separator-->
        <Separator Margin="5,5,5,12"/>

        <!--Submit Button-->
        <Button Content="Submit!" Width="100" Click="UIe_btn_run" />
        <!--<Button Content="Submit!" Width="100" Click="UIe_btn_run" 
                MouseEnter="UIe_enter"
                MouseLeave="UIe_leave"
                />-->

Summary and Homework

And that's how you handle Events in WPF with python. You can see that overall it's not complicated, and they will allow you to add a lot of functionality in your forms and provide better user experience.

You just need to use them a few times to get comfortable.

Homework

Now it's time to get your hand dirty!

Try adding other events to different components like <ComboBox>.

You don't have to do anything crazy, just make a print statements that you've triggered the event and maybe try looking into sender variable.

Also share what you made with others in the community. Let's see how creative you can get with Events in WPF.

What's Next?

Once you've finished with your homework, and you shared your code in the community 😉, you are ready for the next lesson.

In the next lesson, we'll focus on how to get user information from the form controls when the form is submitted.
🙋‍♂️ See you in the next lesson.
- EF

🙋‍♂️ See you in the next lesson.
- EF

Discuss the lesson:

P.S. Sometimes this chat might experience connection issues.
Please be patient or join via Discord app so you can get the most out of this community and get access to even more chats.

Discuss the lesson:

P.S. Sometimes this chat might experience connection issues.
Please be patient or join via Discord app so you can get the most out of this community and get access to even more chats.