Create Simple WPF Form for pyRevit
Welcome to the 2nd module. In this module we will create a more comprehensive form and then we will go through all the steps to connect it to pyRevit and make it work exactly how we need it. And let's start with creating a XAML form.
Create Simple WPF Form for pyRevit
Welcome to the 2nd module. In this module we will create a more comprehensive form and then we will go through all the steps to connect it to pyRevit and make it work exactly how we need it. And let's start with creating a XAML form.
Summary
Welcome to Module 2 of WPF Course
In this module we will finally get our hands dirty and create a really powerful WPF form for pyRevit, and you will learn a lot about the process.
We will:
Create XAML UI Form
Connect XAML to pyRevit
Learn about WPF Event Triggers
How to do Data Binding
How to read user input
How to access WPF Components with code
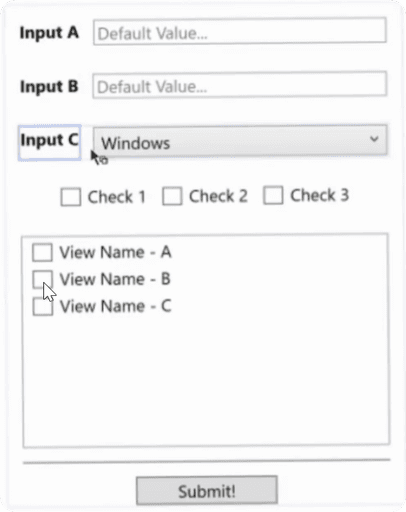
There is a lot included. Also, I don't want to create useless forms, so let's learn by actually creating a really useful form together that will look like this:
This form has a lot of various elements:
TextBlock
TextBox
ComboBox
CheckBox
Button
Separator
ListBox
ListboxItems with CheckBox
So you will learn a lot during this module!
And spoiler alert:
We will create the front-end of this form during this first lesson by using XAML code. So let's open Visual Studio and begin.
Getting Started with Visual Studio and Form Creation
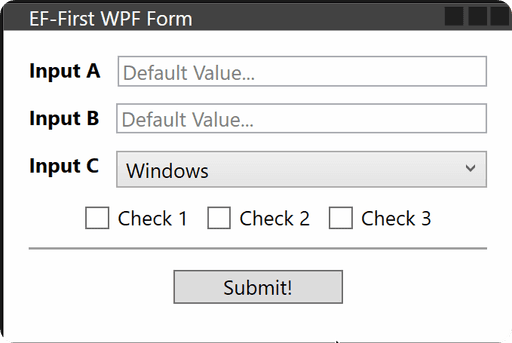
To keep things a little easier, I will copy the code from Lesson 01.04, where I've introduced you to XAML syntax. We already made a good base and we will use it for extending its functionality.
Here is how this form looks like:
And here is the XAML code:
<Window Title="EF-First WPF Form"
xmlns="http://schemas.microsoft.com/winfx/2006/xaml/presentation"
xmlns:x="http://schemas.microsoft.com/winfx/2006/xaml"
Height="450" Width="300" MinHeight="150"
WindowStartupLocation="CenterScreen" ResizeMode="NoResize">
<StackPanel Margin="10">
<DockPanel Margin="5">
<TextBlock Text="Input A" Margin="0,0,10,0" FontWeight="Bold"/>
<TextBox Text="Default Value..."
TextChanged="UIe_txt1_changed"
Foreground="Gray"/>
</DockPanel>
<DockPanel Margin="5">
<TextBlock Text="Input B" Margin="0,0,10,0" FontWeight="Bold"/>
<TextBox Text="Default Value..." Foreground="Gray"/>
</DockPanel>
<DockPanel Margin="5">
<TextBlock Text="Input C" Margin="0,0,10,0" FontWeight="Bold"/>
<ComboBox>
<ComboBoxItem Content="Walls"/>
<ComboBoxItem Content="Floors"/>
<ComboBoxItem Content="Roofs"/>
<ComboBoxItem Content="Windows" IsSelected="True"/>
<ComboBoxItem Content="Doors"/>
</ComboBox>
</DockPanel>
<DockPanel HorizontalAlignment="Center" Margin="5">
<CheckBox Content="Check 1" Margin="0,0,10,0"/>
<CheckBox Content="Check 2" Margin="0,0,10,0"/>
<CheckBox Content="Check 3" />
</DockPanel>
<Separator Margin="5,5,5,12"/>
<Button Content="Submit!"
Width="100"/>
Now let's add a few more elements.
Add Checkboxes
Now let's add a few checkboxes to our form.
I want to add them in a single line so I will group them under <DockPanel>.
Also, CheckBox has a Content property that can display text next to the checkbox, so let's use it for names like (Check 1,2,3).
And lastly, to make it look nicer, we can introduce some spacing by using Margin property. Remember that we can set different values for different sides (Left, Top, Right, Bottom). In our case we just want 10px on the right.
And here is the code:
<DockPanel HorizontalAlignment="Center" Margin="5">
<CheckBox Content="Check 1" Margin="0,0,10,0"/>
<CheckBox Content="Check 2" Margin="0,0,10,0"/>
<CheckBox Content="Check 3" />
</DockPanel>
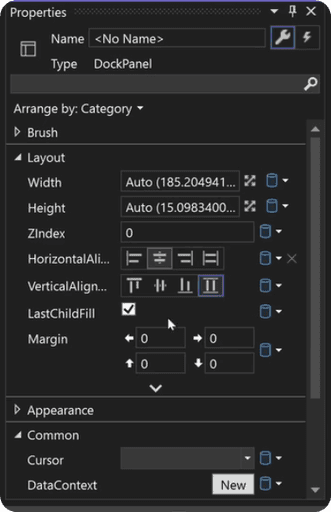
Also as a beginner, it might be confusing to remember all the property names.
But, you can use UI properties menu in Visual Studio to look inside controls and see what's available and modify elements by using controls there.
It might be easier in the beginning, but over time you will save more time by using XAML code directly.
Add ListBox
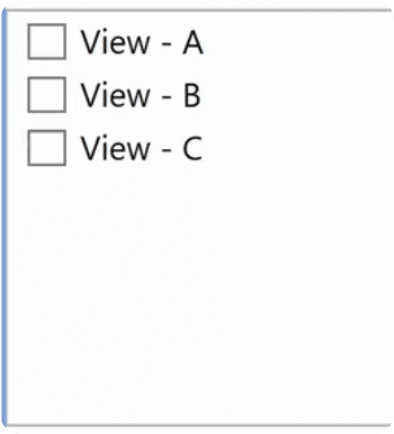
Next, let's add a control that will allow us to stack multiple options and ask user to select from list. We will need to use <ListBox> for that.
In a nutshell, <ListBox> is a container where we can add <ListBoxItems> to choose from. Here is how the basic form looks like:
We can also configure <ListBoxItems> to display <CheckBoxes> for each item so users can select multiple options at once. And that's what we will do.
To do that, we need to provide <CheckBox> as a Content of <ListBoxItem>. We can do that by defining Start and End tag of the <ListBoxItem> and everything in between is considered Content of this element.
Here is the code:
<ListBox Height="150" SelectedIndex="0">
<ListBoxItem>
<CheckBox Content="View - A"/>
</ListBoxItem>
<ListBoxItem>
<CheckBox Content="View - B"/>
</ListBoxItem>
<ListBoxItem>
<CheckBox Content="View - C"/>
</ListBoxItem>
</ListBox>
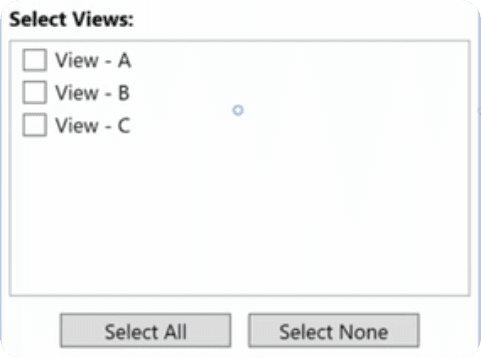
Right now this form looks very boring and misses a bunch of thing, so let's fix that.
Add ListBox Label
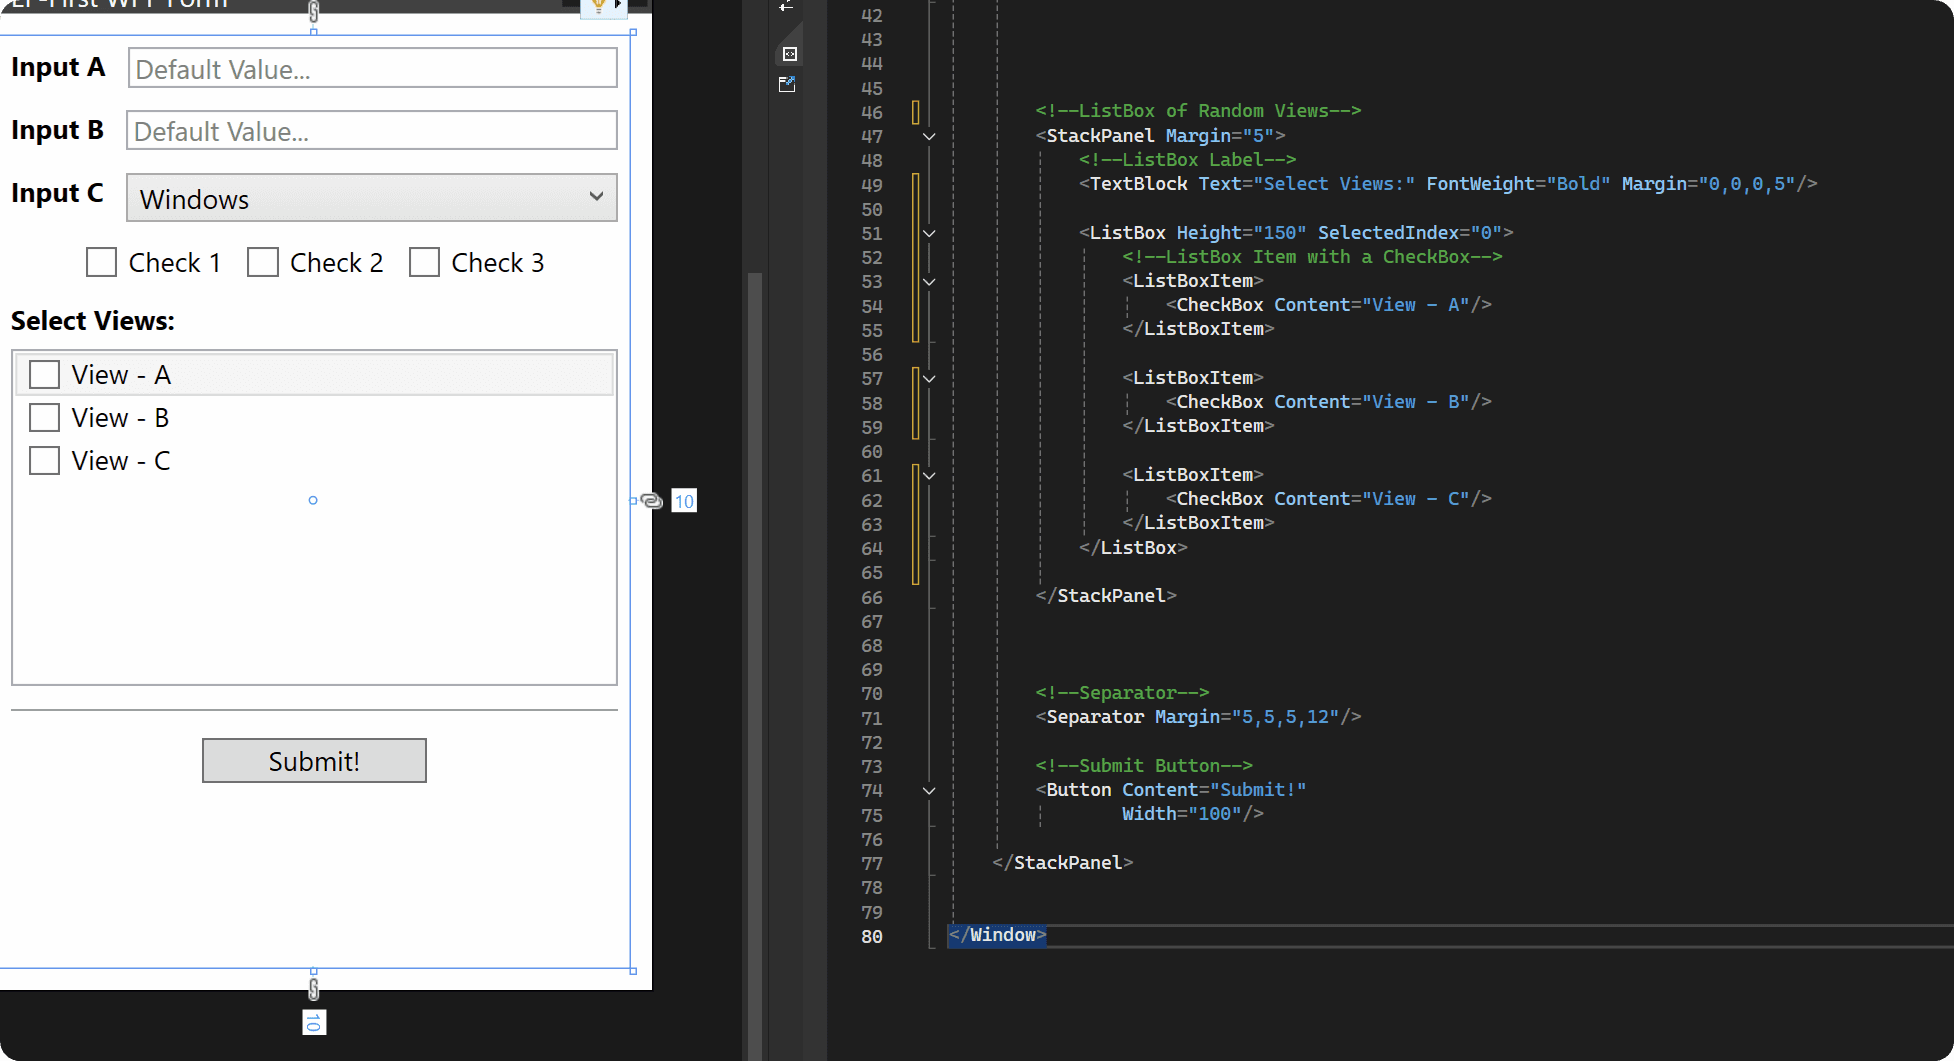
Firstly, let's just add here a <TextBlock> so it's more user-friendly and it's clear what we want users to select from the list.
It's also good idea to create a <StackPanel> to group all elements for the <ListBox> that we are about to create.
Here is the updated code and how it looks:
<StackPanel Margin="5">
<TextBlock Text="Select Views:" FontWeight="Bold" Margin="0,0,0,5"/>
<ListBox Height="150" SelectedIndex="0">
<ListBoxItem>
<CheckBox Content="View - A"/>
</ListBoxItem>
<ListBoxItem>
<CheckBox Content="View - B"/>
</ListBoxItem>
<ListBoxItem>
<CheckBox Content="View - C"/>
</ListBoxItem>
</ListBox>
</StackPanel>
Select Buttons
Next, let's add a few more buttons under the <ListBox> so we can provide users to:
<DockPanel HorizontalAlignment="Center" Margin="0,10,0,0">
    <Button Content="Select All" Width="100" Margin="0,0,10,0"/>
    <Button Content="Select None" Width="100"/>
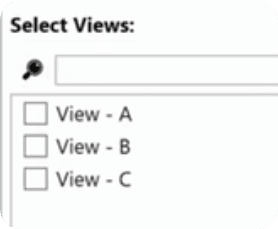
Setting Up the Search Box
Lastly, we will setup search box for this list. We can do that by creating separate elements and then we will add logic in our python code so it can interact with the <ListBoxItems>.
So we will create the search box by adding <TextBlock> and <TextBox> to a <DockPanel>like this:
<DockPanel Margin="5">
<TextBlock Text="🔎" Margin="0,0,5,0" />
<TextBox/>
Final XAML Form
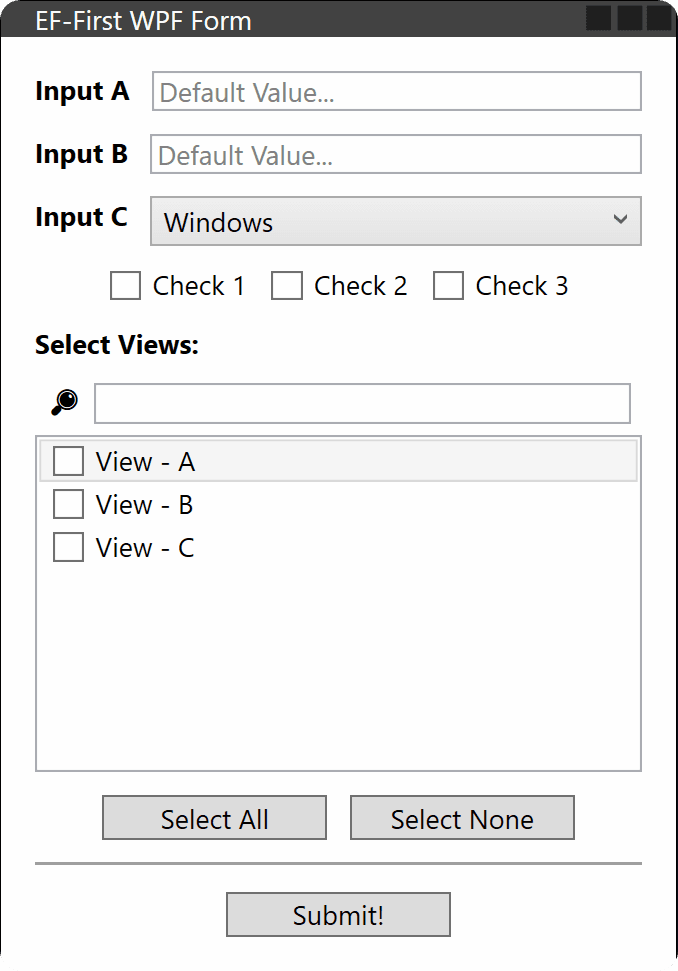
And after all these steps you should already have a XAML Code (front-end) for a very advanced WPF form.
And don't worry, we will keep working on this form during this 2nd module and we will add functionality one step at the time so you learn WPF by doing.
Here is the final code from this lesson:
<Window Title="EF-First WPF Form"
xmlns="http://schemas.microsoft.com/winfx/2006/xaml/presentation"
xmlns:x="http://schemas.microsoft.com/winfx/2006/xaml"
Height="450" Width="300" MinHeight="150"
WindowStartupLocation="CenterScreen" ResizeMode="NoResize">
<StackPanel Margin="10">
<DockPanel Margin="5">
<TextBlock Text="Input A" Margin="0,0,10,0" FontWeight="Bold"/>
<TextBox Text="Default Value..."
TextChanged="UIe_txt1_changed"
Foreground="Gray"/>
</DockPanel>
<DockPanel Margin="5">
<TextBlock Text="Input B" Margin="0,0,10,0" FontWeight="Bold"/>
<TextBox Text="Default Value..." Foreground="Gray"/>
</DockPanel>
<DockPanel Margin="5">
<TextBlock Text="Input C" Margin="0,0,10,0" FontWeight="Bold"/>
<ComboBox>
<ComboBoxItem Content="Walls"/>
<ComboBoxItem Content="Floors"/>
<ComboBoxItem Content="Roofs"/>
<ComboBoxItem Content="Windows" IsSelected="True"/>
<ComboBoxItem Content="Doors"/>
</ComboBox>
</DockPanel>
<DockPanel HorizontalAlignment="Center" Margin="5">
<CheckBox Content="Check 1" Margin="0,0,10,0"/>
<CheckBox Content="Check 2" Margin="0,0,10,0"/>
<CheckBox Content="Check 3" />
</DockPanel>
<StackPanel Margin="5">
<TextBlock Text="Select Views:" FontWeight="Bold" Margin="0,0,0,5"/>
<DockPanel Margin="5">
<TextBlock Text="🔎" Margin="0,0,5,0" />
<TextBox/>
</DockPanel>
<ListBox Height="150" SelectedIndex="0">
<ListBoxItem>
<CheckBox Content="View - A"/>
</ListBoxItem>
<ListBoxItem>
<CheckBox Content="View - B"/>
</ListBoxItem>
<ListBoxItem>
<CheckBox Content="View - C"/>
</ListBoxItem>
</ListBox>
<DockPanel HorizontalAlignment="Center" Margin="0,10,0,0">
<Button Content="Select All" Width="100" Margin="0,0,10,0"/>
<Button Content="Select None" Width="100"/>
</DockPanel>
</StackPanel>
<Separator Margin="5,5,5,12"/>
<Button Content="Submit!"
Width="100"/>
What's Next?
Now you should have the front-end of your form.
Next we need to connect it to pyRevit and that's where majority of people get stuck. But don't worry it's not that complicated and I will provide you the base template for WPF.
🙋♂️ See you in the next lesson.
- EF
🙋♂️ See you in the next lesson.
- EF
🙋♂️ See you in the next lesson.
- EF
Discuss the lesson:
P.S. Sometimes this chat might experience connection issues.
Please be patient or join via Discord app so you can get the most out of this community and get access to even more chats.
Discuss the lesson:
P.S. Sometimes this chat might experience connection issues.
Please be patient or join via Discord app so you can get the most out of this community and get access to even more chats.
Discuss the lesson:
P.S. Sometimes this chat might experience connection issues.
Please be patient or join via Discord app so you can get the most out of this community and get access to even more chats.
