
Resources
Final Code
Summary
Breaking the Stereotype
Many of you think that it's still very hard to create custom Revit add-ins.
And I want to break down this stereotype and take you step by step through the process of creating new tools for Revit.

Most importantly, I want you to feel what it's like to create custom Revit add-ins.
Once you create your first button, you'll want to create more. That's how we all start, and the best way of learning is actually by doing.
So let's get you in the Developers Flow.
Prerequisites
Before we begin, I expect that you already have your own custom pyRevit extension created, either with my EF pyRevit starter kit or on your own.

It only takes 2 minutes to create your custom pyRevit extension and you can watch this lesson if you need help.
But if you already have your toolbar, let's move to the next step.
Create Your First pyRevit Pushbutton
Let's create your first pyRevit button.
I'm going to create my button in my Dev.panel. It's the perfect place for new tools that you are developing, and later you will move them anywhere else once they are ready.
As you already know, pyRevit extension is based on a folder structure.
You can compare folders to what you see in Revit and everything will make sense. Or read pyRevit Docs for more.
Then open the panel where you want to add your new tool (I use Dev.panel).
And duplicate one of the existing tools or create a new folder and rename to FirstButton.pushbutton

💡Make sure you spell "pushbutton" correctly. If you cannot see your button appear in pyRevit after reloading, it probably means that you misspelled "pushbutton".
Here is a sample diagram of the folder structure.

Add Icon and Prepare Script Template
Next let's drop a new icon so it looks different. I always get my icons from icons8.com. Just make sure it's less than 96x96px and you name it icon.png.
💡You can also add another icon_dark.png in case you want different icons based on the Revit Theme (dark/light)
Script Template:
Then open up the script.py and either change something from duplicated button or paste your starting pyRevit Template.
I will paste my template.min:
💡 Don't forget to adjust title and doc so you can recognize your new button.
And spoiler alert: we will create a tool to rename views.
Importance of Brainstorming
Now, before we start coding, we actually should grab a piece of paper and a pen and do a little brainstorming to decide what kind of tool we are creating and create initial code skeleton with smaller steps.
This is necessary as it helps you to think more like a programmer, and you might discover some hidden steps in between that you need to address to avoid errors.

💡It doesn't need to be beautiful or very detailed. It just has to make sense to you!
💡Also, I like to rewrite the diagram many times as it helps me think it all through while I'm writing. That's my way of thinking deeper about the problem and find a better solution.
Brainstorming
In this lesson we are going to create a simple tool to rename our views in Revit with Find/Replace logic. This will help me show you multiple concepts of Revit API.
So here is my diagram of what we will code in this lesson.

Select Views
Get Selected Views in Revit UI
or Select Views from List
Define Renaming Rules (Find/Replace)
Create new View Name
Ensure View Name is Unique
Rename Views
This is what we're going to code, and you can use it as the comments in your code or however you like it. I'm just going to keep the paper in front of me and follow along.
Let's begin coding
Step 1: Select Views
Firstly, we need to get views that should be renamed, and we will combine 2 approaches.
🅰️ Firstly, we will try to get selected elements in Revit UI, and look if there are any views selected (in Project Browser). If yes, then these will be the views we want to rename.
🅱️If no views selected, then we will ask used to select views from a list of views. And to do that we can use pre-written function from pyrevit in forms.select_views
Here is code snippet:
Step 2: Define Renaming Rules
Once we have some views, we need to define rules for renaming. For this tool we will need 4 arguments:
prefix
find
replace
suffix
💡Hardcode these values during development.
Ideally, it would be nice to have a UI for a user to provide these values, but during development that will slow us down. So instead, just hardcode these values and come back to this step later, when everything works.
Let's hardcode these values:
Create Transaction
Now, before we go any further, we also need to create a Transaction.
In Revit API whenever you want to modify your project you need to Start and Commit a Transaction. This is a protection step to ensure that you can only make intentional changes.
💡This is great for beginners, as it allows us to explore Revit API without a fear of changing anything by accident.
Here is how to do that:
💡Code that makes changes should be between Start and Commit.
And don't worry if you make a mistake, everything will be RolledBack and you will see an error message.
Step 3: Create New View Name
Now we can use renaming rules to create a new View Name. And it's very simple:
Step 4-5: Rename Views + Ensure Unique
Now we need rename our view and ensure that our view name is unique to avoid any errors.
We could get a list of all view names to check it, but I find it much easier to try to rename the view, and if you get an error then it means that this view exists.
Here is how to do that:
You will also notice that I use for-loops instead of while loops, because I hate it when I get stuck in an infinite loop because I forgot to add break statement.
💡Additionally, you can make sure you avoid using any forbidden characters like this:
Test in Revit
By this point you should have a working script, and it's a good idea to test it in Revit with all use-cases you can come up.
Select Views in Project Browser
Don't select anything and select views from list
What if you cancel during selection
What if you select Sheets instead of views?
Just try to break your script and see if you find issues. And if everything works well, then we are nearly done.
Just 1 more thing.
Bonus: Add UI Form
As you remember, we've hardcoded renaming rules in Step 2. This is not the most user-friendly experience, right?
Probably nobody will open up your code and change this values to rename differently. So instead we will want to create a simple UI form.
There are different ways to create a custom UI form, but I think the easiest way for a beginner is to use FlexForm in rpw module.
🎦Check the video from this lesson to learn more about it.
But here is the code:
And here is how this custom UI form will look like:
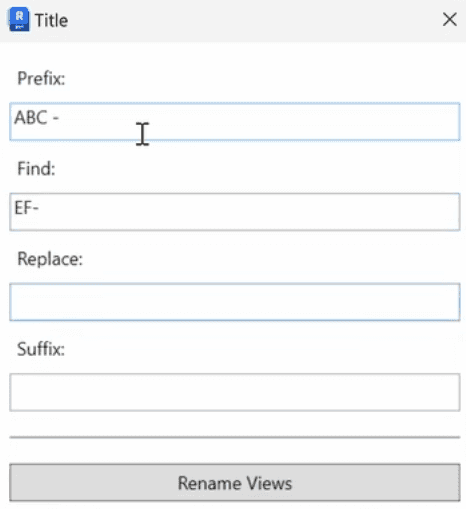
This is more than enough to get the user input to make this tool much more usable.
Also, keep in mind that you will learn a lot more about creating custom forms for pyRevit tools. I will cover various options including a bonus course: WPF Course for pyRevit Users, which will teach you how to create any form with WPF.
Final Code
Now, let's put everything together to avoid any confusion.
Here is final code:
Conclusion
Congratulations!
Now you know how to create new tools in pyRevit, and it's just the beginning. As you will discover, many ideas will help you in your daily work.
Start small and focus on quantity over quality at first, and over time you'll create so many different tools and have a lot of code examples and creating new tools will be so much easier.
In my case, I can create new tools where I copy-paste more than 80% of the code from previous tools because I have so many examples already, and so will you.
Happy Coding!