
Resources
Summary
Why Back Up Your pyRevit Code
As pyRevit developers, you should all back up your code regularly. We all postpone it until one day we lose a chunk of data and then regret not doing it earlier.
I speak from personal experience, as I've also lost a bunch of scripts because I rushed and made some mistakes.
So let's back up your code before it's too late.
Backup Options
Firstly, Let's discuss your backup options.
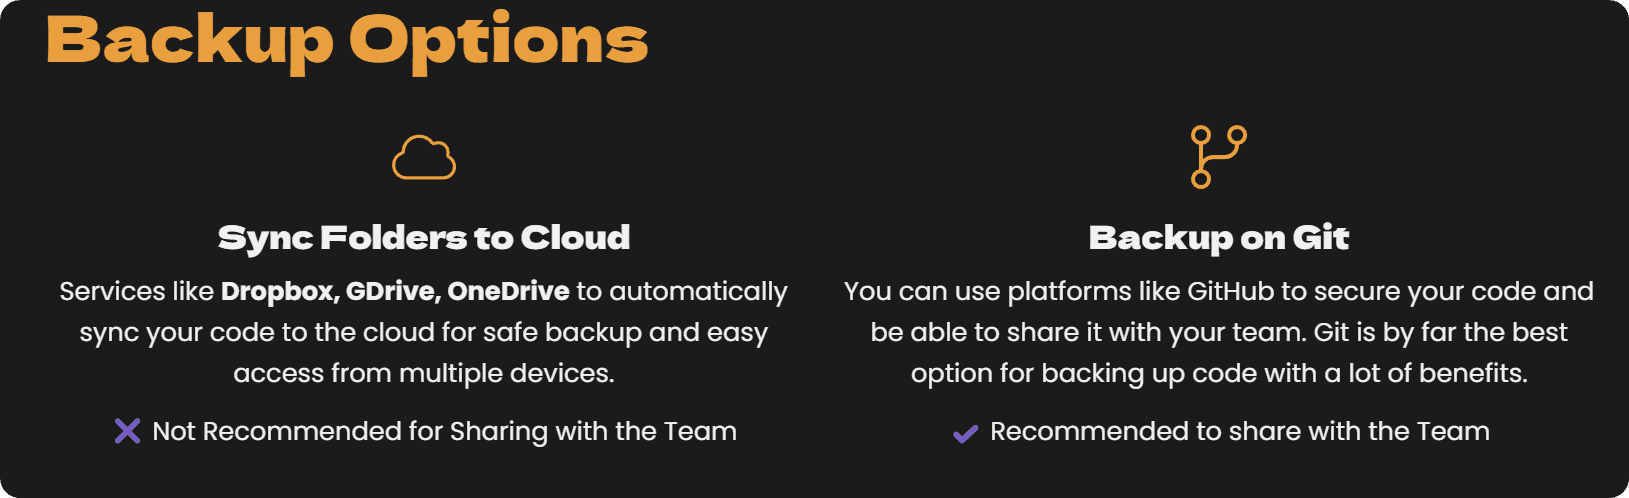
Local Storage: You could take an SSD drive, connect it, and drop your files there once in a while, but this is not robust.
Cloud Sync Services: Many people like to sync folders to the cloud using services like Dropbox, GDrive, or OneDrive…
They automatically sync their code to the cloud for safe backup and easy access from multiple devices. But this option is not recommended for sharing your extension with the team as it can produce some unexpected error messages.
Git: Instead of that, you should all back up your extensions on Git. This is the best option by far for any code.
You can use platforms like GitHub to secure your code and be able to share it with your team.
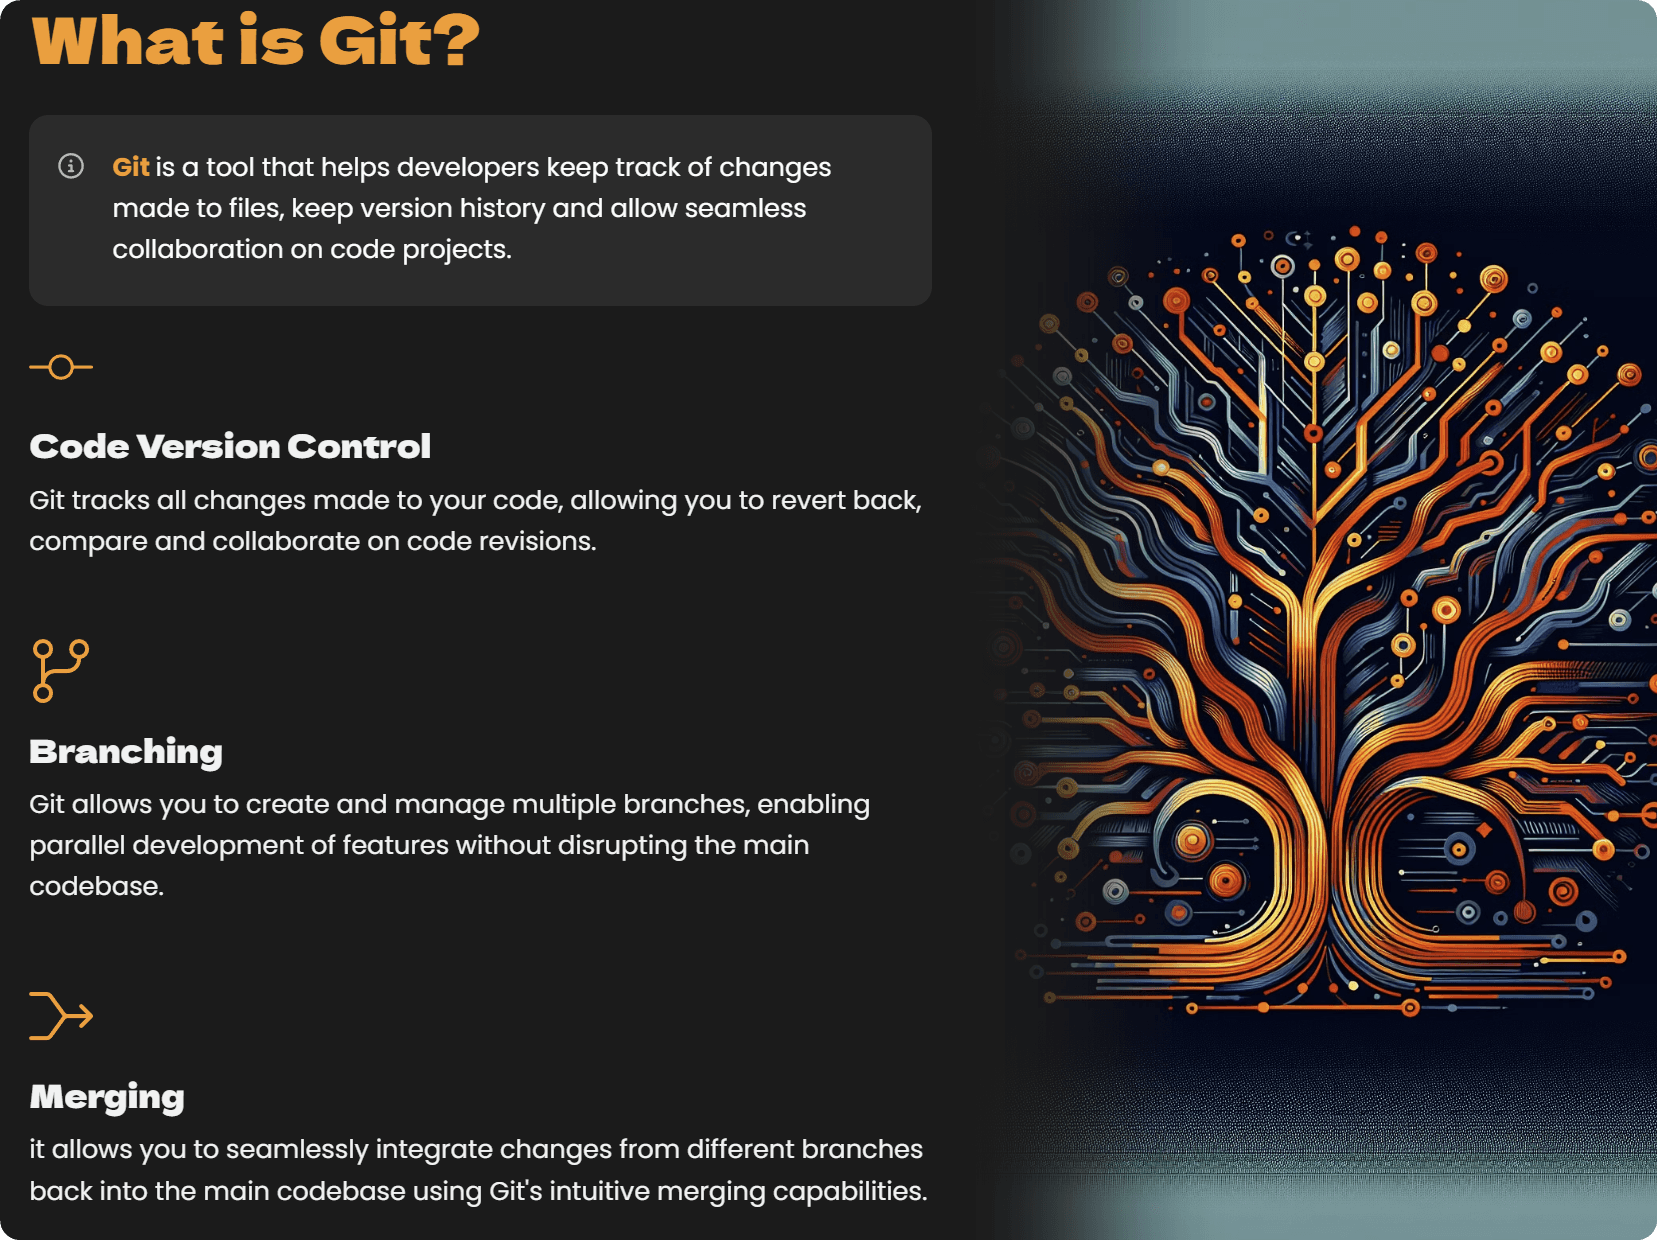
What's Git?
Now, let's talk about what is Git.
Git is a tool that helps developers to keep track of changes made to files. It keeps version history and allows seamless collaboration on code projects between different developers.
I know it still sounds confusing, but let's have a look at a Git example.
Git Example
Have a look at this visual example of a Git branches.
Each dot represents a saving point on the git, and you can see that it can branch out from the main 'Master' branch (Green line)
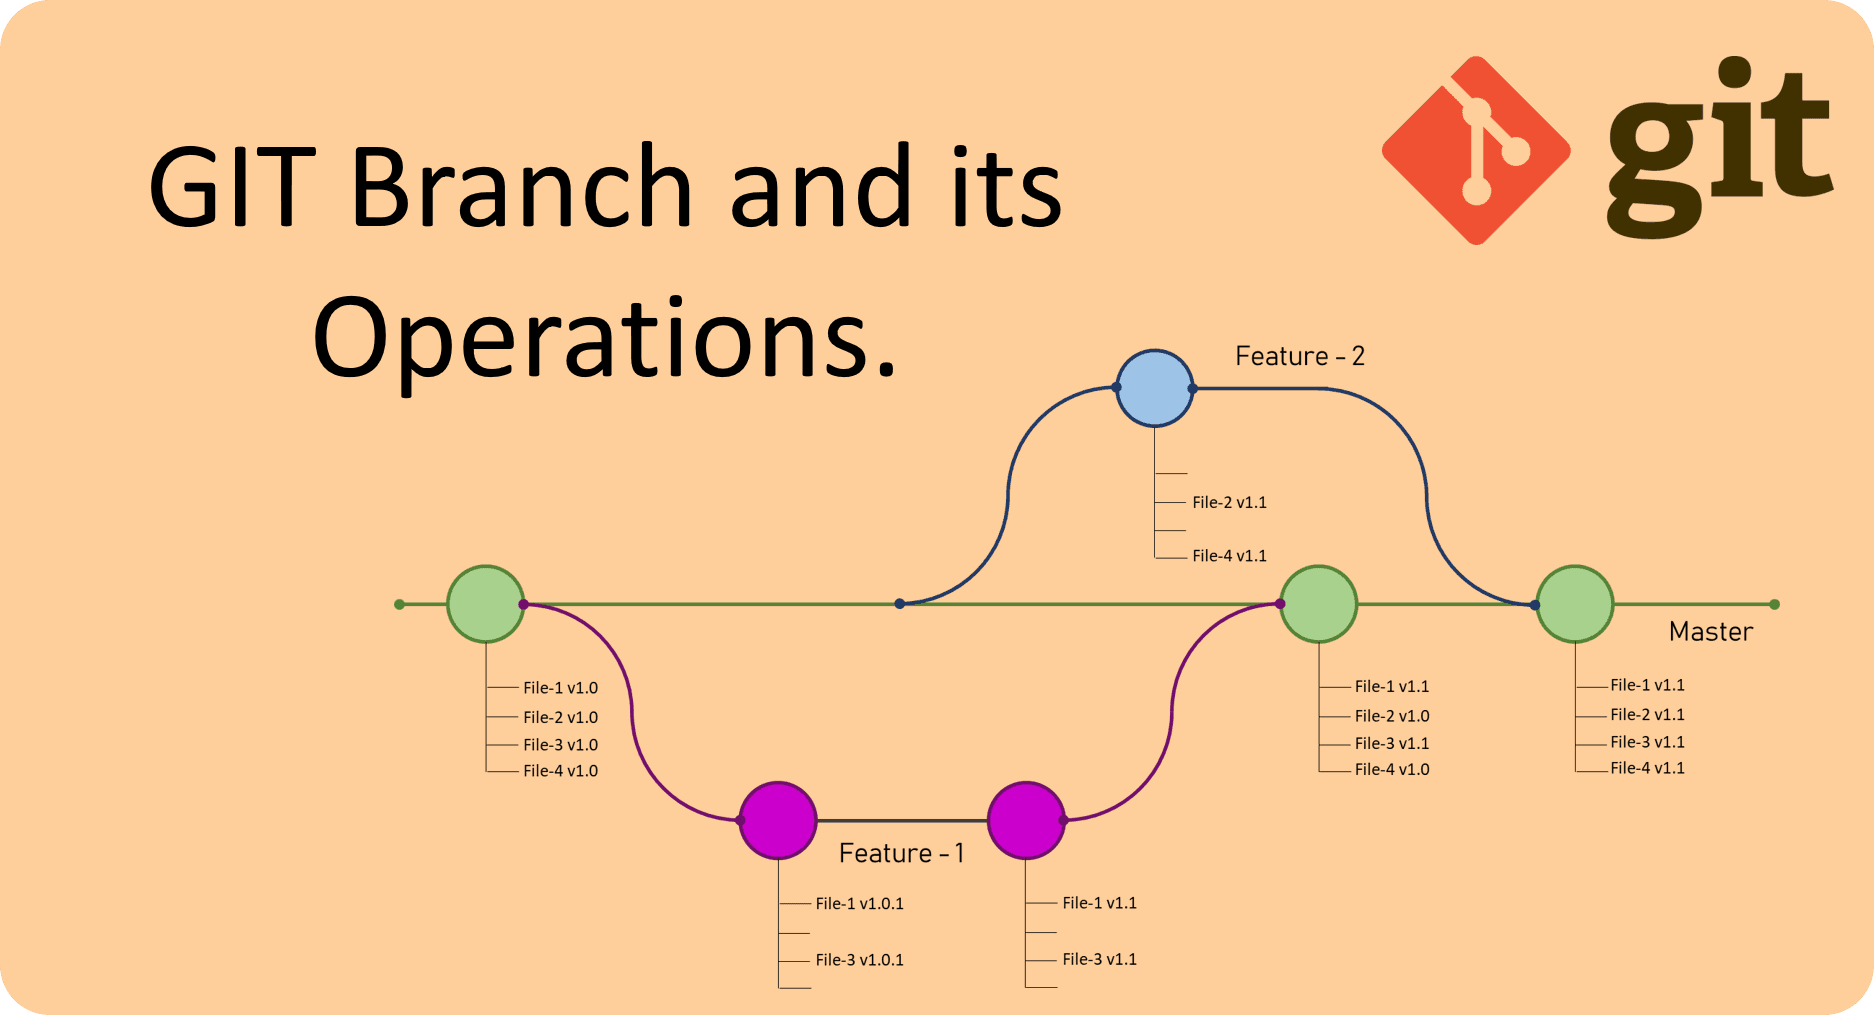
Imagine a green line in the middle representing the main codebase of your repository. Each dot represents updates or saving files to your Git branch.
Starting Point: On the left, we start with the first dot, and in there, we have files 1, 2, 3, and 4, all with version 1.0.
Feature Development: You decide that you want to work on Feature One and you don't want to affect the main branch. So we're going to branch out to the Feature One branch, and you're going to modify files 1 and 3. You save two times.
Another Feature: Then, somewhere in the middle of working on Feature One, you also decide to work on Feature Two. So you make another branch and work on files 2 and 4.
Merging Back: Whenever your features are ready, you're ready to merge them back into the main codebase. You can see that Feature One went into the first green dot on the right, and Feature Two went to the second green dot.
The best part about Git is that it allows you to monitor all the changes that you make.
You can compare any states, and you can see all the code changes. If you ever need to go back in time and look at what the code state was and bring it back, it's all possible. This is the main benefit of using Git for backing up your code.
How Do You Use Git?
There are multiple option on how to use git.

When you want to use Git, GitHub is by far the most popular and free option.
There are a few otoher providers like BitBucket and a few others, but they can only compete on enterprise level in my opinion.
Install GitHub Desktop (Beginner-Friendly)
Now we've finished the main points about Git in this presentation, and it's time for practice. Let's setup the most beginner-friendly option.
Download GitHub Desktop
Install as usual
Create GitHub Account
Login in GitHub Desktop to your account
If you need help with any of these steps, refer to the video where I show you how to do that step by step.
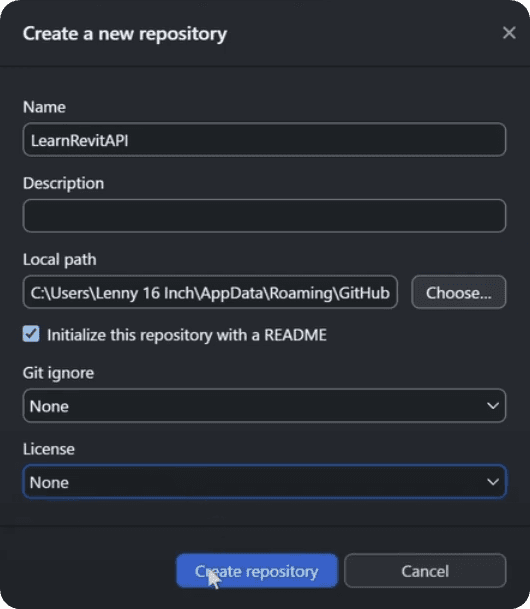
Create New Repository
Now let's create a new repository. Think of it as a folder on the GitHub.

This is not a complicated step, just provide a few details and click on Create Repository.
Next Make sure you publish your repository so you can actually see it on the GitHub.

Now you can open your GitHub account and check your repository.
Add pyRevit Extension Files
Now you have a folder on your machine that is synced to the GitHub repository. Now you can put all your pyRevit files inside this folder.
Then you will need to:
Select Files to 'Commit"
Provide name for the change
Click on Commit to main branch (Accept the Change)
Push to Repository (Send Data to GitHub)

GitHub Secret
Btw, there is a really cool secret about GitHub that no many people are aware of. You can open your Repository on the GitHub website and then you can change website domain from .com to .dev and it will open web version of VS Code IDE, which is much better way to explore GitHub.
You can even make changes and commit them.
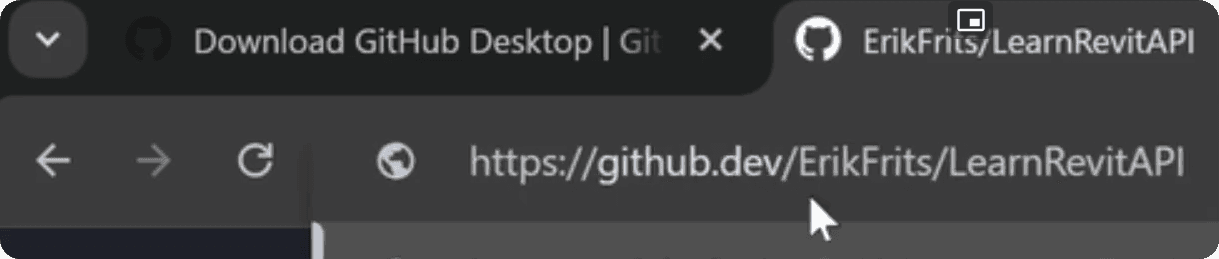
One you do that this is how it will look:
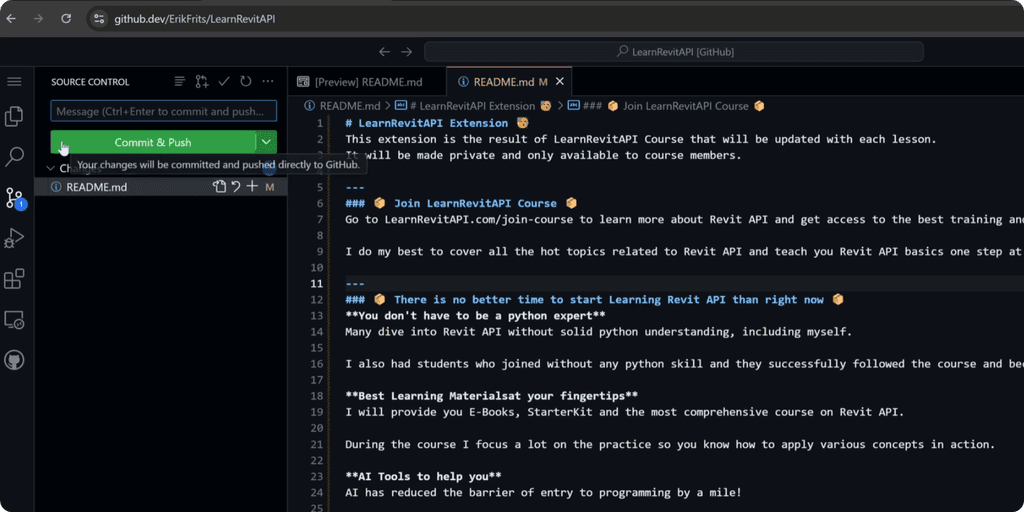
You can browse around the repository, or you can even make changes and commit them to the repository. It's great way to interact with GitHub .
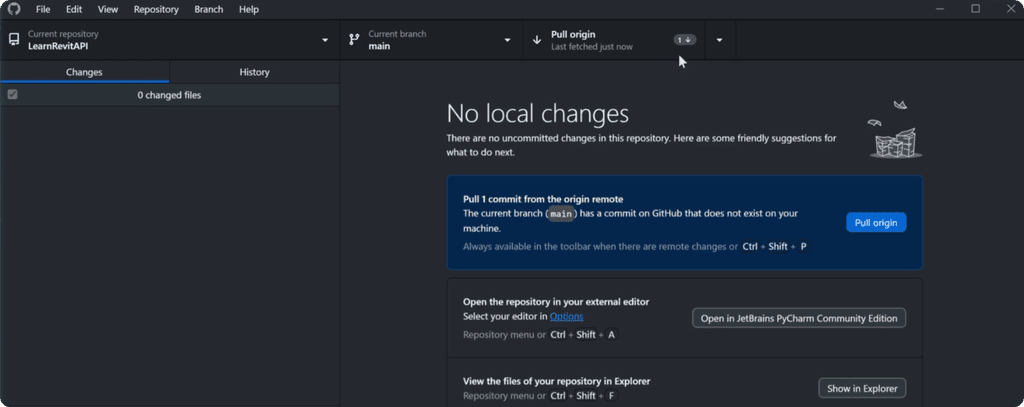
Git Pull (Get Changes from GitHub)
When you work with multiple people or on multiple machines, you will have to not only push (send files to GitHub) your changes, but also pull (get files from GitHub) whatever was changed on Git.
Overall it's very simple, you will have a button in GitHub Desktop that says Pull origin whenever there are changes.
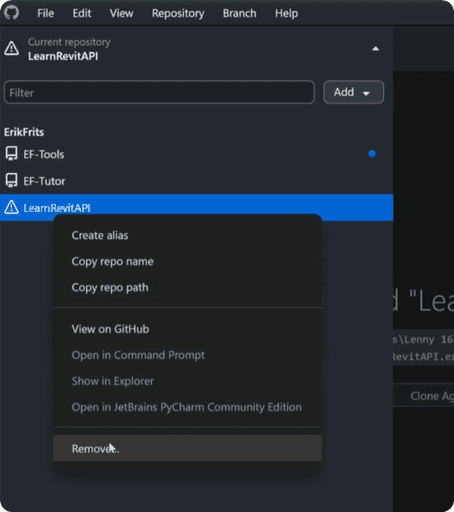
Rename Local Git Folder
We are almost ready to place your pyRevit extension on GitHub.
However, there is one big thing you might notice. We've called our extension something like:
LearnRevitAPI.extension
But our GitHub Repository is called
LearnRevitAPI
And we really need to get that suffix. And it's not an issue. There are different ways to do that, but the simplest is to just rename the folder to whatever you need it to be. In our case LearnRevitAPI.extension
And once you do that, you will notice this warning message:
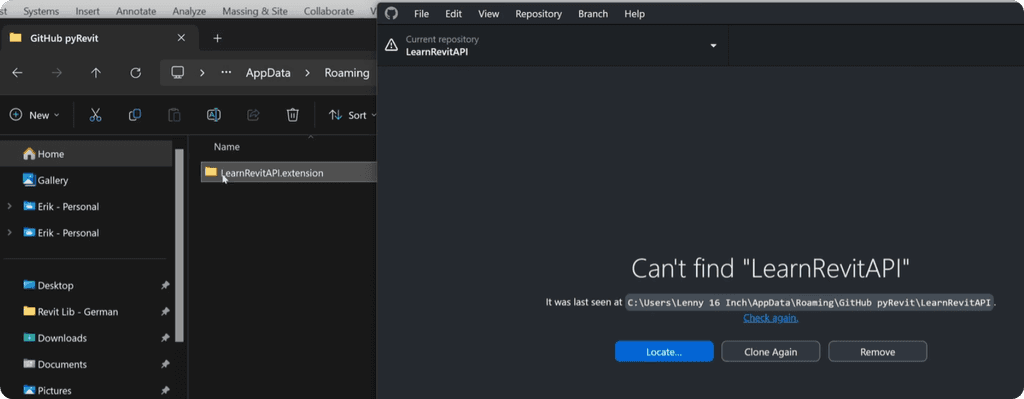
Don't Worry, it's not an issue. We just need to locate this folder again, and then GitHub will continue working as it should, while having the folder named correctly.
Alternatively, you could clone your repository from GitHub and rename the root folder during this process.
Overall, it's not complicated!
How Other Devs should install?
Now, let's have a look how do we install our extension for other developers.
Maybe you want to set it up for you on multiple machines, or maybe you have other people working with you on the code. Either way, we need to get GitHub Desktop and sync GitHub repo on our machine.
I will completely remove my local GitHub repository so I can pretend like I'm on a new machine.
To add a new extension, we need to click on Add button in GitHub desktop and select [Clone repository…]
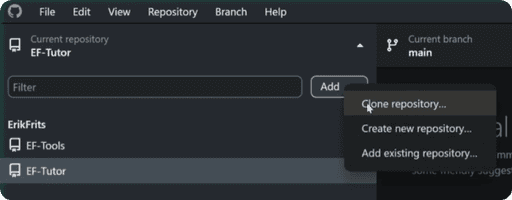
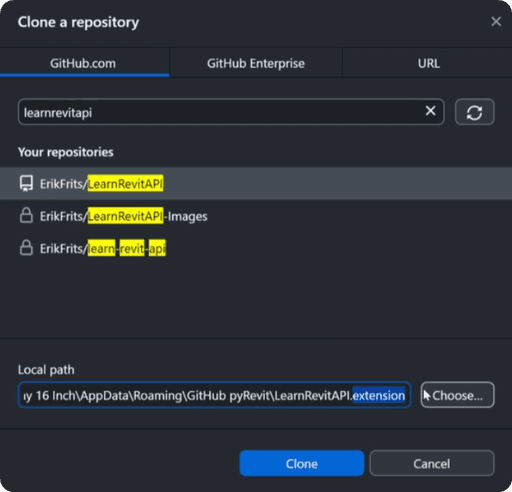
This will open a new menu where you can select from repositories available to your GitHub account. In my case I will use search to find it, and then click on Clone when I'm ready.
💡While you do that, you can also adjust the root folder name in the Local path box. Make sure you add .extension in the end of the folder name.
And that's it!
Now you have this pyRevit extension on your local machine and synched to GitHub repository. Just make sure you provide the path where it's located in pyRevit Settings so your extension is shown in Revit.
Git Branching
If you work in a team of developers, consider learning more about Git Branching.
This will allow you to work on new tools or features without disturbing the main codebase of your GitHub repository. It's a great way to still back up everything online and then merge back when it's ready.
I won't go in that detail, but just know that it's worth exploring.
Git Ignore
When you work on a Git repository, often you will have temp or cache files in your folder that you don't want to sync on GitHub repo.
And while you have an option to select and deselect everything that you commit, it can get really annoying when you will have hundreds of these files…
So there is a way to ignore certain files based on their:
Folder Name
File Name
File Extension
Certain matches
And so on…
There are really a lot of ways you can ignore files by using .gitignore file.
Luckily, in GitHub desktop you can simply right click on any file you don't want and add it to gitignore with following options.
This is the best way to ignore files for beginners and then once you see the syntax in the gitignore file, you will realize that it's also not that complicated.
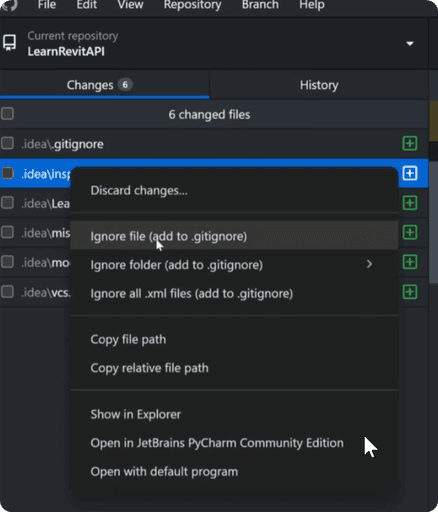
💡 Make sure you commit .gitignore file to GitHub to make it work!
Also, if you are interested, you can see gitignore guide here.
Share Extension with other Users (Locally)
Now let's have a look how to share your extension with other non-coder users.
If you work in a small company - the easiest way to share is to place extension on the shared drive on your server.
You as a developer will have control to easily sync changes to GitHub when needed, and other users can reference the folder in pyRevit settings so they can see your extension.
💡Be aware that placing extension on OneDrive, DropBox or similar services might not be as stable as storing locally or on a shared server drive.
Share via pyRevit Extension Manager (Public)
Alternatively, you can add your extension to pyRevit Extension Manager.
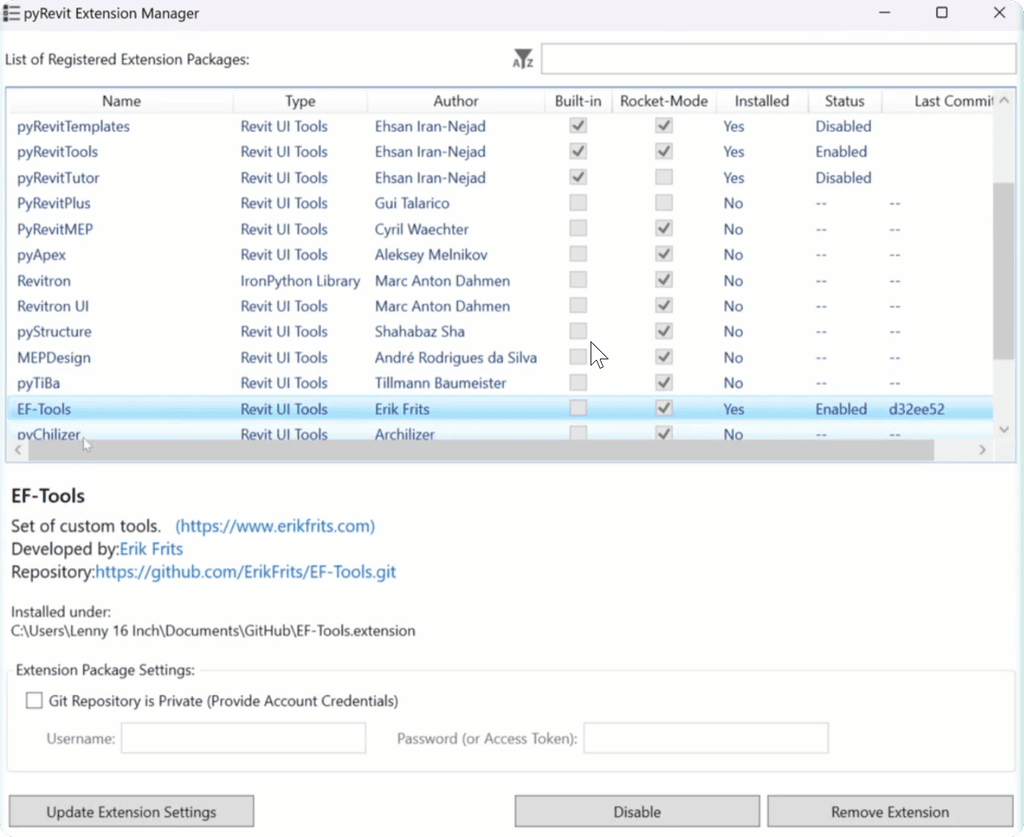
If you want your extension to be available to the whole world, you would need to reach out to pyRevit Dev team and provide them your GitHub repo and some details. You can learn more here.
But you can also add a little information to a .json file yourself to make it available locally to your users.
Create extension.json
Firstly, create extension.json file in your .extension folder. In there you need to write some information about your extension. Here is what I wrote:
Just adjust it to your needs and don't touch settings that you don't understand.
Focus on:
name
description
author
url
website
Leave the rest as it is.
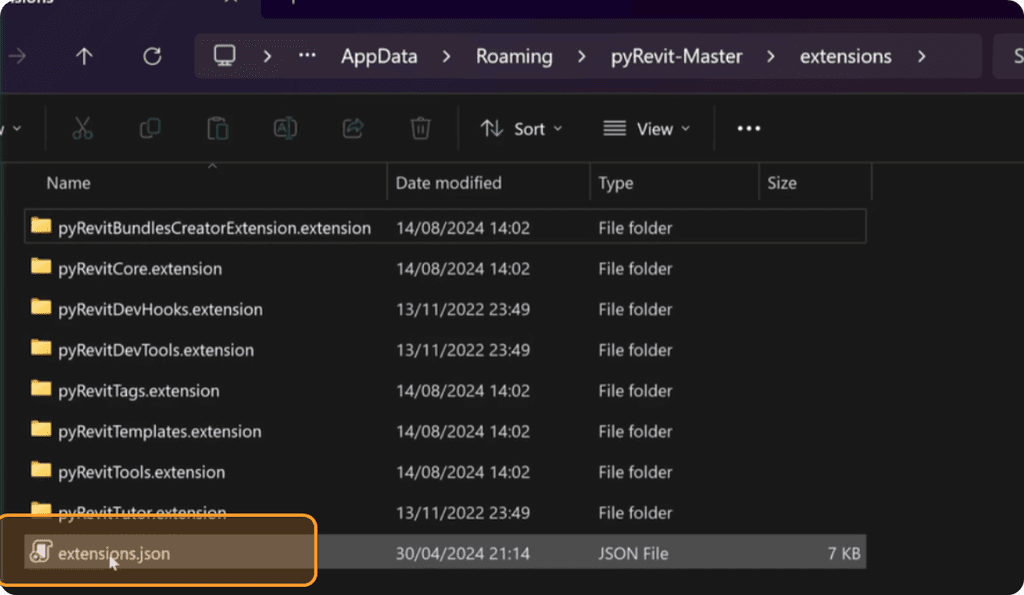
Add to pyRevit's extensions.json
Next, you would want to copy everything you wrote in that file and place it in the pyRevit's json file, which is located in pyRevit-Masters folder.
💡P.S. Sometimes your pyRevit-Masters is located in Program Files folder.
Firstly, find the pyRevit-Masters folder. It's usually located in your AppData folder. You can use a shortcut to access this folder.
Type %appdata% in the path and it will open the right folder.

Once you find pyRevit-Master, open extensions folder and then you need extensions.json file.
Inside you need to add your information in the end of the json file.
💡Be very careful with the syntax of json file. It's quite fragile to all the commas and curly braces, so double check what I do in the video.
Alternatively, you can ask Chat GPT to help you. Provide original file and your own file and ask it to add it to the list. I'm sure it will do a great job.
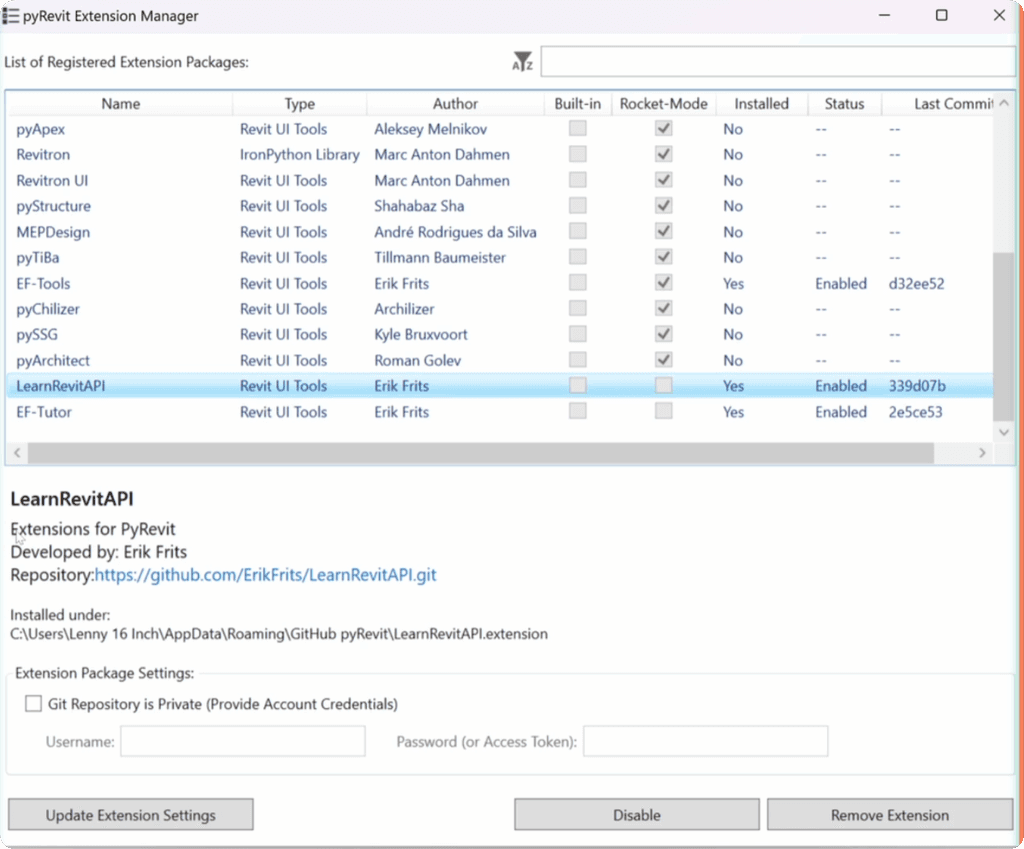
Once you do that, you will be able to find your extension in pyRevit Extensions Manager. This might be a great way to share your extension with other users so they can also update it any time they want.
Share pyRevit Extension from Private Repo
You can also share your extension hosted on private GitHub repo. Then you would also need to provide an access-key during installation.
💡Keep in mind that GitHub keep increasing security measures and make it more complicated.
We used to be able to use our GitHub password, but then they changes it and we have to generate access-token with limited expiration time (up to 6 months I think..).
❌💡This method used to work fine, until GitHub has made changes (again…)… At the moment of recording there was another change in GitHub, and the method didn't work properly…
So instead, you can download your code locally and link pyRevit Settings to your extension. This would be the easiest way to do this.
I will try to update the guide once pyRevit has a fix for this. Probably need to update package used for syncing git.
Sorry for inconveniences, I need to focus on other things right now.
Conclusion
And that's it for this lesson.
It was longer than I expected, but it's really important that you start backing up your code as soon as possible. Trust me, you better spend some hours now than lose days of work later…
Keep in mind that even someone like me has lost his work because of a stupid mistake made in a rush. I lost a bunch of tools and code snippets, and I wish I had a backup before it happened.
HomeWork
Find a way to backup your code as often as possible.
Spend a few hours now to save days later.
⌨️ Happy Coding!