Resources
Lesson Objectives
Create Logic in Python
if/elif/elseStatementsLogical Operators in Python
Are you Ready?
Lesson Summary
Intro
It’s time we add logic to our python scripts which is essential for any code. You will often need to execute different code depending on your condition.
For example: If you want to learn more, continue watching. Else, skip to the next one.
Did you notice what I just did here?
I’ve created an if/else statement to decide on a right action depending on the condition. That’s how we create simple logical statements in python. And don't worry, I will break it down in simple terms.
So, Let's dive into that.
Revit Comparison
Firstly, before we begin with logic in python, let's look at logical statements in Revit.
I find it always helpful to find a middle ground to explain programming concept. And what's better than Revit, right?
Think of Revit Family Parameters for a second.
As you remember, we also create logical statements by using if keyword.
For example if(5>0, 'a', 'b') or if(condition, True_value, False_value)

That's already very close to python.
I'm going a little bit ahead of myself, but here is a similar statement in python.
So, how does it work?
Basic Syntax of Logical Statements
To create a logical statement in python we need to use if keyword and then provide a condition. We will look into various conditions in a moment, for now let's use simple 5 > 0 condition, which always results in True.
Once you create an if-statement with a condition, then you have to end it with a colon :. After that you create a code block that will be executed if condition is True.
Here is a simple example
Hold on, what is a code block and why are there 4 spaces/ 1 tab for the next line?
Code Block - is a piece of code that is grouped under certain statements (including if statements). Many programing languages use curly braces {} to define the Start and the End of the code block, however python uses indentation.
Identation - refers to the spaces or tabs at the beginning of a line of code. So in python all lines should be aligned to create a code block. Usually it's done with a single Tab or 4 spaces.
So, you create an if statement with a condition, and then your code block under it will only be executed if your condition come to True.
💡If condition results False, then you code block will never be executed. Python will skip it.
Also, keep in mind that when you create logical condition in python like 5>0, it results in either True/False. So if you would try to print it, you would just see a boolean.
That's important to know because you can also store that in a variable.
You can read the code above as following:
condition is five is more than zero. If condition is True, then print me condition itself.
More Logical Statements
Logical statements in python always start with if keyword. However, you can also have additional statements to create more logical checks.
if- Create first logical testelif- Create More additional logical tests (optionally)else- Define code to execute if no previous logical test were True.
In general, you always start with if statement and a condtion.
Then, you can create more conditions with elif for each. (elif is short for else if).
And lastly, you have an option to define code if there wasn't a single True condition.
💡Keep in mind that if you've created if/elif/else statements, only one will be executed, depending on the conditions. Once something came true then the rest will be ignored.
Here is how it looks:
In the Example A:
Only one code block can be executed if you use if/elif/else combination. Even if multiple can come to True, once the first one evaluates to True, its code block will be executed and all the rest will be ignored.
If you try the code, you will only see 'A' printed in the console.
In the Example B:
In the second example, both code blocks can be executed. Because each if statement is unrelated to another one. So no matter the results, both of these statements will be checked and code block executed if True.
If you try the code, you will see both 'A' and 'B'.
💡 Don't overthink it. It's a simple concept once you use it a few times.

Example 1 : if/elif/else Statements
Enough of the theory, let's experiment with logical statements. I recommend you to check the video about this example as I will write it out step by step.
In the written summary, I will provide you the whole snippet and then explain what's going on and why. Here is the snippet:
So, in this code you can see that we've defined our temperature as 30. And then we created multiple if/elif statements with different code blocks. However, only 1 code block will be executed, depending on the temp value.
The reason to use many elif statements instead of multiple if statements, is because you only want 1 result. If the temperature is 30, then you would only want the first code block to be executed. It can be evaluated to True in all 3 conditions. Once something is True, the rest will be ignored.

You could use multiple if statements, but your results would be very confusing. You would get Hot, Warm and Chill results on a single temperature. That's not what you expected, isn't it?
I recommend you to copy this snippet and change temperature and try experiments with if/elif to see the difference.
Comparison Operators in python
Alright, let's go through various logical operators in python, starting with simple comparisons.
💡 Notice that single equal sign = is used to assign data to a variable, while double equal sign == means equal comparison.
Logical Operators (And/Or/Not)
Also, keep in mind that you can combine multiple conditions together wit And/Or logic. And it's pretty simple.
Here is the basic syntax:
When you use:
and - All conditions must be True - At least one condition must be
orTrue - Make opposite result (
notnot True = False…)
Example2: Combine Conditions
Let's create a simple example where we have 2 coordinates (XY), and we want ot make sure that both of them are between 0 and 100.
Here is how we could combine everything into a single line:
We could also create many nested statements that would look something like this:
I think we can both agree that the first option is way better, takes less space and easier to read. The second statement is an overkill.
However, if you would need to create more steps in between, the second step could be the only option to achieve it.
Logical or Example:
If you want to see another example using or, imagine that we've selected a list of categories and now we need to make sure that at least one of the required categories is selected.
Here is how it could be done:

Notice that not only I used multiple or conditions, I've also split them into multiple lines by using parenthesis.
That's a trick in python if you want to make your code more readable and split each condition on new line. It doesn't have any difference, except for readability.
Membership Operators
Lastly, you also need to know about membership operators. This allows you to check if something is a collection of items (including strings).
That's a very used operators as you will often need to test if something is already inside your list or not to proceed with your code.
Here is an example:
Example 3: Nested Statements
Alright, let's create another example with logical statements.
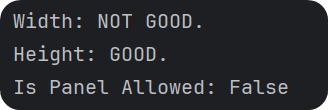
Imagine that you are a Facade panel manufacturer. And you need to make sure that all panels you create do not exceed the limits:
max_width = 1500 mmmax_height = 3000 mm
Then, someone sends an order for a 2000x2500mm panel. Now you need to use python to check if you can produce it or not.
Here is how you could do that:
Define Max Sizes
Define Ordered Sizes
Create
If/elsestatements for WidthCreate
If/elsestatements for Height
You could also create a variable to track if it's possible to do.
This is the result you would get from the last example:
Homework
If you haven't understood something during this lesson, then I highly recommend you to go over the code and write it yourself with minor changes.
💡Don't be afraid to make changes or even write your own code after looking at mine. Experiment and practice as much as you can as that's how you will become a pyRevit Hacker.
And else, if you understood everything, then continue to the next lesson.
PS.
Did you notice what I just did?
⌨️ Happy Coding!
Questions
How many elif-statements can I create?