Lesson Objectives
Learn about pyRevit Folder Structure
Download EF-pyRevit StarterKit
Create Your Custom Revit Toolbar
Are you Ready?
Lesson Summary
Create Revit Toolbar with pyRevit
As promised this will be the most rewarding lesson as all of you will create your own custom Revit Toolbar that will look something like this:

And don't get scared away, this will be very simple to do as I've prepared a special pyRevit StarterKit that will allow you to do that in just 2 minutes. It includes everything you might need for pyRevit development:
Extension Template
Links to Resources
Code Templates
Code Snippets
E-Books
Documentation
Tutorials
And More!
So let's do that together.
Download StarterKit
Firstly, download the EF-pyRevit StarterKit.
Click the button below or under the video to download .zip file.
Inside you will find a pyRevit folder template for your future Revit extension. We will use it in a moment. But first, let me give you a bit of theory on how pyRevit extensions work
pyRevit Extension Basics
Creating a custom toolbar in pyRevit revolves around organizing folders in a specific way, so pyRevit can understand what each folder represents.
In general here is the folder structure anatomy for pyRevit Extension:

That might look a bit overwhelming but it's actually very simple and you don't even need all of these folders.
You can get away by only using the left column folders like extension + tab + panel + pushbutton. That's the bare minimum pyRevit needs to display your toolbar.
Keep in mind that you need to include these suffixes in your folder names so pyRevit recognizes it correctly.
For Example:
📁pyRevitHacker.extension
——📁pyRevitHacker.tab
————📁Dev.Panel
——————📁FirstButton.pushnbutton
————————📄scipt.py
————————🖼️icon.png
👆
This is the simplest pyRevit Extension
pyRevit - Basic Folders
Let's breakdown each of the folder types one by one so you understand how it all works together. Also, you don't have to recreate these folders as you will use my template in a moment to save a lot of time.
📁.extension
This is the root folder of your extension. Think of it just as a container that contains everything you need for your tools.
You can name it anything you want but make sure it has .extension in the end.
Example: pyRevitHacker.extension
📁.tab
This folder represents the tab you will see inside of Revit. You can write whatever name you want to see on your ribbon before .tab suffix.
e.g. pyRevitHacker.tab
💡You can have multiple tabs inside of a single extension. That might be useful to separate your Architectural.tab tools from MEP.tab and Structure.tab, or however you prefer.
📁.panel
Panels help you organize your tools into distinct panels inside of your toolbar like this:

You can have any number of panels in your tab folder, as long as they can fit on the screen.
Name it exactly how you want them to be named inside of Revit.
e.g. Views.panel | Dev.panel …
📁.pushbutton
Lastly, this folder represents the button itself that you will be able to interact with inside of Revit.
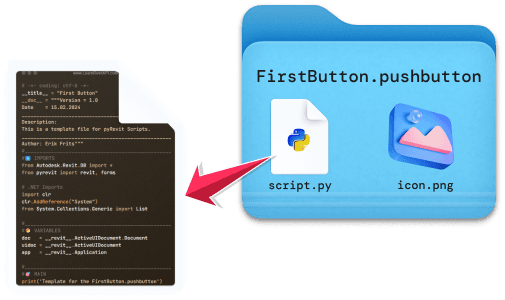
Inside of it you will need to place:
script.py
icon.png
💡Optionally you can also provide icon.dark.png for dark theme.
Organizer Folders
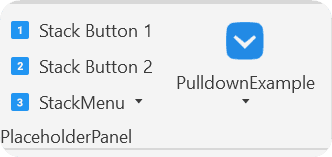
Once you start creating a lot of new tools you will also need to orginize them better to safe space in your toolbar. For that you can use 2 containers:
.stack.pulldown
You can place your .pushbutton inside of these containers and reload pyRevit.
💡Sometimes, you might need to restart Revit to see it organized correctly.
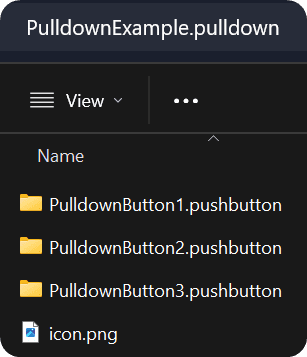
📁.pulldown
You can place a lot of tools inside pulldown folders so you can save a lot of space in your toolbar and create pulldown menu in your toolbar.
💡pulldown folder can have its own icon.png.

📁.stack
You can also place multiple buttons in a stack of 3.
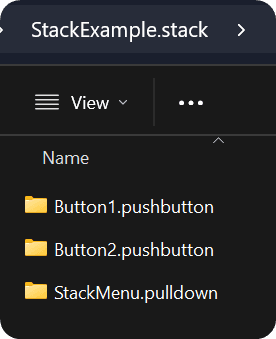
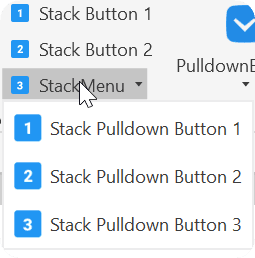
💡You can also add .pulldown inside of .stack
Utility Folders
There are also folders for more advanced users to reuse code and create EventTriggers.
lib (library of reusable code)
hooks (event trigger for different actions)
💡Don't worry about these for now, you might explore it later when you are more confident developer.
Create Your Own Revit Toolbar
Alright, enough of the theory, it's time to get your hands dirty. Let's create your own custom pyRevit Extension.
You should have EF-pyRevit StarterKit downloaded. Inside, you should find EF-pyRevitStarterKit.extension folder that contains the full template for your own toolbar. You can extract it literally anywhere you want, and don't over think about it. You can move it to another place any moment you want.
Next, we need to do 2 things with that folder.
Rename
.extensionand.tabfoldersProvide path in pyRevit Settings
And then you will have your own extension, isn't it exciting already? I want you to think of the coolest name you can for your Revit extension and put it before .extension and .tab folders.
I will rename my folders like this.
📁pyRevitHacker.extension
——📁pyRevitHacker.tab
Once you do that it's yours! This StarterKit alone have saved you a lot of hours in the future already, trust me.
P.S.
💡Don't forget to share your extension name with the community or maybe even the whole world. Let us know the name and what is your end goal for your toolbar. Who knows, maybe you will even find someone with the same goal and you could team up to get faster results together.
pyRevit Settings
We are almost done. We just need to copy the path where we placed our .extension folder and write it in the pyRevit's settings.
Go To:
Revit
pyRevit Tab
pyRevit Pulldown Menu
Settings
Then, inside Settings, you need to point pyRevit to where your placed .extension
Click on Add Folder in Custom Extension Directories.
Important: Ensure the path points to the folder without the .extension suffix, or the toolbar won’t load correctly.

Lastly, reload pyRevit and you will become a pyRevit Developer with your own custom Revit toolbar.
🥳Congratulations!
You should see a new Tab in Revit with your own extension name.
And it should look like this👇
What's Inside?
You will notice there are a lot of things inside of your pyRevit Extension. And don't worry, everything is 100% customizable and I will show you how to do that in another lesson.
For now, all you need to know is that you can use ALT + CLICK to open folder that contains source code for selected button.
This will allow you to look inside of your own extension, pyRevit extension and many other pyRevit extensions.
💪 That's like your new super power in Revit that will give you instant answer on how different tools were created and you can learn and even reuse that code.
In general your extension contains:
Links to best resources
Links to Documentation
Links to E-Books
Placeholder Buttons
Code Templates
Beginner's Code Samples
And more!
👀 Make sure to watch the full video lesson to learn more about it.
What's Next
Alright, once you've created your extension you are ready to jump into the next lesson, where we will personalize it specifically for you.
You will learn how to everything works, how to remove what you don't need and most importantly how to add new buttons to your extension.
See you soon.
Homework
Follow this lesson to create your own Revit Toolbar and make your first HUGE step towards becoming pyRevit Hacker.
After this lesson you can proudly say that you've created your own Revit Extension.
Also, I highly recommend you to share the name and the goal of your pyRevit Extension in the community.
That would give you a boost of motivation and maybe even help you find other pyRevit hackers who are on the same path. So, why don't you team up with someone to get better results faster?
⌨️ Happy Coding!
Questions
My extension doesn't show up in Revit.