Download Files


Resources
Summary
Graphic Overrides in Revit
As you know, we can select any element in a view and apply custom graphic overrides. And using the graphic overrides with Revit API is great.
Often, we need to highlight some elements based on a specific parameter. While view filters are a great option, we don't always want to create hundreds of them just for a single view.
So, Graphic Overrides are the perfect solution to that, and it's very easy with Revit API.
How to Change Graphic Overrides?
Graphic Overrides are stored in a specific view, so we need to check the View class to find out how to get and set an element's overrides. There are two methods:
💡Also, we would need to check the OverrideGraphicSettings Class.
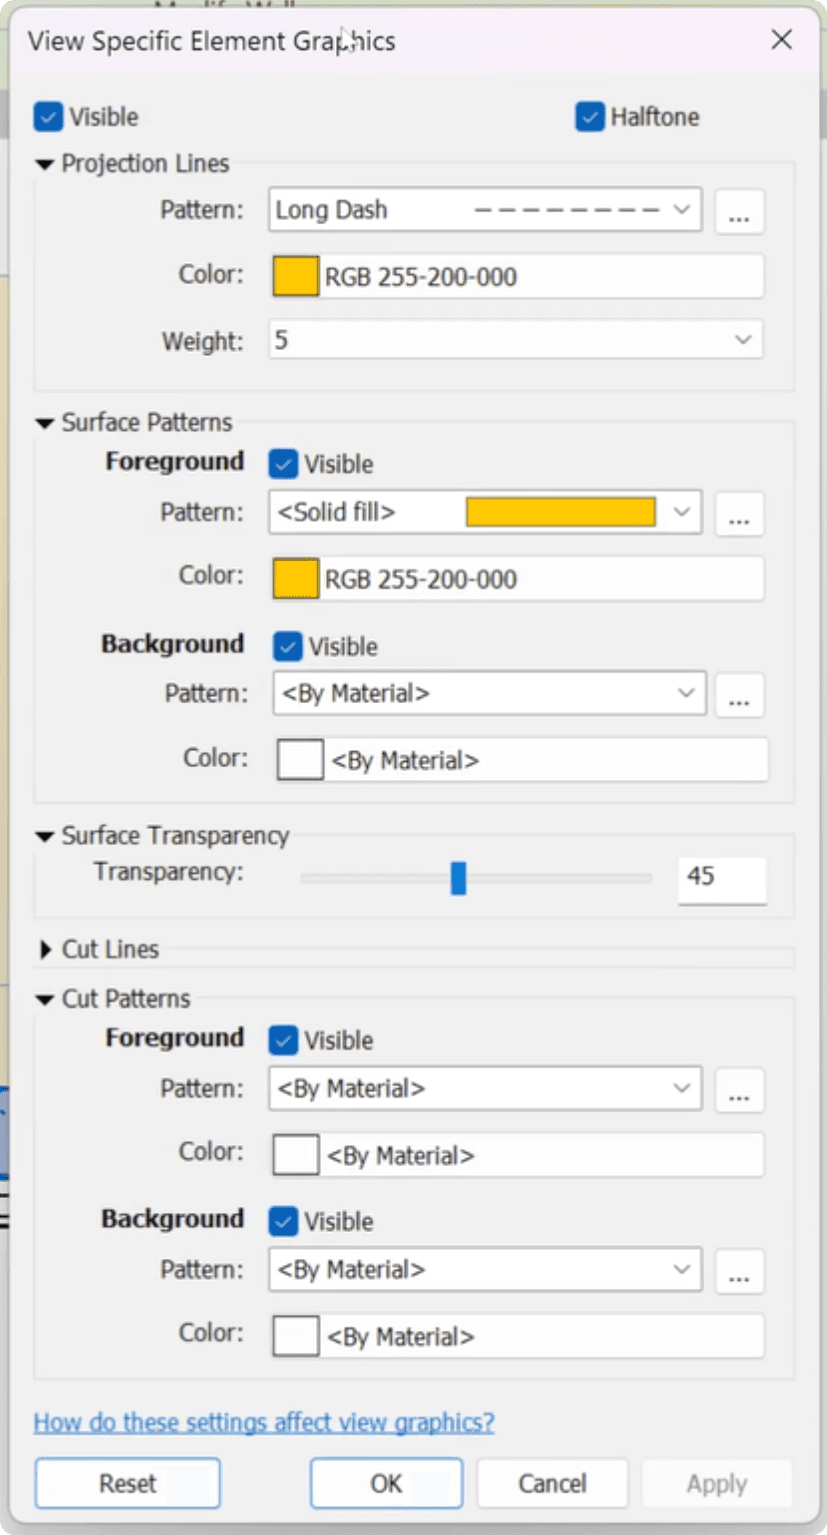
👈This menu from the Revit UI represents OverrideGraphicSettings.
It contains all overrides for Projection/Cut Lines, Surface/Cut Patterns, and a few extra settings in a view.
So, to override elements with Revit API, we need to create an instance of a OverrideGraphicSettings and then change overrides as we want by using methods such as:
SetCutBackgroundPatternColor, SetCutBackgroundPatternId, SetCutBackgroundPatternVisible, SetProjectionLineColor, SetProjectionLinePatternId, and so on…
Preparations
Let's start by defining our script for the button and picking an element with PickObject, so we have something to override.
Define Colors and Patterns
To override graphics, we also need to define the colors and patterns which should be used in OverrideGraphicSettings. We need to use the following classes to define them:
Color Class - Define colors with R,G,B values.
FillPatternElement Class - Get all fill patterns with FEC
LinePatternElement Class - Get all lines patterns with FEC
Now we can create a default instance of OverrideGraphicSettings and then modify its overrides.
We will use the following methods:
There are many more methods to override cut patterns, lines and colors… They are used exactly the same way.
Just choose the settings that you want to override and apply colors and patterns as you want.
Lastly, we can get our ActiveView and SetElementOverrides for the selected element.
Complete Code: Set Graphic Overrides
Here is the full code to avoid any confusions.
How To Clear Overrides?
You know how to set your colors, but what if you want to clear the overrides?
It's actually very simple, as we just need to create a default OverrideGraphicSettings, and set it as the override. This will have the same effect as if we clicked the Reset button in the Revit UI.
Here is the code:
How to Match Graphic Overrides?
Let's also have a look at how to match graphic overrides.
Obviously, we need to select at least 2 elements and then use GetElementOverrides from one element, and SetElementOverrides on another element.
Here is a simple code:
It works! But only for one element at a time… Let's have a look at how to make it work for more than one element.
Match Graphic Elements (Multiple)
To make this code work for multiple elements, we need to create a loop. Since the number of elements can be different, we can use While True loop, and then control when to stop execution.
💡Whenever you use while loops, start by writing a break statement! You don't want to create an infinite loop and restart Revit.
Also, keep in mind that when we use PickObject method and we cancel the selection, it will prompt an error message to the user, saying the selection was aborted… So we can use that as a trigger to stop our loop.
We can use try/except and make changes in the try statement, and if it fails during selection, then we can break out of our loop.
💡Also, keep in mind that if you want changes to be visible after each element, we should place the Transaction inside the loop as well, so each element will have its own transaction.
But since we place and start a transaction inside the loop, we also need to make sure we RollBack the Transaction whenever try statement fails (due to aborting selection).
So here is the updated code to do that:
Summary
Now you know how to create, apply, clear, and match graphic overrides using Revit API.
This can help you highlight elements based on various parameters, allowing you to create awesome overviews of your projects.
There will be another lesson in this module, where we will create a tool to Isolate and Override element colors in a 3D View.
It's a great use of GraphicOverrides to create specific plans.
HomeWork
How about trying Graphic Overrides in action?
I want you to create a simple tool based on this lesson. You will need to get some elements, and override their colors based on a parameter.
Here is an example for this Tool Idea:
Get Elements (Walls)
Sort by Parameter (Type Name)
Create a unique Color for each TypeName ( dict{TypeName: Color} )
Override all walls in a view based on a the Type Name
Adjust this to something that you might find useful and give it a try.
⌨️ Happy Coding!

