
Resources
Summary
Intro
When we want to automate anything with views, we should visit the View Class and have a look at its methods and properties. In there, you will be able to find nearly everything related to views: Graphic Overrides, View Filters, View Settings, View Templates, and so on…
But you won't find any methods on how to create any of the views. Because you have to look at children classes. We can see all these classes in Inheritance Hierarchy:
Autodesk.Revit.DB View3D
Autodesk.Revit.DB ViewDrafting
Autodesk.Revit.DB ViewPlan
Autodesk.Revit.DB ViewSection
Autodesk.Revit.DB ViewSheet
These subclasses have their own additional methods including a method to create these views. We will focus primarily on the view creation in this lesson, but feel free to explore what's possible to do with your views!
Here are screenshots of all the Create Methods:
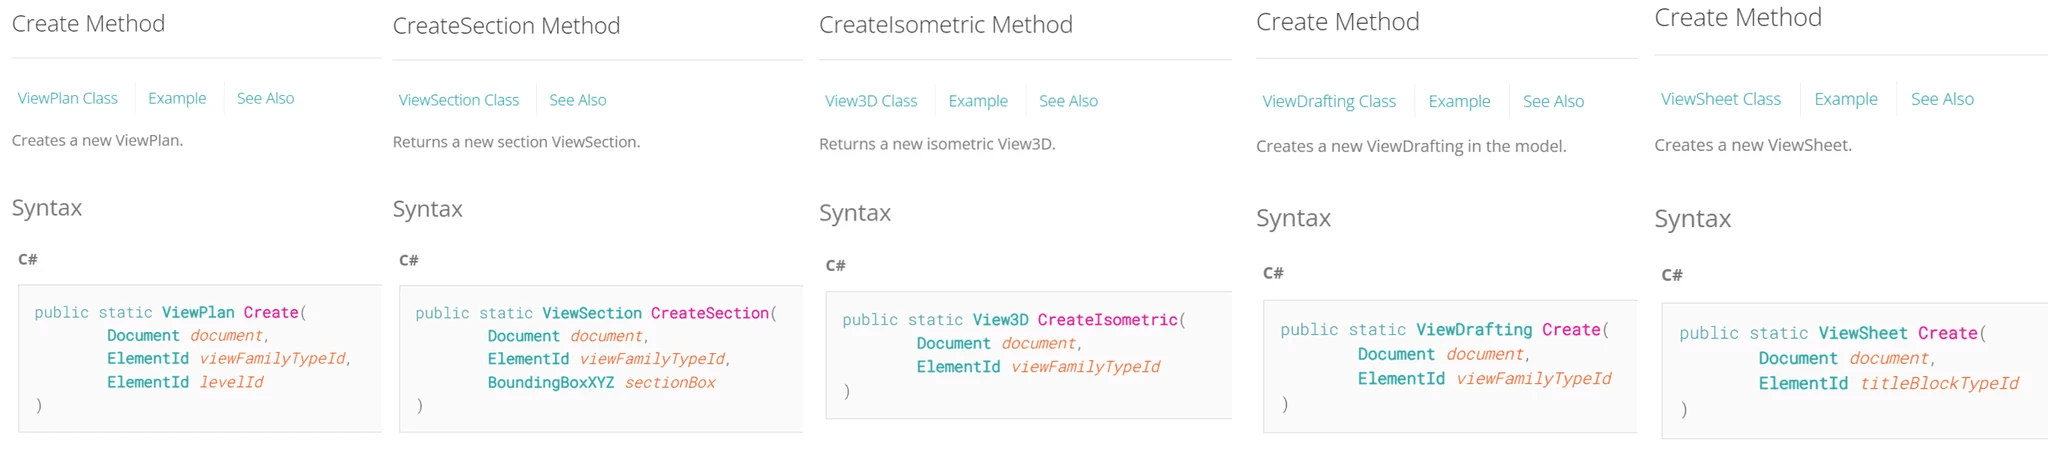
You will notice that they have a lot in common. All of them require a Document and a ViewFamilyTypeId, and some of them also have more arguments.
Get Variables: ViewFamilyType
While exploring the Revit API Documentation, you've probably noticed that we always need to provide the correct ViewFamilyType to create our views. Therefore it's important to understand how to get the correct one.
There are 2 ways we can do it:
Get all ViewFamilyType with a FEC, and then filter them to what we need.
Or, we can get the default ViewFamilyType by using doc.GetDefaultElementTypeId
Here is how to get all ViewFamilyTypes with FilteredElementCollector:
But to be honest, most of the time we don't care that much which view type we will use. So therefore I prefer to just get the default ViewTypeId for whatever viewtype I want to create like this:
Once we understood how to get different ViewTypes, let's go and create some views.
Create ViewPlan - FloorPlan
Let's start with a ViewPlan as it's very commonly used and it's simple to create.
The Create method takes 3 arguments:
document, viewFamilyTypeId and levelId
But keep in mind that the ViewPlan class is used for:
FloorPlan
CeilingPlan
StructuralPlan
AreaPlan
So it means that we need to provide the correct viewFamilyTypeId argument to create what we need.
Here is an example of how to create each one of them:
You will also notice that we can't get a ViewTypeArea with GetDefaultElementTypeId. So, we have to get it with a FEC as I showed earlier, or we can also use another method: ViewPlan.CreateAreaPlan, which takes an AreaSchemeId
Rename Views
Also, if you decide that you want to change the View.Name, we can use its property to override that. It's very simple, but keep in mind that it should always be unique, or you will get an error.
To avoid it, I like to use a for loops, and then keep adding '*' at the end until it becomes a new unique name.
💡You might be tempted to use 'while True' here, but if you forget to break, then you will create an infinite loop and crash your Revit. Be careful ;)
Change View CropBox
Another common thing to do with ViewPlans, is to change their CropBox to isolate certain elements in a view. To do that, we can provide a new BoundingBox to a CropBox property, and it will change it.
Here is a simple snippet where we will get a random room in the project, get its BoundingBox, then add a little bit of offset and update View's CropBox property.
💡 Make sure that you activate CropBoxActive, so your new CropBox is actually used.
Create View3D
Alright, let's move to the next type of view - View3D.
There are 2 methods and they have the same arguments:
Also if you decide to change its SectionBox, you should use the SetSectionBox method instead of the CropBox property!
Create - ViewDrafting
The next ViewType is ViewDrafting, and it's as simple as the previous examples:
Create - Legend View
Now let's look at legend views in Revit. You will realize that it's a tricky one, because there is no such thing as ViewLegend. Instead, Legends use the regular View Class, which doesn't have any create methods…
But there is a workaround! We can take any legend in the project, and duplicate it, and it will create an empty Legend View like we need.
💡And also keep in mind that if there are no legends in the project, then we can't continue with the script, so we need to add this check too!
Here is a snippet to create new Legend Views:
Sections
Next we have ViewSection, and it's not as straight-forward. The Create method is simple: we need a Document, a ViewFamilyTypeId and a SectionBox.
But the SectionBox is not as simple to create because we need to make it with the correct size, and also locate it in the correct place with the direct rotation.
Overall I find it quite simple to do, after I've done it a few times. But the first time it will look very confusing. So I hope I will do a good job to explain it to you, to make it much simpler than it was for me…
So, we will get a wall with PickObject so we have some element to work with. We will be able to get the line from the wall and use its middle point as the Section Origin. Then we will use the line to create the Direction Vector and get Height and Width of the wall so we can size it correctly too.
Then we will have to put it all together into a BoundingBox with the correct Transform.
To make it a bit simpler, try visualizing this:
Sections are just 3D Boxes in 3D Space. They define the area of where you cut, what do you see and how far. So it means that we need to create a box with the correct sizes and then place it into the correct place with the right rotation.
Here is a clip from one of the videos, which can hopefully help you understand the role of the Transform in this.
Now let's put it all into a code:
This code does the following:
Pick a Wall
Get Wall Curve
Get Middle Point of the Wall's Curve
Create Direction Vector
Get Dimensions of the Wall
Create Transform (Origin + Vectors)
Create SectionBox (Dimensions + Transform)
Create a Wall Section
It might look like a lot of steps, but it actually makes sense because we want our section to be in a correct place with the correct size, therefore, we need to go through these steps.
Elevations
Lastly, I will show you how to create Elevations. First of all, keep in mind that the elevation itself will have exactly the same ViewSection class. So Personally I don't use Elevations, I just default to use regular sections.
However, I know that some of you would want to create Elevations anyway. And the biggest difference here is that Elevations have an ElevationMarker.
So, we have to use the CreateElevationMarker(doc, view_type_el_id, pt, scale) method to create the marker. And then we can activate its elevations with CreateElevation (doc, view_id, index)
Keep in mind that you would also need to figure out how to change the size of the Elevations and if you need to rotate the ElevationMarker. I hope you will find how to do that without me.
Summary
Alright, we've covered how to create all types of views in the Revit API (except for Schedules and Sheets). Now we are ready to dive a bit deeper in to views.
In the next lesson you will learn how to create Sheets and how to place your views on them!
Happy Coding!
HomeWork
As I've mentioned View Class and all the subclasses (ViewPlan, ViewSection…) have a lot of methods and properties.
I want to encourage you to scroll through them and see what's available. Don't try to understand how to use every one of them. Just read their name and it will give you a good idea of what's available in these classes.
Also you might not need to check every single class. Just think of what kind of views are you going to automate and look at their properties and methods.
Here are the links:
⌨️ Happy Coding!