
Download Files


Resources
Summary
In this lesson, we will learn how to create sheets and place views on them. I will also show you how to get the sizes of Title Blocks and Views so you can calculate their positions when you place them.
Let's begin by exploring documentation.
Docs: How to Create Sheets and Place Views?
Mainly, we will need to work with the ViewSheet and Viewport classes in this lesson.
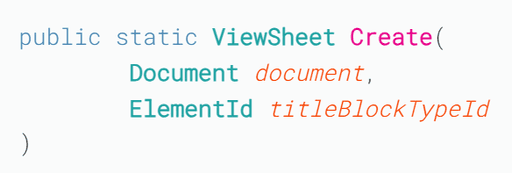
To create a sheet in Revit API, we need to inspect the Create(doc, title_block_id) method of the ViewSheet Class. It's very straightforward and easy to use.
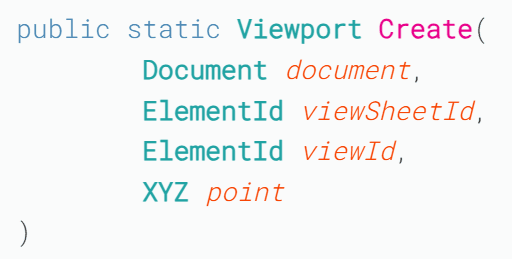
To place a view on the sheet, we would need to have a look at the Viewport Class.
It's a class that establishes the placement of a view on a sheet. So, to place a view on the sheet, we would need to Create a Viewport.
It needs 4 arguments: doc, view_sheeet_id, view_id, point
Create ViewSheet
Let's start by creating a sheet. For that, we need an ElementId of a TitleBlock.
There are 2 ways we can get them:
1️⃣ Get All TitleBlock Types with FilteredElementCollector
2️⃣ Or, get a default TitleBlock Type with GetDefaultFamilyTypeId method
Once you choose your TitleBlock Type, you can create new sheet like this:
Rename ViewSheet
Renaming Sheets is similar to renaming Views. We can use the SheetNumber and Name properties.
Keep in mind that the SheetNumber has to be unique, while the Name can be repeated across multiple sheets.
Get Views to Place on the Sheet
Now that we know how to create sheets, let's get some views that we could place.
💡This step will depend on the script that you want to create. Usually, when you create a bunch of views or sections and you want to place them on the sheet, it's simple.
But in this lesson I will keep it very simple and grab a few sections that I prepared with their ElementIds. I can inspect these views with RevitLookup and rewrite their Ids.
View Positions on Sheet
We are nearly ready to place views on the sheet. We just need to define their positions with the XYZ class.
Firstly, let's keep it simple and manually define these points. It works great when you know that your views will all have similar structure or sizes and you can use the same fixed positions for them. For example, I did when I created sections for my windows, and it was great in 99% of cases.
So for this example, I've manually placed my views on the sheet and then inspected the Viewports with Revit Lookup to find the right coordinates by looking at GetBoxCenter method.
Here are my coordinates:
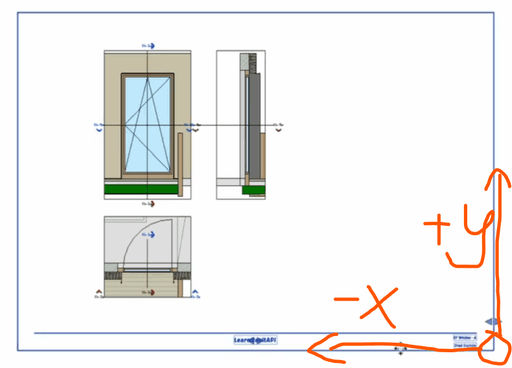
💡 Also, keep in mind where the Origin point of your TitleBlock is located. Since mine is located on the bottom right corner, it means I have to move along the negative X-Axis and the positive Y-Axis.
Place Views on Sheet
As I've mentioned, to place views on sheets we need to Create Viewport instances. It's fairly simple to do, as we need to provide doc, new_sheet_id, view_id and xyz_position arguments.
Also, it's a good idea to always check if a View can be added by using CanAddViewToSheet(doc, view_sheet_id, view_id) method.
Now you know how to create Sheets and place views on them.
Now, let's focus on calculating the positions.
We are interested in the paperscale sizes of our views and Title block. Let's begin with the title block.
TItleBlock Size
First of all, we need to get the title block from our sheet. There are different methods to get it, and you can read about it in this blog post.
There are 2 options you can use, but I will use the first one because it's quicker. Here is the function where we use ElementParameterFilter to get the Title Block.
Now we can easily get the titleblock from our newly created sheet and read it's SHEET_WIDTH and SHEET_HEIGHT parameters.
Since these are built-in parameters, all TitleBlocks have them, so we can easily get values with AsDouble()
💡 Some of you might want to get other type parameters to determine the size of your TitleBlocks. In this case, make sure you are getting parameters from the type and not the instance of your titleblocks!
Calculate View Size
To calculate the View size, we can grab one of the views and experiment in RevitPythonShell.
There are 2 things you might want to check: Outline and CropBox sizes of your views.
Let's begin by inspecting the Outline:
View.Outline (BoundingBoxUV)
View.Outline property will return you a BoundingBoxUV element. This is a 2-dimensional Area. Similar to BoundingBoxXYZ, but without 3rd dimension.
It's the outline which you can see around your Viewport when you hover over it. It will depend on CropBox + all the elements visible outside of the CropBox.
Outline has Min/Max points that define it, but in here we need to use properties U and V. And we can calculate Width and Height by substracting Max coordinates vs Min coordinates like this:
Don't forget that units will be in Feet, so it might be a good idea to ConvertFromInternalUnits to compare the results.
View.CropBox (BoundingBoxXYZ)

We can also inspect the size of the CropBox of our views. We can get it with CropBox property, but this time we will get BoundingBoxXYZ Class. But we won't need Z coordinates for calculations as it's irrelevant.
💡You can also ensure that it property CropBoxActive is True.
Function: Get View PaperSize
Now you know how to get TitleBlock and View sizes. I won't use View sizes in my example for position calculations. But you can easily turn it into a function to simplify the code like this:
Calculate Views Position
I will make a simple calculation by using Titleblock's Width and Height to find 3 points in the middle of the sheet. I won't make any checks to see if my views are bigger that the sheet, because I know that they will fit.
But you might want to do that in your future scripts if necessary 😉

Final Code
Lastly, let's place our views to these new calculated positions.
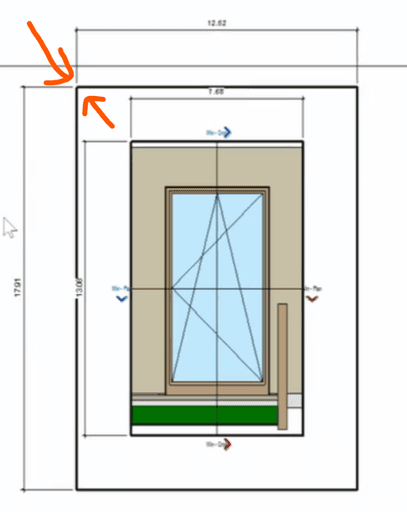
💡Keep in mind that the center of the Outline is used for placing your views!
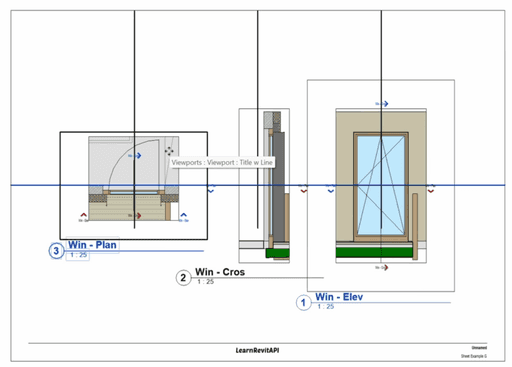
Here is the result:
Summary
Now you know how to work with Sheets!
If you want to get the Revit File or the complete code from the lesson, scroll all the way up and have a look in Download Files section.
Happy Coding!
HomeWork
Practice what we learnt in this lesson by creating a few sheets and placing views on them!
You can grab my Revit File and just follow along, or you can combine it with the previous lesson and create new floor plans for multiple levels, and place each one individually on the sheet.
⌨️ Happy Coding!