Translate C# to Python

While working with Revit API you will encounter a lot of C# examples. So let's have a look how to translate them into python.

Translate C# to Python

While working with Revit API you will encounter a lot of C# examples. So let's have a look how to translate them into python.

NB! There are 3 more videos on the bottom

I've left you 3 code snippets for your homework and you can also watch short videos with solutions.

Summary

Translate C# to Python

You've seen the basic differences between C# and python, and I hope that you agree that it's not so different afterall.

And in this lesson we will go through various examples and try them out ourselves. The goal is to show you that it's not that complicated to take C# snippets and translate them to Python.

So let's open RevitAPI Documentation and go through a few examples

Example 1 - FEC.OfClass

Let's begin with one the most used classes - FIlteredElementCollector.

This class is used for getting elements from our projects and applying various filters. Don't worry, we will cover it in great detail in its own module. For now just focus on translating C# to Python.

We will look at one of its most used methods - OfClass because it's very simple.

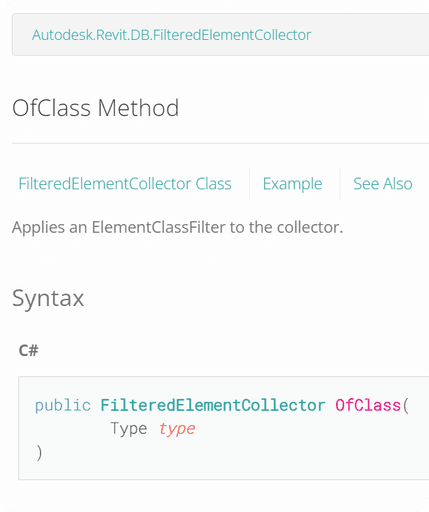
Here is the C# Example:

// Use OfClass method to apply an ElementClassFilter and find Levels in the document
FilteredElementCollector collector = new FilteredElementCollector(document);
ICollection<Element> levels = collector.OfClass(typeof(Level)).ToElements

In general, we just need to get rid of a bunch of C# stuff like

  • Type Hinting

  • 'new' keyword

  • ; semi-colons

  • Comments

And then it will be a python code.

# Use OfClass method to apply an ElementClassFilter and find Levels in the document
collector =  FilteredElementCollector(doc)
levels    = collector.OfClass(Level).ToElements()

for lvl in levels:
    print(lvl, lvl.Name)

Let's also print the results to see what we get.

How to Read Results

When you print your elements you might see a confusing message. Just ignore the beginning, it's about memory alocation that is used by python engine.

You just interested in:

Example 2 - Wall.Create

Next let's have a look at Wall.Create() method and have a look at the structure inside of Revit API Docs and how to translate C# to python.

If you are going to look at Wall.Create methods, you will notice that there are multiple methods available. You can read their descriptions to understand the difference, but I will take the simplest one, that creates a wall using default wall style.

Once you select something in Revit API Docs, you will see more information about it on the right.

On the top you will see where is it coming from and a general description of selected Class/Method/Property…

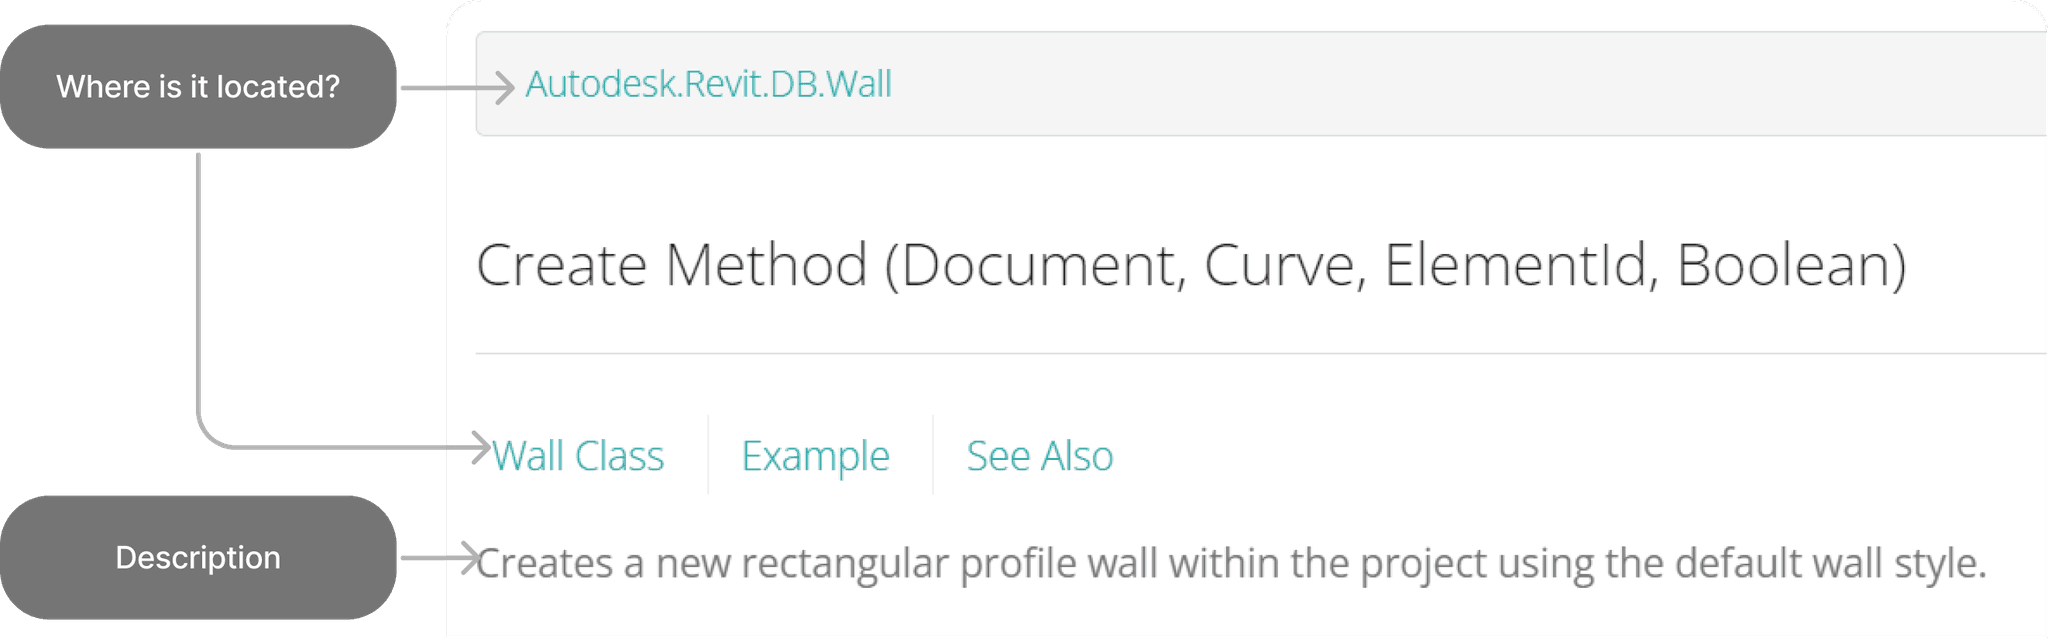
Then, most importantly you will see Syntax example.

Syntax will be provided in multiple languages, but not in python. Unfortunately python is not officially supported by Autodesk, but that shouldn't discourage you from using it. It's very simple to read it, let me explain.

Let's break down this C# syntax:

1. In C#, "public" member can be accessed outside of the clas.
private members can only be accessed by code in the same class.

"static" means that it's not associated with any instances or objects and can be accessed from the class directly.

💡You can ignore both since python doesn't use these restrictions

2. Wall - This represents a type of returned value. If nothing is returned it will say void


Let's break down this C# syntax:

1. In C#, "public" member can be accessed by other classes. private members can only be accessed by code in the same class.

"static" means that it's not associated with any instances or objects and can be accessed from the class directly.

💡You can ignore both since python doesn't use these restrictions

2. Wall - This represents a type of returned value. If nothing is returned it will say void.

Let's break down this C# syntax:

1. In C#, "public" member can be accessed by other classes. private members can only be accessed by code in the same class.

"static" means that it's not associated with any instances or objects and can be accessed from the class directly.

💡You can ignore both since python doesn't use these restrictions

2. Wall - This represents a type of returned value. If nothing is returned it will say void

3. document, curve, levelId, structural- These are arguments of a method.

💡 You can name them anything you want in your code.

4. Document, Curve, ElementId, bool - These show required types for arguments. For example structural is marked as bool, so we have to provide True/False for it.

3. document, curve, levelId, structural- These are arguments of a method.

💡 You can name them anything you want in your code.

4. Document, Curve, ElementId, bool - These show required types for arguments. For example structural is marked as bool, so we have to provide True/False for it.

3. document, curve, levelId, structural- These are arguments of a method.

💡 You can name them anything you want in your code.

4. Document, Curve, ElementId, bool - These show required types for arguments. For example structural is marked as bool, so we have to provide True/False for it.

In case of Wall.Create method, parameters are quite self-explanatory. But if you need more information about them, you can scroll down to Parameters section to get a little description about each of them.

You will also see what kind of value is being returned.

How to use Syntax?

To use a method we usually just need to find C# Syntax Snippet, so we know what arguments needs to be provided and what is being returned.

As I mentioned, turning C# snippet into python is not hard. In this case we just need to get rid of type hinting and use Class name to call this method.

👇 You can see an example below how to turn this example into python.

public static Wall Create(
	Document document,
	Curve curve,
	ElementId levelId,
	bool structural

new_wall = Wall.Create(doc, 
                  curve, 
                  level_id, 
                  structural)
C# Method Example

Now, let's have a look at the code example provided for this method on how to use it. It's very simple and again, we just need to get rid of all the same things as before.

public Wall CreateWallUsingCurve2(Autodesk.Revit.DB.Document document, Level level, WallType wallType)
{
    // Build a location line for the wall creation
    XYZ start = new XYZ(0, 0, 0);
    XYZ end = new XYZ(10, 10, 0);
    Line geomLine = Line.CreateBound(start, end);

    // Determine the other parameters
    double height = 15;
    double offset = 3;

    // Create a wall using the location line and wall type
    return Wall.Create(document, geomLine, wallType.Id, level.Id, height, offset, true, true

💡 You can ask ChatGPT or similar services to translate C# to python and provide snippet that you found. In most cases it does a decent job with translation.

But here is the screenshot of all the things we need to get rid of to turn this C# into Python manually.

Here is the final Python Code:

def CreateWallUsingCurve2(doc ,  level,  wallType):

    # Build a location line for the wall creation
    start    =  XYZ(0, 0, 0)
    end      =  XYZ(10, 10, 0)
    geomLine = Line.CreateBound(start, end)

    # Determine the other parameters
    height = 15
    offset = 3

    # Create a wall using the location line and wall type
    return Wall.Create(doc, geomLine, wallType.Id, level.Id, height, offset, True, True)

How to test this snippet

We can also test the snippet, to make sure it works. Since this is a function we just need to gather all arguments and provide it to the function.

Also we will have to use Transaction, but more on that in a moment…

To use this python function we need to get doc and level variables and create a Transaction, so we can make changes to the active document.

doc    = __revit__.ActiveUIDocument.Document #type:Document

collector =  FilteredElementCollector(doc)
levels    = collector.OfClass(Level).ToElements()
lvl          = list(levels)[0]
wall_type_id = doc.GetDefaultElementTypeId(ElementTypeGroup.WallType)
wall_type    = doc.GetElement(wall_type_id)


t = Transaction(doc, 'Create New Wall')
t.Start()

new_wall = CreateWallUsingCurve2(doc, lvl, wall_type)

t.Commit

💡 Transactions are used to make changes in Revit projects. We create an instance of a transaction and then .Start() and Commit(), and all the changes have to be in between these statements.

Transactions are like guardians that make sure no unintentional changes are made. It's great for beginners, because you know you can't change anything unless you use it. There also going to be a module about Transactions to go in depth.

💡 doc.GetDefaultElementTypeId - This method is great to get default type id of various elements. It takes one argument ElementTypeGroup, which is Enumaration.

Enumeration means that you can select from pre-defined options like WallType, FloorType…

Example #3: Selection

Let's have a look at one more example in Selection class. This is an important class because you will need to use it to get user selection, set new selection or even prompt user to pick some elements.

You will also notice that you can find examples not only for methods, but even for the classes itself. There is a big example, but don't worry, there is a lot of things applicable only to C#, which we can ignore.

I will get rid of a lot of code and just take the code from try statement:

// Select some elements in Revit before invoking this command

// Get the handle of current document.
UIDocument uidoc = commandData.Application.ActiveUIDocument;

// Get the element selection of current document.
Selection selection = uidoc.Selection;
ICollection<ElementId> selectedIds = uidoc.Selection.GetElementIds();

if (0 == selectedIds.Count)
{
    // If no elements selected.
    TaskDialog.Show("Revit","You haven't selected any elements.");
}
else
{
    String info = "Ids of selected elements in the document are: ";
    foreach (ElementId id in selectedIds)
    {
       info += "\n\t" + id.ToString();
    }

    TaskDialog.Show("Revit",info

Hopefully, you can already see the common pattern of how to turn it into python.

Here is the translated snippet. I've also adjusted print statements to be more pythonic as you can see.

# Get the element selection of current document.
# selection   = uidoc.Selection
selectedIds = uidoc.Selection.GetElementIds()


if not selectedIds:
    # If no elements selected.
    print("Revit","You haven't selected any elements.")
else:
    print("Ids of selected elements in the document are: ")
    for el_id in selectedIds:
        print(type(el_id

Alright, enough watching me doing it. It's time for you to practice!

HomeWork

In the first version of this lesson, people said that I didn't provide enough examples, so I will give you more homework with solutions. So you can practice and watch me do it even more.

Try to translate yourself before you watch solutions. This is how you will learn the most.

P.S.
💡You might need to implement a Transaction to change projects!
Place your code between Start and Commit if you want to make changes in the project.

t = Transaction(doc, 'Change Name') #🎯 Create a Transaction 
t.Start()  # 🔓 Start

#👉 Changes Here

t.Commit() # 🔒 Commit

⌨️ Happy Coding!

Task #1: Set Override Graphics

Translate this little function I found on one of the blogs.

It's a simple function that will prompt element selection and change its ProjectionLineColor overrides. Let's compare the snippets, and you will see how little has to change to work in python.

public void ElementOverride()
{
    Document doc = this.ActiveUIDocument.Document;
    UIDocument uidoc = this.ActiveUIDocument;
    ElementId id = uidoc.Selection.PickObject(ObjectType.Element,"Select an element").ElementId;
    OverrideGraphicSettings ogs = new OverrideGraphicSettings();
    ogs.SetProjectionLineColor(new Color(0,255,0));
    using (Transaction t = new Transaction(doc,"Set Element Override"))
    {
        t.Start();
        doc.ActiveView.SetElementOverrides(id, ogs);
        t.Commit();
    }
}
Solution #1
from Autodesk.Revit.UI.Selection import ObjectType

#Variables
doc   = __revit__.ActiveUIDocument.Document
uidoc = __revit__.ActiveUIDocument

def ElementOverride():
	id = uidoc.Selection.PickObject(ObjectType.Element,"Select an element").ElementId
	ogs = OverrideGraphicSettings()
	ogs.SetProjectionLineColor(Color(50,250,100))
	
	with Transaction(doc, 'Set Override') as t:
		t.Start()
		doc.ActiveView.SetElementOverrides(id, ogs)
		t.Commit()

ElementOverride()

💡It's worth noting that I took doc and uidoc outside of the function, because we would normally have it that way.

Task #2: Create Ceiling

Let's have a look at the 2nd example - Ceiling.Create.

💡This method will be available in Revit API 2022+ only. Funny enough, we couldn't create ceilings before Revit 2022…

By now you know how to understand this syntax.

  • Element with Ceiling type will be returned

  • It takes 4 arguments written in orange

  • You can see respective types of each argument on the left

The snippet might look more complicated, but it just involved more steps to define the geometry of a Ceiling.

  • It creates 4 points

  • Use these points for creating Lines

  • Add this lines to CurveLoop()

  • Gets default Ceiling Type

  • Create a Ceiling

Also to use this function, we would need to use Transaction, like this:

Luckily, there is also an example of this method, so we just need to translate it to python to understand how it's used.

Let's compare the snippets:

Ceiling CreateCeilingAtElevation(Document document, Level level, double elevation)
{
   XYZ first = new XYZ(0, 0, 0);
   XYZ second = new XYZ(20, 0, 0);
   XYZ third = new XYZ(20, 15, 0);
   XYZ fourth = new XYZ(0, 15, 0);
   CurveLoop profile = new CurveLoop();
   profile.Append(Line.CreateBound(first, second));
   profile.Append(Line.CreateBound(second, third));
   profile.Append(Line.CreateBound(third, fourth));
   profile.Append(Line.CreateBound(fourth, first));

   var ceiling = Ceiling.Create(document, new List<CurveLoop> { profile }, ElementId.InvalidElementId, level.Id);
   Parameter param = ceiling.get_Parameter(BuiltInParameter.CEILING_HEIGHTABOVELEVEL_PARAM);
   param.Set(elevation);

   return ceiling;
}
Solution #2
def CreateCeilingAtElevation( document,  level,  elevation):

    first =  XYZ(0, 0, 0)
    second =  XYZ(20, 0, 0)
    third =  XYZ(20, 15, 0)
    fourth =  XYZ(0, 15, 0)

    profile =  CurveLoop()
    profile.Append(Line.CreateBound(first, second))
    profile.Append(Line.CreateBound(second, third))
    profile.Append(Line.CreateBound(third, fourth))
    profile.Append(Line.CreateBound(fourth, first))

    list_curve_loops = List[CurveLoop]([profile])

    ceil_type_id = doc.GetDefaultElementTypeId(ElementTypeGroup.CeilingType)

    ceiling = Ceiling.Create(document,  list_curve_loops, ElementId.InvalidElementId, level.Id)
    param   = ceiling.get_Parameter(BuiltInParameter.CEILING_HEIGHTABOVELEVEL_PARAM)
    param.Set(elevation)

    return ceiling


t = Transaction(doc, 'X')
t.Start()  #🔓

lvl = list(levels)[0]
new_ceil = CreateCeilingAtElevation(doc, lvl, 1)


t.Commit() #🔒

Task #3: Create Group
public void MakeGroup(Document document)
{
    Group group = null;
    UIDocument uidoc = new UIDocument(document);
    ICollection<ElementId> selectedIds = uidoc.Selection.GetElementIds();

    if (selectedIds.Count > 0)
    {
        // Group all selected elements
        group = document.Create.NewGroup(selectedIds);
        // Initially, the group has a generic name, such as Group 1\. It can be modified by changing the name of the group type as follows:
        // Change the default group name to a new name "MyGroup"
        group.GroupType.Name = "MyGroup"

Solution #3
def MakeGroup():
    selectedIds = uidoc.Selection.GetElementIds()

    if selectedIds.Count > 0:

        # Group all selected elements
        group = doc.Create.NewGroup(selectedIds)


        # Initially, the group has a generic name, such as Group 1\.
        # It can be modified by changing the name of the group type as follows:
        # Change the default group name to a new name "MyGroup"
        group.GroupType.Name = "MyGroup"


t = Transaction(doc, 'Group Elements')
t.Start()

MakeGroup()

t.Commit()
More Examples (if you really want it)

If you want to practice even more, you can check these simple examples:

1️⃣ doc.Paint
2️⃣ ViewPlan.Create
3️⃣ View.Duplicate

There are also plenty of example in Revit API Developer's Guide

Conclusion

That was a long lesson… But that's what people has asked me, so here you go.


In general I hope that it helped you to understand how to convert C# to Python.

Questions:

Why do I need to translate C#?

Why do I need to translate C#?

Discuss the lesson:

P.S. Sometimes this chat might experience connection issues.
Please be patient or join via Discord app so you can get the most out of this community and get access to even more chats.

P.S. Sometimes this chat might experience connection issues.
Please be patient or join via Discord app so you can get the most out of this community and get access to even more chats.

© 2023-2024 EF Learn Revit API

© 2023-2024 EF Learn Revit API

© 2023-2024 EF Learn Revit API