basics/2-5-populate-listbox
Populate Items in ListBox
For many of you Listbox is the sole reason why you decided to learn how to create custom UI Forms. So let me show you how to populate items inside of your ListBoxes correctly.
basics/2-5-populate-listbox
Populate Items in ListBox
For many of you Listbox is the sole reason why you decided to learn how to create custom UI Forms. So let me show you how to populate items inside of your ListBoxes correctly.
Summary
Populate ListBox in WPF
Our WPF form is keep improving with each lesson, and now it's finally time to address <ListBox>.
For me personally, <ListBoxes>
were the main reason why I decided to learn WPF in the first place and I struggled with them a lot on my own. I had to try a lot of different ways and learn the hard way.
So, I want to teach you how to correctly work with <ListBox>
, so you can:
Add Revit API elements to choose from
Add <CheckBoxes>
for user selection
Get Selected Elements
Create Interactive Select Buttons for ListBox
It's a bit tricky topic if you don't know where to start, but I will make sure that you know how to do it correctly from the beginning.
So, let's open Visual Studio and begin this lesson.
Setting Up the Project
Same as before I will begin by duplicating the code from previous code.
You can continue with your own code, or here is a copy so you can follow along from the previous lesson:
<Window Title="EF-First WPF Form"
xmlns="http://schemas.microsoft.com/winfx/2006/xaml/presentation"
xmlns:x="http://schemas.microsoft.com/winfx/2006/xaml"
Height="Auto" Width="300" MinHeight="150"
WindowStartupLocation="CenterScreen" ResizeMode="NoResize"
SizeToContent="Height">
<StackPanel Margin="10">
<DockPanel Margin="5">
<TextBlock Text="Input A" Margin="0,0,10,0" FontWeight="Bold"/>
<TextBox x:Name="UI_textbox1"
Text="Default Value..."
Foreground="Gray"
/>
</DockPanel>
<DockPanel Margin="5">
<TextBlock Text="Input B" Margin="0,0,10,0" FontWeight="Bold"/>
<TextBox x:Name="UI_textbox2"
Text="Default Value..." Foreground="Gray" />
</DockPanel>
<DockPanel Margin="5">
<TextBlock Text="Input C" Margin="0,0,10,0" FontWeight="Bold"/>
<ComboBox x:Name="UI_combobox">
<ComboBoxItem Content="Walls"/>
<ComboBoxItem Content="Floors"/>
<ComboBoxItem Content="Roofs"/>
<ComboBoxItem Content="Windows" IsSelected="True"/>
<ComboBoxItem Content="Doors"/>
</ComboBox>
</DockPanel>
<DockPanel HorizontalAlignment="Center" Margin="5">
<CheckBox x:Name="UI_check1" Content="Check 1" Margin="0,0,10,0" />
<CheckBox x:Name="UI_check2" Content="Check 2" Margin="0,0,10,0" />
<CheckBox x:Name="UI_check3" Content="Check 3" />
</DockPanel>
<StackPanel Margin="5">
<TextBlock Text="Select Views:" FontWeight="Bold" Margin="0,0,0,5"/>
<DockPanel Margin="5">
<TextBlock Text="🔎" Margin="0,0,5,0" />
<TextBox x:Name="UI_search"/>
</DockPanel>
<ListBox x:Name="UI_listbox" Height="150" SelectedIndex="0">
<ListBoxItem>
<CheckBox Content="View - A"/>
</ListBoxItem>
<ListBoxItem>
<CheckBox Content="View - B"/>
</ListBoxItem>
<ListBoxItem>
<CheckBox Content="View - C"/>
</ListBoxItem>
</ListBox>
<DockPanel HorizontalAlignment="Center" Margin="0,10,0,0">
<Button Content="Select All" Width="100" Margin="0,0,10,0"/>
<Button Content="Select None" Width="100"/>
</DockPanel>
</StackPanel>
<Separator Margin="5,5,5,12"/>
<Button Content="Submit!"
Width="100"
Click="UIe_btn_run" />
__title__ = "02.04 - Get User Inputs with xName"
__doc__ = """Version = 1.0
Date = 15.09.2024
________________________________________________________________
Description:
Learn how to get user input from WPF forms by using xName attribute.
________________________________________________________________
Author: Erik Frits"""
from Autodesk.Revit.DB import *
from pyrevit import forms
import wpf, os, clr
clr.AddReference("System")
from System.Collections.Generic import List
from System.Windows import Application, Window
from System.Windows.Controls import CheckBox, Button, TextBox, ListBoxItem
from System import Uri
PATH_SCRIPT = os.path.dirname(__file__)
doc = __revit__.ActiveUIDocument.Document
uidoc = __revit__.ActiveUIDocument
app = __revit__.Application
class FirstButton(Window):
def __init__(self):
path_xaml_file = os.path.join(PATH_SCRIPT, 'xNameAttributes.xaml')
wpf.LoadComponent(self, path_xaml_file)
self.ShowDialog()
@property
def textbox1(self):
return self.UI_textbox1.Text
@property
def textbox2(self):
return self.UI_textbox2.Text
@property
def search(self):
return self.UI_search.Text
@property
def combobox_item(self):
return self.UI_combobox.SelectedItem
@property
def check1(self):
return self.UI_check1.IsChecked
@property
def check2(self):
return self.UI_check2.IsChecked
@property
def check3(self):
return self.UI_check3.IsChecked
def UIe_btn_run(self, sender, e):
print('Form Submitted!')
print('Printing from inside form:!')
print('textbox1: {}'.format(self.textbox1))
print('textbox2: {}'.format(self.textbox2))
print('check1: {}'.format(self.check1))
print('check2: {}'.format(self.check2))
print('check3: {}'.format(self.check3))
print('search: {}'.format(self.search))
self.Close()
UI = FirstButton()
print('-'*50)
print('Printing from outside form:!')
print('textbox1: {}'.format(UI.textbox1))
print('textbox2: {}'.format(UI.textbox2))
print('check1: {}'.format(UI.check1))
print('check2: {}'.format(UI.check2))
print('check3: {}'.format(UI.check3))
print('search: {}'.format(UI.search))
Accessing the ListBox in Python Code
First of all, let's get the <ListBox>
in our python code. This control already has the x:Name
assigned from the previous lesson, so it will be easy to get it.
<ListBox x:Name="UI_listbox" Height="150" SelectedIndex="0">
</ListBox>
We will be able to get it inside our WPF class by using self.UI_listbox
Getting All Views from Revit API
Before we continue, we need to get some elements that we want to populate inside the <ListBox>
. I will get views with FilteredElementCollector
since it's quite easy to work with.
Also keep in mind that we might want to filter out Views from ViewTemplates.
all_views_and_vt = FilteredElementCollector(doc)\
.OfCategory(BuiltInCategory.OST_Views)\
.WhereElementIsNotElementType()\
.ToElements()
all_views = [view for view in all_views_and_vt if not view.IsTemplate]
This will get us a list of all Views.
Now, it's good idea to sort them in a dictionary, so we will have our view name as a key and the view itself as a value. This makes it easy to display and get correct items.
💡Also it's good to include ViewType
as part of the key since we can have the same View.Name
``for different view types like Ceiling, Floor, Area, Structural…
I will do that with dictionary comprehension to fit it in one-line. I highly recommend to get comfortable using comprehensions in python.
You can ask ChatGPT to break it down into multiple lines if you need to.
dict_views = {'[{}]_{}'.format(view.ViewType, view.Name): view for view in all_views}
At this point, ensure that you are getting the right elements with your code by just printing the contents of your dictionary.
💡As you've seen in the video, even I made a typo here and didn't get any elements because I rushed. So, test if you get the right elements.
for key, value in dict_views.items():
print(key, value)
Populating the ListBox with Views
Now let's populate these items in our <ListBox>
.
To organize our code better we are going to create a separate method to make it more maintainable.
1️⃣ Firstly, since we used placeholders in the XAML code, it's good idea to Clear()
all the items from the <ListBox>
in case you forget to remove them.
2️⃣ Secondly, we need to create a <ListBoxItem>
that will be added to the list and we can provide the name of the view as its Content
.
Here is the code:
class FirstButton(Window):
def __init__(self):
path_xaml_file = os.path.join(PATH_SCRIPT, 'PopulateListBoxItems.xaml')
wpf.LoadComponent(self, path_xaml_file)
self.populate_listbox_with_views()
self.ShowDialog()
def populate_listbox_with_views(self):
self.UI_listbox.Items.Clear()
for view_name, view in dict_views.items():
listbox_item = ListBoxItem()
listbox_item.Content = view_name
self.UI_listbox.Items.Add(listbox_item)
Also make sure you import WPF controls in your code.
from System.Windows.Controls import CheckBox, Button, TextBox, ListBoxItem, TextBlock
Also make sure you import WPF controls in your code.
Testing the Code
Now it's a good step to test your code and see if you misspelled anything or everything works exactly like it should.
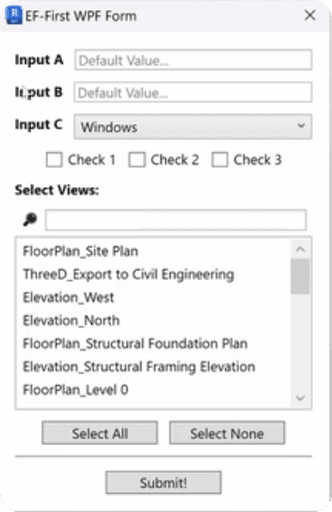
At this point you should see a form like this with View names inside the list. That's already a good progress but we are just getting started with this <ListBox>
.
Get Selected Item
Before we go too far, let me show you how would you get your selection from the current <ListBox>
, because later we will use another method for getting selection.
At this point we can easily reference the ListBox itself and look at its SelectedItem
property. And it will return you the <ListBoxItem>
You can add this part to your UIe_btn_run
handler.
def UIe_btn_run(self, sender, e):
print('Form Submitted!')
selected_item = self.UI_listbox.SelectedItem
print('Selected Item: {}'.format(selected_item))
print('Selected Item Content: {}'.format(selected_item.Content))
self.Close()
Add CheckBoxes to ListBoxItems
Now in our case we want to do thing a little bit different.
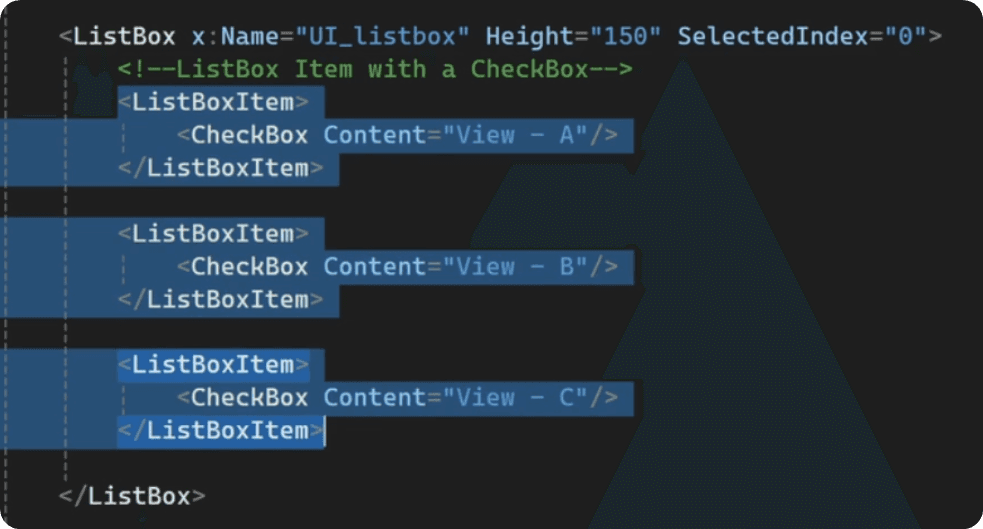
Firstly, I want users to be able to select multiple options, and the best way to do that is to add <CheckBox>
for the <ListBoxItems>.
And to do that we will literally create a checkbox inside of the listbox item like this:
<ListBoxItem>
<CheckBox Content="View - A"/>
</ListBoxItem>
Now we need to do the same but in the python code.
We will do the following:
Clear ListBox
Create Checkbox
Store View.Name
and the View
inside CheckBox
Add CheckBox
inside ListBoxItem
Add ListBoxItem
to the ListBox
.
Here is the code to do all that:
def populate_listbox_with_views(self):
self.UI_listbox.Items.Clear()
for view_name, view in dict_views.items():
checkbox = CheckBox()
checkbox.Content = view_name
checkbox.Tag = view
listbox_item = ListBoxItem()
listbox_item.Content = checkbox
self.UI_listbox.Items.Add(listbox_item)
💡Notice that I use Tag
property to store an actual View
in the back-end.
This will be useful later on when we will be getting selected elements. Tag
property can be used to store any data you want without showing it to the user in the front-end.
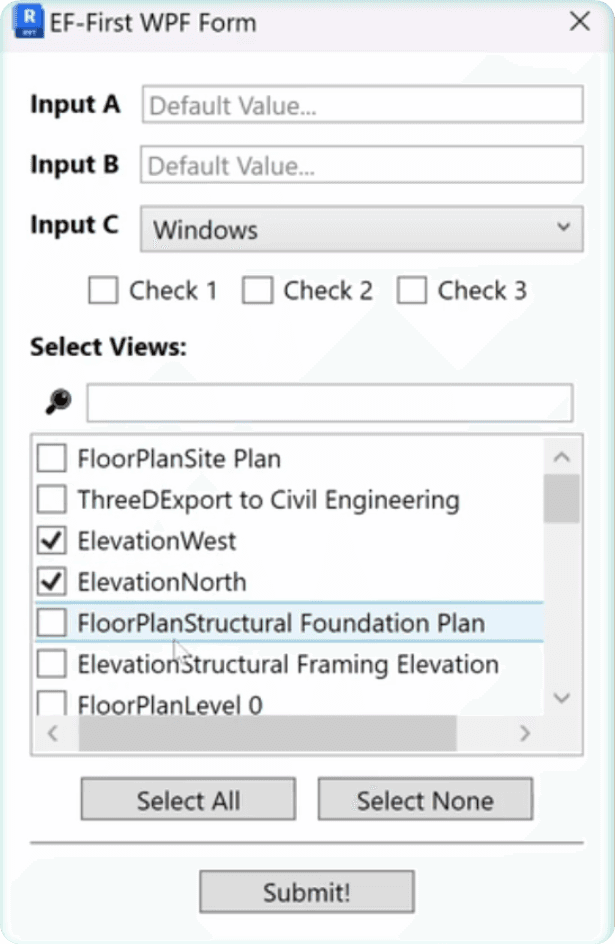
And this should give you the following result:
How to get selected items?
Now let me show you how to get selected items. There are different ways to do that, and since we've added checkboxes, we need to reverse engineer the logic to check what was selected by the user.
We will just read in the reverse order how we added items:
ListBox
-> Items
Property -> ListBoxItem
-> CheckBox
-> IsChecked
Property -> Tag
Property.
For now let's add the code inside the run button so we can get results when we submit the form.
def UIe_btn_run(self, sender, e):
print('Form Submitted!')
selected_views = []
for listbox_item in self.UI_listbox.Items:
checkbox = listbox_item.Content
if checkbox.IsChecked:
print('Selected View: {}'.format(checkbox.Content.Text))
selected_views.append(checkbox.Tag)
print(selected_views)
self.Close()
This code will iterate through all the items inside the ListBox
and check what was selected by the user.
And if any item was selected we will get the view from Tag
property, which we used as a storage container and add it to the selected_views
list.
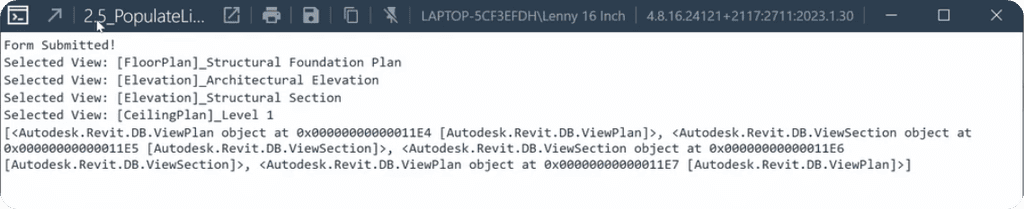
And this is what I see when I test this snippet:
Solving the Underscore Issue
During this lesson we've encountered a bug where underscores '_' have disappeared from front-end names in the form. That's an annoying bug when you put text in CheckBox.Content
.
There is a workaround by actually creating a TextBlock
control with the name and then adding this TextBlock
as a CheckBox.Content
.
It might sound confusing, but it's just one more step. Here is the code to solve this issue:
def populate_listbox_with_views(self):
self.UI_listbox.Items.Clear()
for view_name, view in dict_views.items():
textblock = TextBlock()
textblock.Text = view_name
checkbox = CheckBox()
checkbox.Content = textblock
checkbox.Tag = view
listbox_item = ListBoxItem()
listbox_item.Content = checkbox
self.UI_listbox.Items.Add(listbox_item)
💡This will solve this bug with disappearing underscores '_'.
Create @property for Selected Items
Let's clean up the code a little and move the code for getting selected elements.
Similar to previous lessons, we will create a @property
to get selected items outside of class easier.
We just need to move the same code we wrote inside the Submit button.
@property
def selected_listbox_items(self):
selected_views = []
for listbox_item in self.UI_listbox.Items:
checkbox = listbox_item.Content
if checkbox.IsChecked:
selected_views.append(checkbox.Tag)
return selected_views
Adding 'Select All' and 'Select None' Buttons
Lastly, let's also make [Select All] and [Select None] buttons work since they are made specifically for this <ListBox>
Firstly, we need to specify the Event in the XAML code for these buttons.
<DockPanel HorizontalAlignment="Center" Margin="0,10,0,0">
<Button Content="Select All" Width="100" Click="UIe_btn_select_all" Margin="0,0,10,0"/>
<Button Content="Select None" Width="100" Click="UIe_btn_select_none"/>
Then same as other Event Triggers, we need to create EventHandler methods in your class. And let's write logically the steps how these buttons should work:
Iterate through all Items in <ListBox>
Get the <CheckBox>
Set IsChecked
Property to True/False
💡Also since it's the same logic, I will create a reusable method and only provide True/False argument depending on the EventHandler.
Here is the code:
def listbox_select_all(self, toggle):
""" Set all ListBoxItem to be Selected or Not
:param toggle: True/False"""
for listbox_item in self.UI_listbox.Items:
checkbox = listbox_item.Content
checkbox.IsChecked = toggle
def UIe_btn_select_all(self, sender, e):
self.listbox_select_all(True)
def UIe_btn_select_none(self, sender, e):
self.listbox_select_all(False)
And here is the final test in Revit.
Conclusion
Alright this was a big lesson, but hopefully you've learnt a lot of useful information.
By now you should know how to work with <ListBox>
control and how to populate any data you need inside of it. Also you've learnt how to add <CheckBoxes>
for multiple selection and how to get selected items out of your form.
This alone is what will allow you to create extremely powerful custom WPF forms.
Homework
But as you remember, the best way of learning anything is by doing.
So for your homework, firstly follow me along and just do what I did here in this lesson. And then I want you to try with other elements, try experimenting a little bit more.
Try to put your wall types or group names or window types inside the list box and try to get these values out of there. Whatever you feel is more relevant to you and your discipline.
And trust me, you will love list boxes once you will do it on your own. And if you have any issues, ask the community or ChatGPT.
And once you finish with your homework, you're ready for the next lesson. And we'll again focus on the list boxes, but this time we'll make it even more versatile by implementing a really powerful search text box. This will help you to sort the right elements and provide far better user experience.
I'll see you in the next lesson and I'll wish you Happy Coding.
🙋♂️ See you in the next lesson.
- EF
🙋♂️ See you in the next lesson.
- EF
Discuss the lesson :
P.S. Sometimes this chat might experience connection issues.
Use Discord App for best experience.
Discuss the lesson :
P.S. Sometimes this chat might experience connection issues.
Use Discord App for best experience.
Discuss the lesson :
P.S. Sometimes this chat might experience connection issues.
Use Discord App for best experience.
The pyRevit Hackers Community is only available with pyRevit Hackers Bundle.
Upgrade Here to Get Access to the community and all pyRevit Courses.
Use coupon code "upgrade" to get 150EUR Discount as a member.
The pyRevit Hackers Community is only available with pyRevit Hackers Bundle.
Upgrade Here to Get Access to the community and all pyRevit Courses.
Use coupon code "upgrade" to get 150EUR Discount as a member.
The pyRevit Hackers Community is only available with pyRevit Hackers Bundle.
Upgrade Here to Get Access to the community and all pyRevit Courses.
Use coupon code "upgrade" to get 150EUR Discount as a member.