
Feb 3, 2024
Stop Wasting your Time on Revit Sections. Automate with Revit API!
Learn How-To Automate Sections in Revit For windows with Revit API and python. We will create 336 sections with a click of a button. Each unique window type will have elevation, cross-section and plan view. That’s the power of Revit API.
Intro
Creating sections in Autodesk Revit is boring, and adjusting them to see only the correct elements is even worse! So let me help you with this problem.
In this video I will show you how to automate section creation with Revit API + python. And by the end of this lesson you will learn how to create a custom add-in to automate sections for windows. This will allow you to create multiple sections for your windows with a click of a button.
It will include:
- Elevation Section
- Cross Section
- Plan View (Made with section. Yes, we can rotate sections to act like plans 😉)
And the best part - You will understand the steps it takes to create and rotate sections correctly to apply for any other category in Revit. So you will be able to automate not only sections for windows but also for other elements you have in mind.
So let's begin this lesson 🥳!
✂️ How to Create a Section
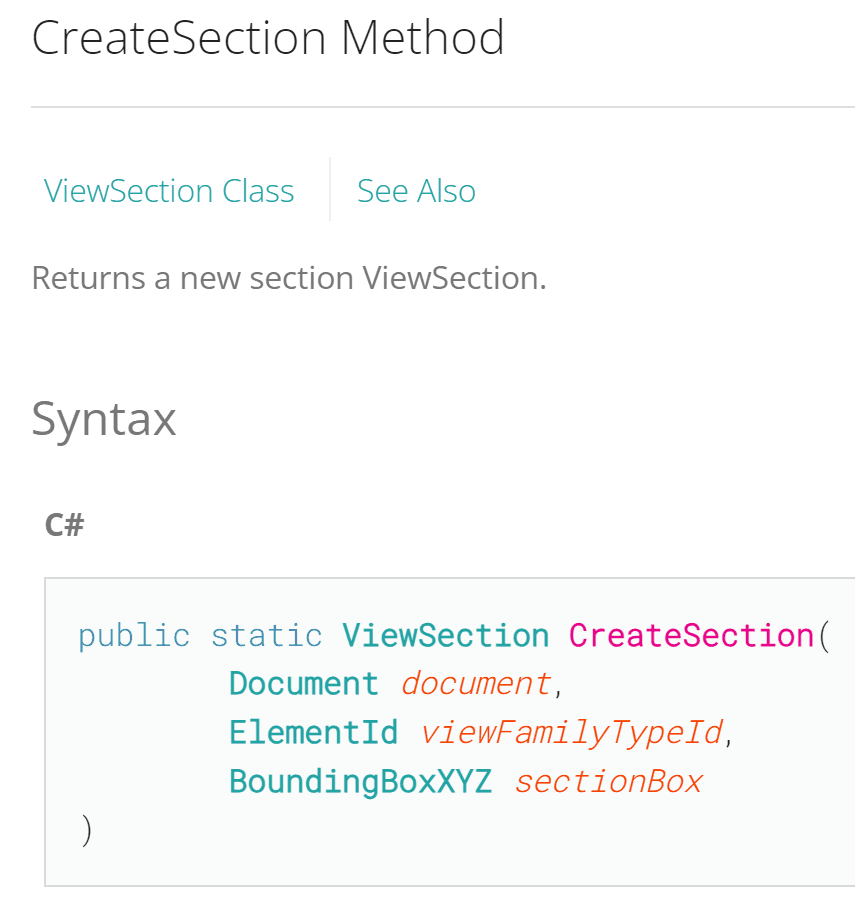
First of all we need to check Revit API documentation to see what's necessary to create a ViewSection.
Here is the CreateSection method and we need 3 arguments:
document - Represents Revit Project
viewFamilyTypeId - Element Id of a SectionType
sectionBox - 3D BoundingBox that represents the section
So in the end we will need to use it like this with python:
👀 The first 2 arguments are easy to get, but the 3rd one will involve multiple steps. So let's brainstorm together.
🧠Brainstorm the Steps
Now, before we begin coding, we need to understand what are the steps to create sections for each window. The main focus will be on creating a Section Box, because not only we need to make it in the right location with the right size, we also need to rotate it to match the wall direction.
Let's brainstorm together and write out all the steps:
📃 Check Docs how to create Section
🪟 Get and Sort Windows of Each Type
1️⃣ Get Window Origin Point
2️⃣ Get Vector to match Host Wall Location
3️⃣ Get Window Sizes
4️⃣ Create Transform (Location Point + XYZ Vectors)
5️⃣ Create SectionBox
6️⃣ Create ViewSection
7️⃣ New Section View Naming
8️⃣ Transaction to make changes
9️⃣ Simple Error Handling
And most importantly:
- ⌨️ Happy Coding!
It's a big lesson, but it's a certainly the one that is worth going through!
🐍Template
To use Revit API with python we will need to use pyRevit.
If you are new to this, make sure you check my free lessons on setting up your development environment here:
👉 How To Setup Developemnt Environment for Revit API + Python?
Lesson 1 - What is Revit API
Lesson 2 - Install Revit Plugins
Lesson 3 - Setup Revit API Autocomplete in VS Code
Lesson 4 - Create YOUR OWN Extension with pyRevit
Lesson 5 - pyRevit Script Anatomy
Lesson 6 - How to Reuse code in pyRevit
Lesson 7 - pyRevit vs Dynamo
These lessons should help you get started with Revit API to create your own custom tools.
And now let's continue with automating sections.
🪟 Get & Sort Windows
First of all we need to get window instances of each type. This step can be done in a lot of different ways.
I will keep it simple and get all window instances with FilteredElementCollector Class. And then we will iterate and create a dictionary where we will combine Family and Type names for a key, and place the window instance as a value itself.
Also, keep in mind that windows can be made with different family templates. So I want to filter windows that are hosted in a Wall. This will make it much easier to work with, and ensure I create my sections correctly.
For that I will use Host property and check the type of a host. And if it's not a Wall, I will make a print statement to notify user that certain windows are not wall hosted.
Once you get your elements, make a test print statement to ensure you get elements.
1️⃣ Get Window Origin
Now, we can start iterating through all these windows and get more information from them for our section boxes.
First of all we need to get window's origin point. And it's very simple to do!
Since all our windows are hosted in walls, we can use Location.Point property to get a point.
2️⃣ Get Vector of Host Wall
Next, let's create a vector to match wall's direction. This will be necessary for rotating our section correctly.
First of all we can get our wall by using Host property.
Then we will get the curve that is used with Location.Curve.
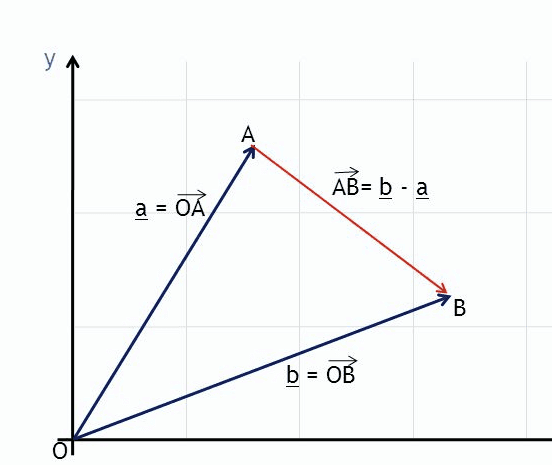
And by using GetEndPoint method we can get Start/End Points.
Once you have points, creating a vector is simple. Just subtract these points and it will result in a vector between them.
This vector will be used for setting up XYZ axis of the Transform in a moment.
👇 Here is the Snippet on how to do all that:
3️⃣ Get Window Sizes
Now let's think about how we are going to create a SectionBox with the correct size.
We can look at the window's Height and Width parameters and add a little offset to see around the window as well.
NB! - It's important that you adjust parameters to your projects!
I use windows from Autodesk German library of windows. They are really good and consistent.
I need to look at default 'Width' and 'Height' parameters in Window Types.
They have BuiltInParameter names: GENERIC_WIDTH and CASEWORK_HEIGHT.
💡Also some windows don't use that parameter!
Instead, they have a custom parameter called 'Höhe ab FBOK, which means 'Height above Floor Finish'.
So I will also make an if statement and use that parameter when regular Height returns 0 and None.
And I will manually define the depth of the box (which represents how far section looks) and the offset. I work in metric system so I also need to convert units to feet, because REVIT API USES FEET BY DEFAULT!
For that I will use ConvertToInternalUnits method from UnitUtils Class.
💡 UnitTypeId is used for converting in Revit 2022+. Before that we used DisplayUnitType Enumeration.
4️⃣ Create Transform (Origin + XYZ Vectors)
Now we going to make the trickiest step of all. We need to create a Transform.
It's a bit confusing first time you use it. But once you understand it, it's fairly simple.
This step is all about defining Origin point and XYZ vectors for rotation. And keep in mind that we can rotate our vectors in any direction we want. We are not limited to use Z axis as vertical! So let's break all the steps.
First of all we need to create an instance of Transform by using Identity property. (it's a common way across many 3D software to use property instead of constructor or method..)
Then defining a point is simple, we just write a value to Origin property.
Now not so fun part - Vectors. We need to define BasisX, BasisY and BasisZ vectors.
First try to imagine 3 vectors that are perpendicular to each other. Like Transform Gizmo(👇)

👀 Watch this short explanation for XYZ Vectors.
💡 Also it's important that we can invert our vectors by multiplying by -1. (vector * -1)This means that we can Flip the axis of our section like this. Check the full video to see an example 😉
Transform - Cross Section
Here is an alternative of Transform for CrossSection.
If you think about it we just need to change X and Z axis that we used before.
Because our X used to go along the wall, now it should be perpendicular.
And the Z used to be perpendicular and now should go along the wall.
And since Y stays vertical we can use it for calculating cross product of other vectors!
Transform - ViewPlan
⚠️ I noticed too late that in my video I made my ViewPlan section to look up and not down…
So it means that we need to invert a vector. In my case I inverted BasisZ vector, and I also need it inverted during calculation of BasisY.
Overall it's the same logic as before. We need to define our XYZ vectors to rotate our box correctly, and in the end we will see whatever the box is cutting through 😉
I also included Create SectionBox, because we need to modify Z values for Min and Max so we are actually cutting through the window at the correct location.
5️⃣ Create SectionBox
Now we have everything to create a SectionBox by using BoundingBoxXYZ Class.
I will continue here in the written lesson by creating only Elevation, and you can adjust the rest like in a video yourself 😉.
But keep in mind that when you create you BoundingBoxXYZ , it has its origin at XYZ(0,0,0). And we can change the size by using Min/Max properties. And we can use Positive and Negative values to move in opposite directions from origin point.
X - Left/Right
Y - Up/Down
Z - Forward/Backwards
💡 It will also depend on how you rotate your box with Transform that we created earlier. Since we defined BasisY as Vertical Axis, and X as the vector along the wall, these are the directions that section box will affect. If we would change axis, then we would need to address it here as well!
Don't forget to add offset here.
Once you create a box with the right size, we can apply transformation by using Transform property.
6️⃣ Create Section View
Now we are ready to create our first section - Elevation.
As you remember we needed: document, section_type_id and section_box.
The only missing thing is the Id of a ViewTypeSection. And we can easily get it by using GetDefaultElementTypeId.
So here is the final snippet:
By now we have all the main steps for creating a section, however we are not done yet!
7️⃣ Section Naming
Let's also name our newly created sections correctly.
I will use the name we created in a dictionary, where we combined Family + Type name.
Also I will create a loop with try/except statement, so in case a view with the same name already exists, I will add '*' symbol in the end and try again for 10 times.
Many will prefer to use while loop here, but I hate them. You always at a risk to end up with an infinite loop, and then you will crash your Revit. So I stick with for loops instead!
8️⃣ Transaction + Basic Error Handling
And the very last step is to add Transaction.
As you know, we can't make any changes to our project with Revit API, unless we are using Transaction.
It's like a guardian of our projects, to make sure that all changes happen intentionally, so we don't accidentally break something. We just need to Start and Commit the Transaction. And all the changes have to be in between, so make sure you start before and commit after you create your sections.
And additionally, we can introduce Try/Except to avoid crashing our script due to exception cases. This is always good to have.
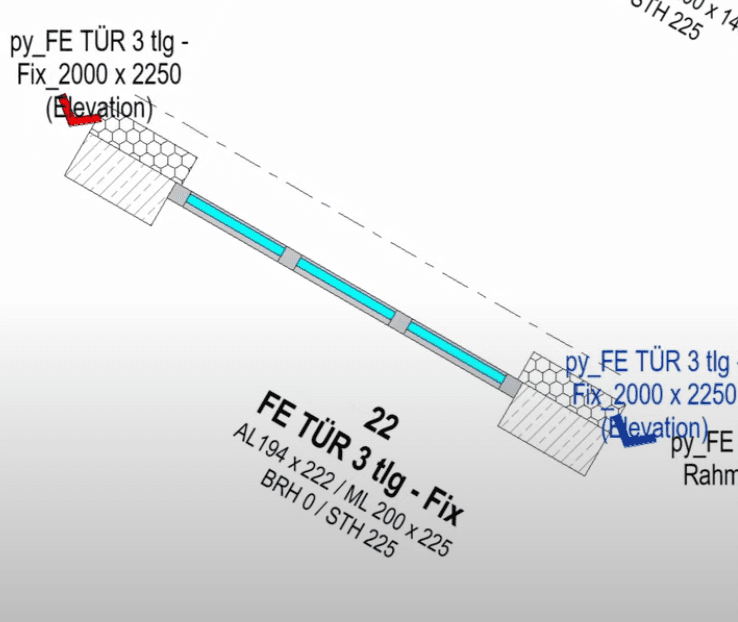
✨Results
At last we made sections for all our window types!
So far we only made Elevation section.
However, as I showed in the video, by adjusting Transform a little, we will be able to create Cross and Plan sections as well!
And you can combine all of this to create all 3 sections for your windows with a single click!
Happy Coding!
💻Final Code
Lastly, let's put it all together into a single snippet👀
I know it was a huge lesson, but I am sure it was totally worth it!
Here is the final code Snippet to Automate your Sections for Windows:
🧙♂️You are a Legend!
🙌Listen, if you are reading this, then you are certainly decided on making it work in your project!
🙏 I hope you won't have major issues and I would highly appreciate if you would share this lesson with others, so they also automate that boring step in their work!
📶 Feel free to post your results in LinkedIn and tag me along(Erik Frits), so I can see how much it helped you and what you managed to achieve!
💟 Now I wish you all the best in your coding journey with Revit API.
-Erik Frits
P.S.
Help me spread the word 😉
Want to Learn More?
🔥 Amazing Revit API Resources!
Join Revit API
Newsletter Today!
Join Us!
which is already read by 4500+ people!


Get short Revit API Lessons and Tips directly in your mail!